|
|
|
| |

|
|
Description:
The Grace Catcher is a great Macrame
project for Easter holiday
decorations. It features a cross
inside a ring, with a long fringe on
the sides and bottom.
This is an easy pattern, suitable for
beginners.
Any size ring can be used, so I have
given you a
formula to determine the
length of the cords.
For help with the calculations, contact me.
|
|
| |
|
The credit for this project goes to Sheri
Dohner, who requested this custom pattern.
She made an extra-large Grace Catcher to help her
church members learn about God's Grace in their
lives. |
|
| |
| |
| Supplies
Needed: |
- Cord Material - see Preparation
- One Ring (4 inches or larger)
|
| |
| |
| |
| Knots Used: |
|
|
| |
|
|
|
Preparation
|
|
|
|
To determine the thickness
of the material to use, use this formula:
- Ring Size 4 - 9 inches -- Use 2mm Cord
- Ring Size 10 - 14 Inches -- Use 4mm Cord
- Ring Size 15 inches or more -- Use 6mm Cord
|
| |
|
| |
|
To determine the length
of each cord, use one of these
formulas:
- Diameter of Ring x 8 for a long
fringe
- Diameter of Ring x 7 for a short
fringe
The diameter
of the ring is the measurement from side to
side.
To determine the total
amount needed for the entire project,
do the following:
1. Multiply the length
of the cords x 24.
2. Multiply the diameter
of the ring x 14 for the extra
cord used to wrap the ring.
3. Add the two numbers together to get the total in
inches.
4. For yards or meters, divide by 36. |
| |
| |
| |
Creating the Cross
|
| |
| |
|
Step 1: Cut 24 cords,
each the length you came up with using the
formula above.
Prepare all the cords with one of the methods
described in Cord
Preparation.
Cut one cord 14 x the diameter
of the ring, so you can wrap
it.
Place 12 cords on your project board vertically.
Locate the center
of each cord, and move down 10 inches.
Secure them at that point, so the shorter
portion is near the bottom
of the board, with the
long portion
at the top.
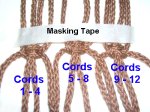
After they are all secured, place a piece of
masking tape across them, to mark where the
first row of knots will rest.
|
|
|
| |
Step 2:
Work from the tape downward, so you are making the
top portion first.
Each knot should be tied using two working cords
and two fillers.
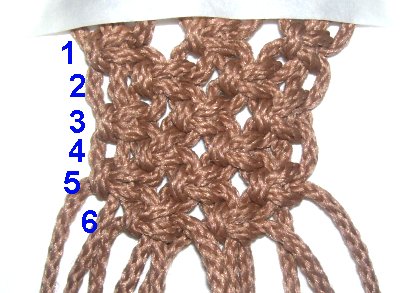
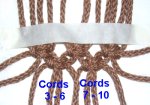
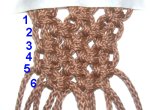
Mentally number the cords 1 - 12, and tie left
ASK as follows: |
| |
|
| |
 |
|
Row 1: Tie ASK with
cords 1 - 4, 5 - 8 and 9 - 12.
These three knots should rest next to
the masking tape, in a straight row.
|
|
| |
|
| |
 |
|
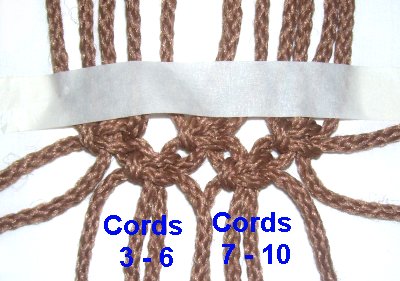
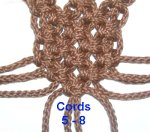
Row 2:
Use cords 3 - 6 and 7 - 10. This
alternates the cords. |
|
| |
|
| |
 |
|
Rows 3 and 5: Repeat
Row 1
Rows 4 and 6: Repeat
Row 2
|
|
| |
|
| |
 |
|
Row 7:
Tie one ASK with cords 5 - 8. |
|
| |
|
| |
|
Step 3: Turn the Grace
Catcher around.
Repeat
rows 2 - 6 to complete the lower
portion of the vertical segment.
You will need to reverse the direction
and tie right
Square knots, so the two
ends match.
Measure the band to see if you need more rows
of ASK. The entire vertical portion should be 2
inches less than the ring size.
For example: For a ring of 12
inches, the final measurement of the band should
be 10 inches from top to bottom.
Once the size is correct, tie the last knot, as
in Row
7.
|
| |
|
|
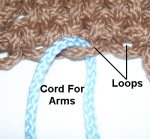
Step 4: Note that there
are loops along the edges of the
Grace Catcher (vertical portion).
The cords for the arms will be placed here. |
|
| |
 |
|
Pass 6 cords through three spaces on
the left side, and center them (total of
6 cords). Do the same on the right.
Make sure they near
the tape rather than at the
center.
|
|
| |
|
| |
|
Step 5: You should now
have 12 cords to work with, on both
sides of the Grace Catcher.
Mentally number each group 1 - 12, and repeat
step 2.
Make sure you check
the size of the arms before you tie the
last ASK, like you did in step 3.
There should be at
least 1-inch between the end of each
arm and the ring.
|
| |
| |
|
| |
Wrap the
Ring
|
| |
| |
 |
|
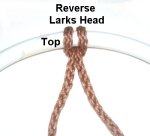
Step
6: Fold in half the long
cord you cut for wrapping the ring.
Attach it to the ring with a reverse
Larks Head Knot.
The place where the cord is attached is
considered the top. |
|
| |
|
| |
|
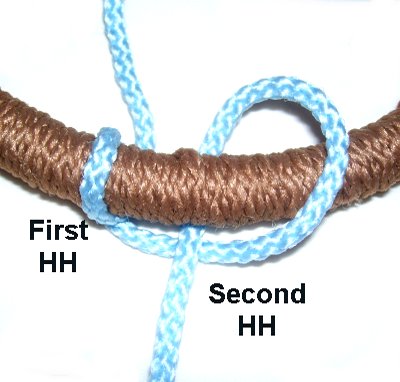
Wrap the cord around the ring numerous times to
cover it completely, pushing the wraps close
together.
One half of the cord should go one way, and the
other will head the opposite direction.
Where the two ends meet is considered
the bottom.
Secure both ends to the ring with Double Half
Hitches.
|
| |
|
|
| |
Attaching the
Cross
|
| |
| |
|
Step 7: Lay the covered
ring for the Grace Catcher on your work surface,
so the top and bottom are straight up and down.
Place the cross inside
the ring, so it rests in the center, and is
balanced.
Secure the ring and the cross to your board or
work surface, with tape or pins.
Make sure the distance between the cross and
the ring is the same at the bottom and top, as
well as side to side (at least 1-inch).
Make adjustments if needed.
|
| |
| |

|
|
Slide the cords under
the ring, and attach each one to it with
a Double Half Hitch.
Pull the cords as tight as possible, so
there is plenty of tension.
|
|
| |
|
|
| |
Finishing Touches
|
| |
| |
|
Step 8: Trim the ends in
all four areas of the Grace Catcher, to neaten
them.
At the top, you can weave the ends through the
upper cross rather than make a fringe in that
area.
Or you can simply tie off the cords so the
knots are in the back
of the design.
At the bottom and sides, unravel each cord to
produce a wavy fringe. Make sure you
include the ends of the cord used to wrap the
ring.
You could also attach beads, followed by Barrel
Knots.
|
| |
| |
|
|
By
using any text or images on Free Macrame
Patterns, you are agreeing to our Terms
of Use
|
|
|
| |
|
Have
any comments about the Grace Catcher? Contact
Me.
|
|
|
| |
 |
| |
| |