|
|
| |
|
|
|
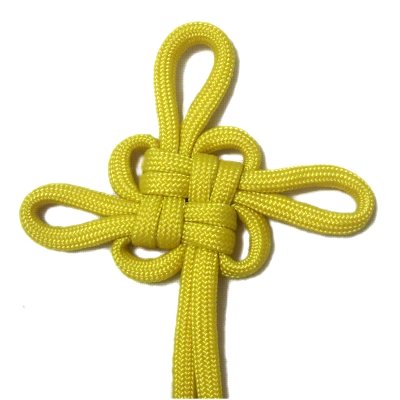
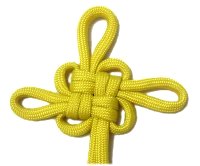
Description: The Good Luck
Knot has four
small and three large loops surrounding a woven
square in the center. It's a beautiful
Chinese knot that's been around for thousands of
years.
This is a thick knot, so using 2mm to 4mm size
material will make it less bulky. Any
material can be used, but Paracord will really
help show off the woven square shape.
This unique design is based on the Crown
Knot, which is a basic Macrame
knot. Try practicing that knot first, if
this design proves too challenging for you to
make.
The Chinese Flower
is a variation of this knot. It has five
petals rather than three.
|
|
| |
| |
| |
To practice the Good
Luck Knot, you need one cord at least 60 inches
long.
Size 550 Paracord was used in the images
shown. Make sure you prepare it properly if
you decide to use it.
See Cord Preparation
for details. |
| |
| |
|
|
|
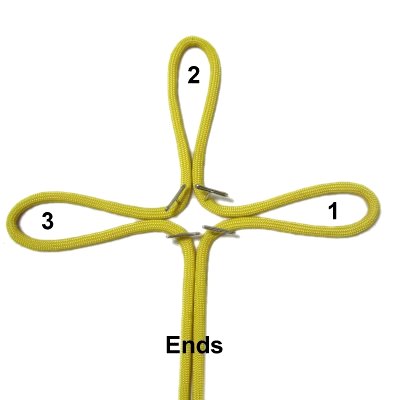
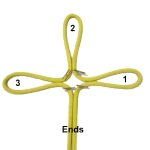
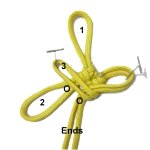
Step 1: Fold the cord
in half, and secure it to your board, so
the ends are heading forward.
Fold the cord to make bights on the
top, right and left. Mentally
number them as shown.
Each bight should be 3
inches long if you are using
4mm size material (2.5 inches long for
2mm cord).
|
|
| |
| |
|
|
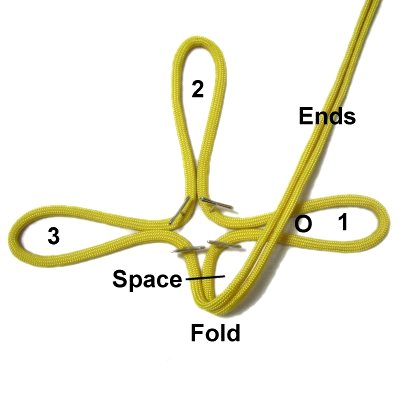
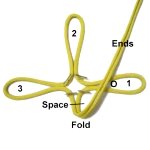
Step 2: Fold the two ends
backward and slightly to the right, so
they pass over
bight
1.
Make sure you leave a space
as shown. Placing a pin at the
fold is recommended.
|
|
|
|
Designer's
Tip: When you fold a cord, you
don't just curve it. You actually turn the
cord upside down as you move it into place.
You can see this in more detail in the following
images. Be sure to click on the photos to
see larger ones, which show the details more
clearly. |
|
| |
| |

|
|
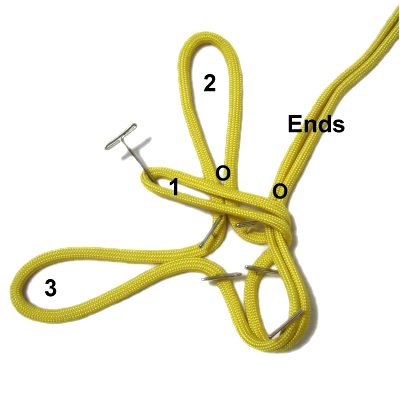
Step
3: Fold bight
1 to the left, passing over
the ends as well
as bight 2.
Secure it to your board. |
|
| |
|
|
Step
4: Fold bight
2 forward,
passing over bight 1 as well as bight 3.
Secure it to your board.
Make sure you can clearly see the space
made by the ends when they were folded. |
|
| |
|
| |
|
|
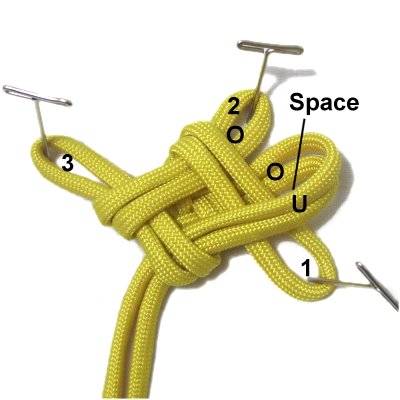
Step
5: Fold bight
3 towards the right,
passing over
bight 2.
Pass it through the
space made by the ends, so it goes over
- under the folded area. |
|
| |
|
| |

|
|
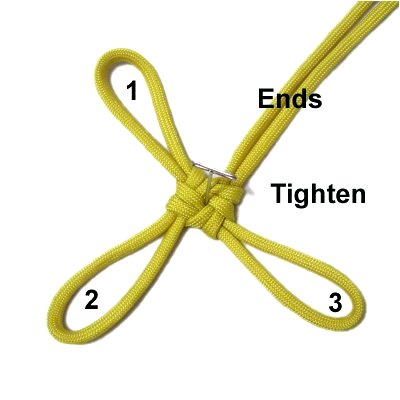
Step 6: Tighten the
first half of the Good Luck Knot
slightly, then remove the pins and
tighten it the rest of the way.
Make sure it remains in the same
position on your board. |
|
| |
|
| |

|
|
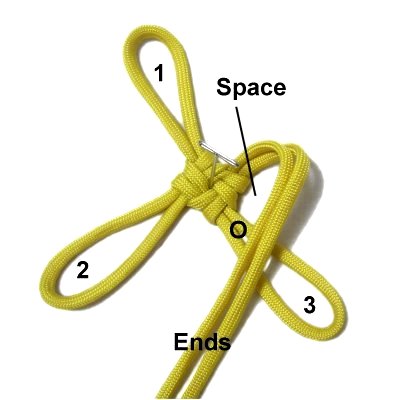
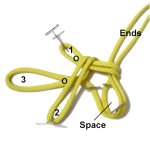
Step
7: Fold the ends
towards you (forward), passing over
bight 3. Make sure you leave a
space.
Secure them to your board.
|
|
| |
|
|
|
|
Step
8: Fold bight
3 to the left, passing over the
ends as well as bight 2.
Make sure the folding takes place very
close to the first half of the Good Luck
Knot, since the bights are smaller now.
|
|
| |
|
|

|
|
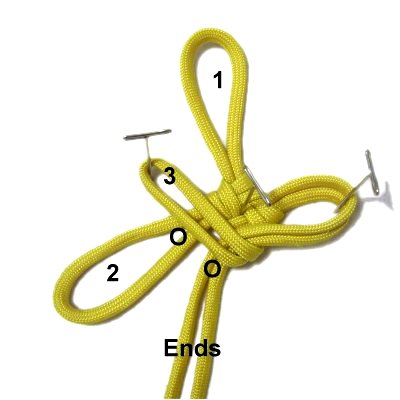
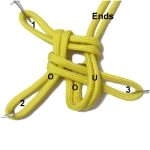
Step
9: Fold bight
2 to the right, passing over
bight 3 as well as bight 1.
Identify the space you left when you
folded the ends.
|
|
|
|

|
|
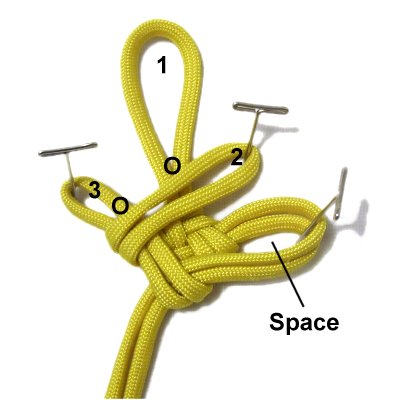
Step
10: Fold
bight 1 forward (towards you),
passing over bight 2.
Pass bight 1 through the space under
- over the two segments.
|
|
| |
| |

|
|
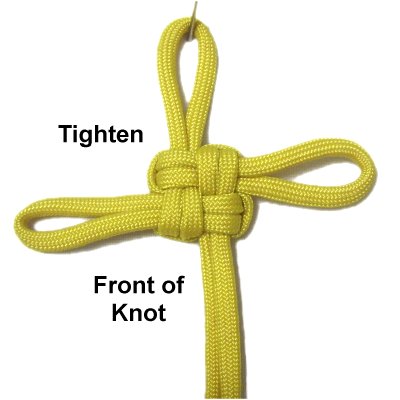
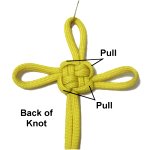
Step
11: Tighten the Good Luck
Knot by pulling on the bights and the
ends.
The surface you have been looking at is
the front of the knot. Turn the knot
over so you can see the back.
|
|
| |
|
|
|
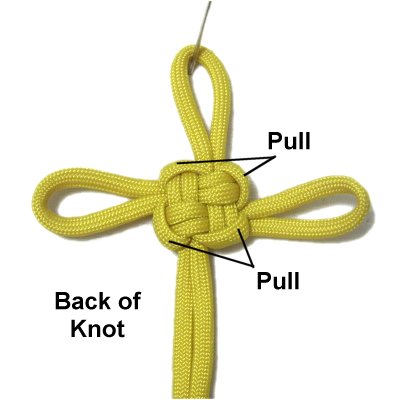
Step
12: There are four segments
on the edges of the central knot that rest
between the loops.
You can pull those segments to make the
small loops between the larger ones.
This is optional if you prefer to leave
them flat.
|
|
|
|
|
|
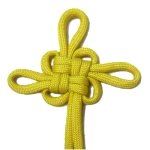
Step
13: After the loops are the
right size, turn the knot over to see the
front again.
For a design without the four small loops,
you can reverse the knot so the back is
showing instead of the front.
|
|
|
|
| |
| |
|
|
| By using any
text or images on Free Macrame Patterns, you are
agreeing to our Terms of Use |
|
|
|
| Have
any comments about the Good Luck Knot? Contact Me.
|
|
|
|

|
|
|
|