|
|
| |
|
|
| |
| |
|
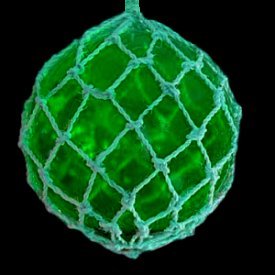
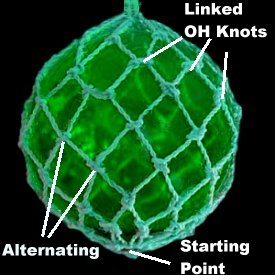
Description: The Globe Float
Hanger is a net-like pouch that surrounds glass
globes. You can use this general design to
cover other items, such as bottles.
This type of Macrame project was very commonly
seen on sailing vessels, back when this craft
was first being introduced. So it's considered a
Vintage design.
For decorations that will be exposed to
weather, use nylon or other man-made cord,
rather than natural materials.
This pattern is rated Easy, and is a suitable
project for beginners.
|
| |
| |
| |
| Supplies
Needed: |
| |
- 2mm - 4mm Nylon Cord, Twine, or Rope
- Glass Globe or other round object
|
| |
| |
| Knots
Used: |
| |
|
|
| |
| |
| |
|
Step 1: Cut 8 cords,
each 10 times the size of the globe you are
covering.
For example: To cover a
globe that is 6 inches tall, each cord needs to
be around 60 inches long.
Be sure to prepare the ends, particularly if
you are using twisted
style material.
|
| |
|
| |
Step 2:
Make
a Crown Knot for your Globe Float Hanger,
following the instructions below.
Note that only two cords are used in these images.
|
| |
|
|
|
|
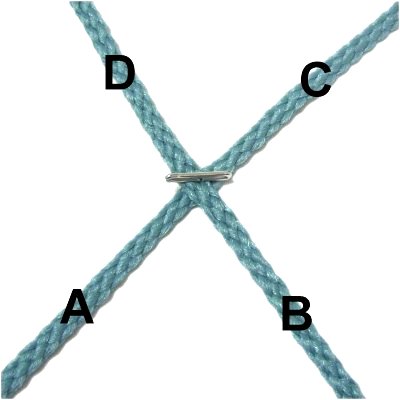
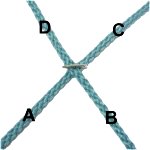
Place 4
cords diagonally on your
board. Place the other 4 on top of
them, the opposite direction (forming an X
shape).
Mentally number the four groups as shown. |
|
|
| |
| |

|
|
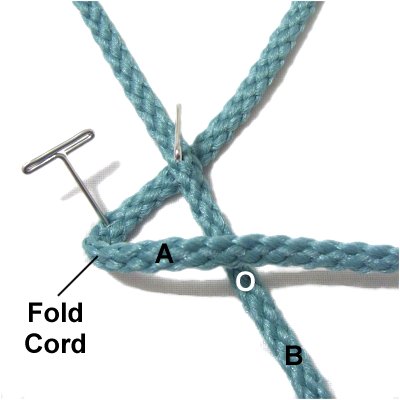
Fold the 4 cords in group
A towards the right, resting on
top of group B.
Make sure you leave a space, and
arrange the cords neatly.
|
|
| |
|
| |

|
|
Fold the cords in group
B so they are heading towards
the back of your board (backward).
They should rest on top of the cords in
group C.
|
|
| |
|
| |

|
|
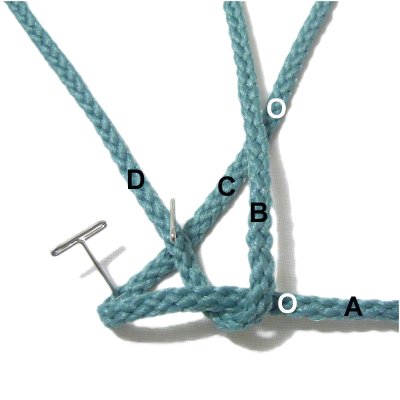
Fold the cords
in group
C to the left.
They should rest on top of the cords in
group D. |
|
| |
|
| |

|
|
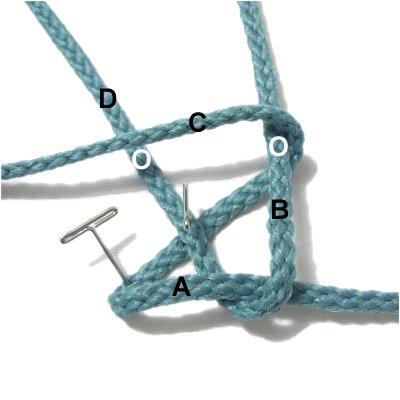
Fold the cords
in group
D forward, to the space formed by
group A.
Bring them through the space over
- under.
Tighten the knot by pulling on all 4
groups gradually. |
|
| |
|
|
| |
|
Secure the Crown knot to the bottom
of the glass globe with masking tape.
As you make the net, its better to work around
the glass ball, but you can also make the Globe
Float Hanger flat on a table.
As you tie each row of knots, be sure to secure the net to
the globe with additional tape.
|
| |
|
| |
| Step 3:
You now have 16 cords to work with. Arrange them
into 8 sets of two cords. |
| |
| |
 |
|
Tie a Linked
Overhand knot with each
set, 1-inch from the
Crown knot.
The Fishermans
knot is the easiest one to
use for the Globe Float Hanger, but
other knots on that page will work, too.
Tighten the knots so the net is flat
against the glass globe, without
any slack.
|
|
| |
|
| |
|
Step 4: Move down
1-inch, and tie another row of the same
knot you used in the previous
step.
Alternate the
cords before you get started.
That means you use one cord coming from two
different knots in the previous row.
|
| |
|
| |
|
Step 5: Repeat
steps 3 and 4 until the net is close to
the top of the
globe.
Make sure you alternate the cords each time.
Designer's
Tip: You can increase the distance
between each row of knots if you wish, but don't
go over 2 inches.
|
| |
|
| |
|
Step 6: Bring all the
cords together. Select the four
longest cords and use them to tie a Square Knot
around all the others, which act as fillers.
So there will be two working cords acting
together on each side.
This SK should rest against the top of the
globe. Make sure the net is still tight before
moving on.
This finishing technique is optional, if you
prefer to do something else.
|
| |
|
| |
| Step 7:
Tie a sennit of Square Knots measuring 3
- 4 inches. |
| |
|
| |
|
Step 8: Pass it through
the ring and then fold it, so it rests around
the bottom of the ring.
Select the two cords on the outside
of the group. Use them to tie an Overhand
knot (or a Square Knot), making sure it goes
around ALL the cords, including the ends.
Apply glue while
tightening, so it's on the inside.
You can tie additional knots if you feel they are
necessary. Cut off the excess material after
the glue dries.
|
| |
| |
|
|
By
using any text or images on Free Macrame
Patterns, you are agreeing to our Terms
of Use
|
|
|
| |
|
Have
any comments about the Globe Float Hanger? Contact
Me.
|
|
|
| |
 |
| |
| |
| |