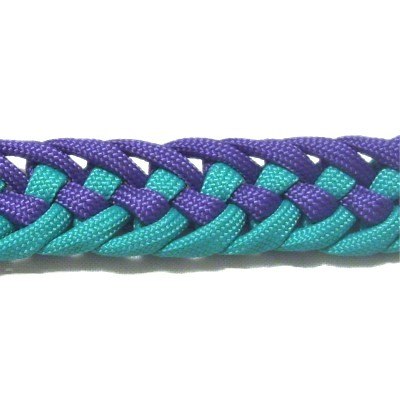
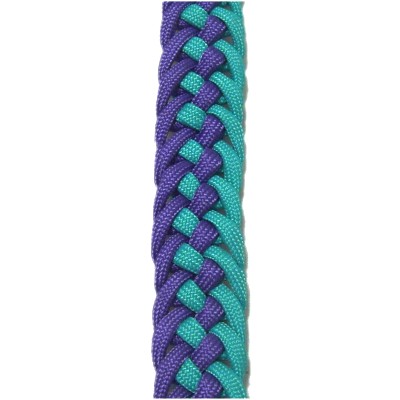
Description: The Genoese
Zipper is related to the Zipper
Sennit. It's a series of bights
passed into one another in an alternating
pattern, using both halves of two cords.
It may seem complicated, but it's really easy
once you understand the steps.
The key to success is positioning the cords so
you can keep track of the four segments.
Be sure to read the tips included in these
instructions.
This decorative knot can be used for bracelets,
purse straps, belts, and in other Macrame
projects requiring a wide flat band.
The instructions include a loop for a clasp
(optional).
2018
Update: I changed the
instructions to include a more stable loop.
The video gallery containstutorials for many other
interesting knots and techniques.
Preparation
To practice the Genoese Zipper, you need two
60-inch cords, each a different color.
When making a project with this technique, both
cords should be at least 7 x the finished length
you want to make. Increase the length if you
plan to make a button knot for a clasp.
Please read the bottom section of Cord
Preparation to learn how to prepare
Parachute Cord for knotting, if you plan to use
it.
In the example shown, cord
A is turquoise, and cord
B is purple.
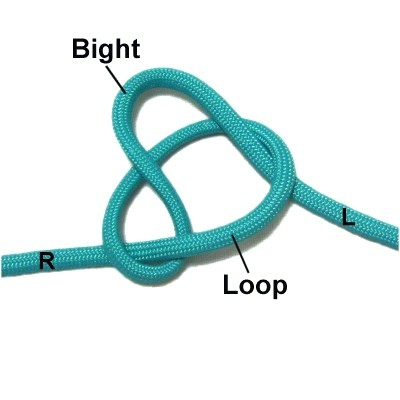
Step 1: Make a
loop in the center of cord
A, crossing left
over right.
Form a Slipknot by creating a bight
with the left half, and passing it
through the loop under
- over (from below).
Tighten the loop by pulling on the
bight and the right half of the
cord.
Step 1,
continued: Make sure both halves of
the cord are close to the same length as you
tighten the Slipknot.
Secure the knot to your board diagonally (to the
right).
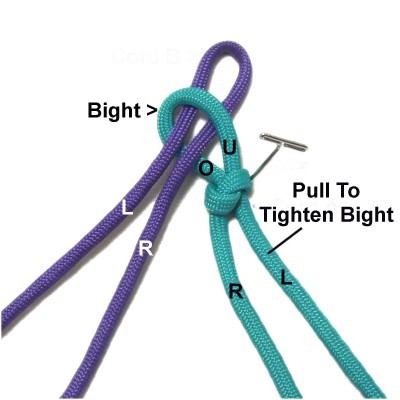
Step 2: Fold cord
B in half. Pass it
through the bight made with cord A over
- under (from the top).
Pull on the lefthalf
of cord
A to tighten the first bight
around the new cord.
Mentally label each half of both
cords.
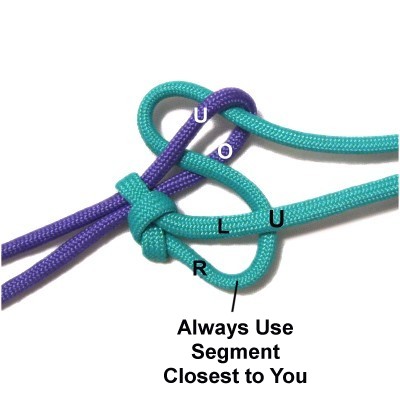
Step 3: You always
use the segment closest
to you, when making
each bight for the Genoese Zipper.
So for this step, fold the righthalf
ofcord A
to make the next bight. Pass it under
the left half of cord A, then through
the folded portion of cord B.
Pull both halves of cord
B to tighten it firmly around
the new bight.
Designer's
Tip: The purpose for
passing one half UNDER the other half in this
step is to create a loop for a clasp.
You can pass the right half OVER the left half
if you don't need a loop. Pull the slack
out of cord A in that area.
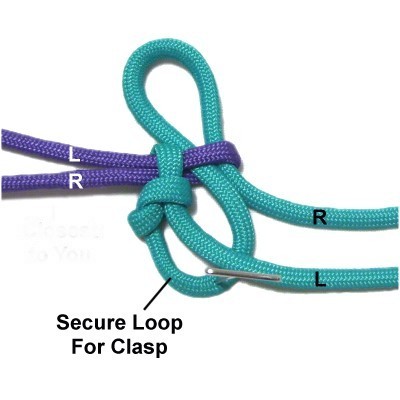
Optional Loop:Secure the right
half of cord
A in the area closest to you,
where it curves.
This is the loop you can use for a clasp
if you need one.
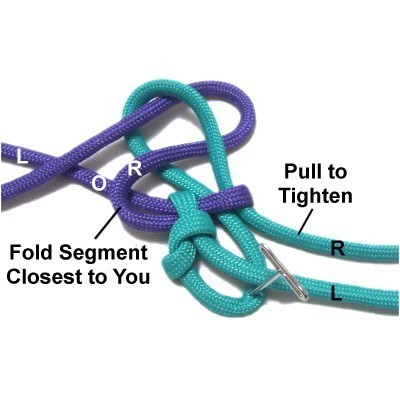
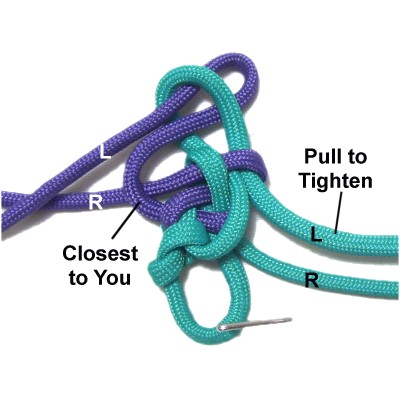
Step 4: Fold the right
half of cord
B to make the next bight,
since it's closest to you.
Pass it over
the left half as you move it through the
previous bight made with cord A.
To tighten, pull the right half
of cord
A first. Then pull on the
new bight to remove any slack.
Designer's
Tip: When making the Genoese
Zipper, keeping track of all four cords is
challenging. Just focus on making each bight
with the segment closest to you, alternating back
and forth between the two colors.
Here's another
way to stay organized:
You can place four pins on your project board, one
closer to the front
and the other closer to the back
(on both sides). Place each half of the
cords draped over a pin.
After you make the bight with the segment closest
to you (front position), move that segment to the
BACK pin.
Move the other half to the front pin so it's in
position when it's time to use it.
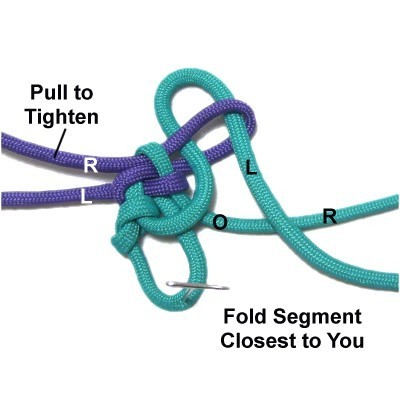
Step 5: Fold the
left half ofcord
A to make
the next bight (closest to you).
Move it through the previous bight
(cord B), which brings it over
the right half of cord A.
See tightening information below.
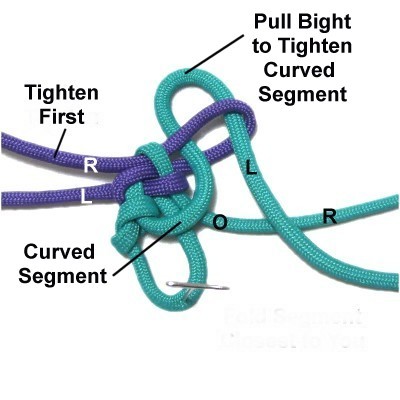
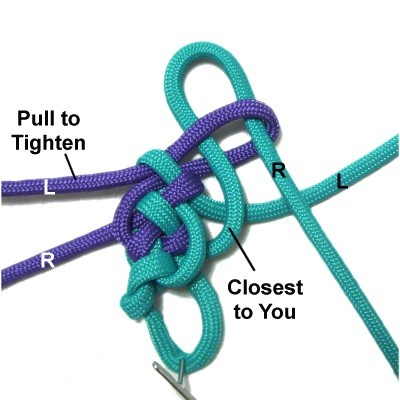
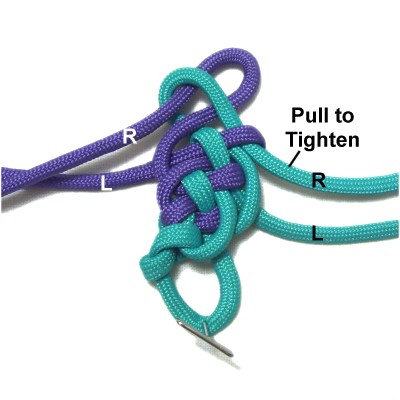
Tightening:
Take note of the curved
segment in this image, where one
half of the cord passes over the other
half.
You start tightening by pulling the slack
out of the previous
bight. Then pull on the NEW bight to
tighten the curved segment. The
final step is to reduce the size of the
new bight.
Step 6: Fold
the left halfofcord
B to make the next
bight. Pass it through the
previous bight (cord A), which brings it
over
the right half of cord B.
Tighten as described in step 5.
Step
7: Use the right
half of cord
A again, since it's closest to
you. Fold it, then pass it through
the previous bight.
Tighten as described in step 5.
Step
8:Repeat
step 4, making the next bight
with the right half of cord
B.
Step
9: Repeat
steps 5 - 8 several
times, until the Genoese Zipper is the
size you want to make.
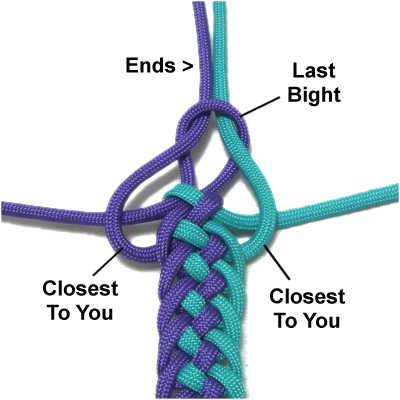
Step
10: Determine which half
of both cords is closest to you.
Pass the ENDS of those cords through the
last bight you make (not another bight).
Tighten the last bight firmly.
The cords you
passed through the last bight can now be
used to make a button knot for a clasp.
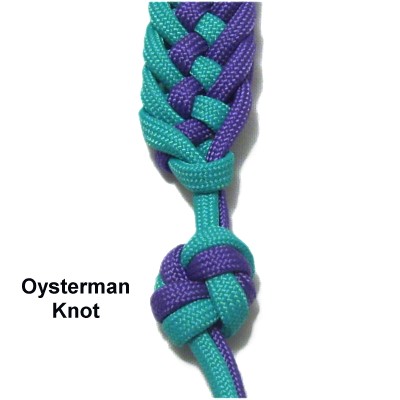
This image shows the Oysterman
Knot, which is a good
option for the Genoese Zipper.
The other half of both cords can be
finished off in whatever method is
suitable for your project.
By
using any text or images on Free Macrame
Patterns, you are agreeing to ourTerms
of Use