Description:
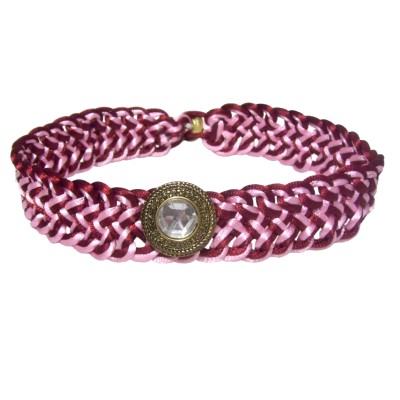
This Figure Eight Choker features a
series of Figure Eight knots arranged
vertically. By using two colors,
the choker necklace appears to ripple.
The clasp is a simple loop and button closure,
which can be changed if you want a different type.
You can add a button and/or pendant in the center
of the design, or use small charms.
In the example shown, I used Satin material to
make this Micro-Macrame design, and added both a
button and a pendant in the center.
Important:
When using delicate materials like Satin, don't
push pins through it. Instead, use the Cross
Pin Technique or just LEAN
the pins over the segment you are securing.
This Macrame Necklace is easy to make, but is time consuming.
You will need several hours to complete this
necklace design.
Cutting
Instructions: Use the chart below
to determine the length of the two cords for the
Figure Eight Choker.
For sizesover 20 inches,
multiply your neck size by 10, and then divide by
36 to get the yards.
Size of
Choker
Length of
Cords
Less than 16
inches
4
yards
16 to 17
inches
4.5
yards
18 to 19
inches
5
yards
20 inches
5.5 yards
The Vertical Figure Eight Design
The instructions below are for the basic design
used in the Figure Eight Choker, which is a vertical
Figure 8 chain.
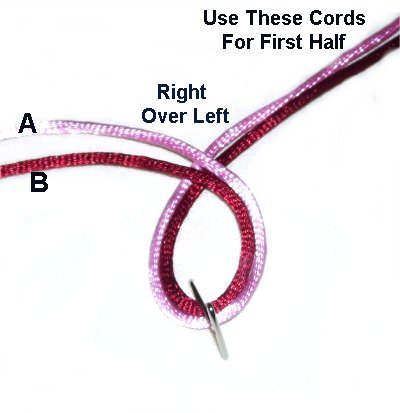
Step
1: Make the first lower
loop in the center
of BOTH cords, crossing right over
left. The cords to your right
will be used to make the first half of the
choker.
Arrange the colors so that color
B is on the inside
for this first loop.
Color A
= PinkColor B
= Wine
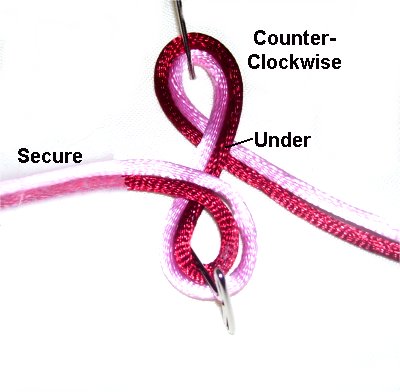
Step
2: Move the cords upwards
and rotate them counter-clockwise,
to make the upper
loop.
Pass the ends under to
make the crossing point, as you bring them
back down.
The loops should be around
1-inch in size.
Design
Tip: In the images,
note how the colors have switched places at the
top (Color
B on the outside).
The colors should change when you make each new
loop.
Check to make sure the cords are not crossed if
you don't see this happening.
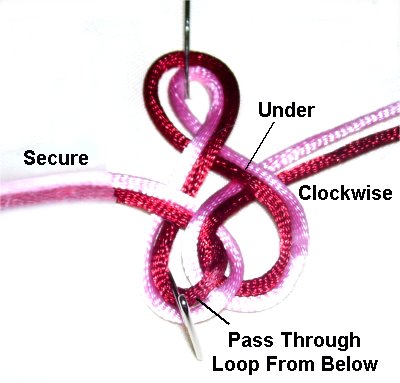
Step
3: Make the next lower
loop in a clockwise
direction, passing the cords through the
first lower
loop from
below.
Bring the cords under
the area in the middle of the knots, to
make the crossing point.
Using one cord at a
time really helps--see the next two
images.
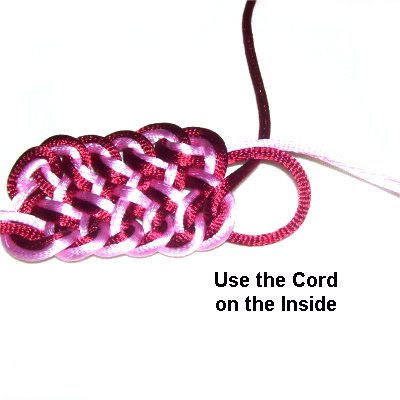
I highly recommend you create the lower
loops as shown below. This allows
you to hold the Figure Eight Choker while
constructing it, which is easier than making it on
a surface.
When you create the upper
loops, the colors are switched, so you
use Color
A first since it's on the inside.
<<
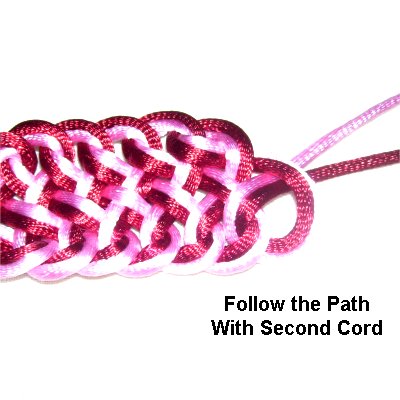
Start with color
B, since it is on the inside
when you make the loops at the bottom.
Use color
A to follow the same path,
fitting it around the outside
of the first loop. >>
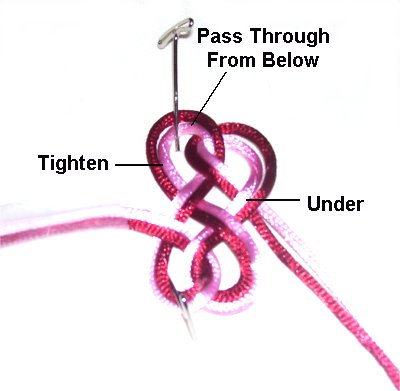
Step
4: To make the next upper
loop, pass the cords through the first
knot from
below.
Bring the cords under
the area in the middle, rotating counter-clockwise.
Tighten the firstupper
loop, which holds the second one in place.
Tightening
Process: The best way to adjust
the size of the loops is to tighten them as you progress.
They should all be tightened to the same
size, which is why this project takes
so long to complete.
Always
tighten the loop that the new one is linked to (on the left).
You do this by pulling on the loop you made AFTER the one
you are tightening.
In the image above, I tightened the first upper
loop by pulling on the second
lower loop, which was made next.
Step 5:Repeat
steps 3 and 4 until the necklace design
is the half
the size you are making.
So for a 16 inch necklace, stop at 8 inches.
For these
instructions to make sense, stop after you make
a loop at the bottom.
First Part of Clasp
This end of the clasp
for the Figure Eight Choker is a simple
loop. You add a button on the other
end.
Skip the next 3 steps if you prefer a different
type of clasp.
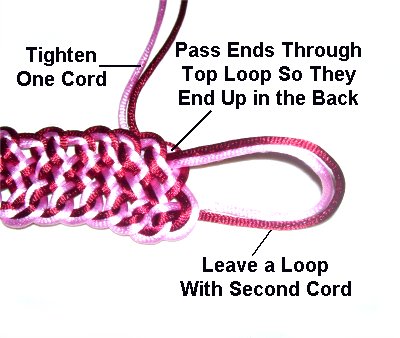
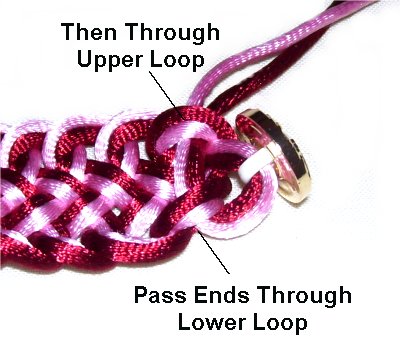
Step
A: Make the loop for the
clasp by passing the ends through the last
upper
loop you made, so they are in the back
of the choker.
Tighten one cordcompletely by pulling on the end.
Leave a loop with the second
cord.
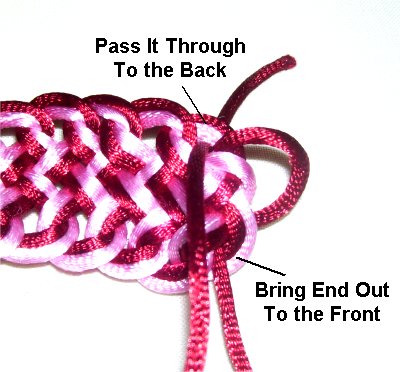
Step
B: Bring the second
cord to the front, by passing it
through the last lower
loop you tied.
Bring it to the back again, through the upper
loop.
Step B,
continued: Adjust the size of this
new loop, so the button used for the clasp fits
through it snugly.
Don't make it too large, or the clasp will come
untied too easily.
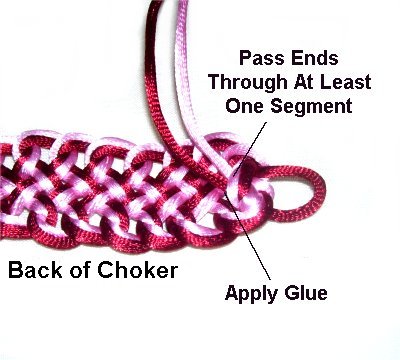
Step
C: Flip the Figure Eight
Choker, so you are working in the back
of it. Pass both ends through the
back of one segment, to hold them in
place.
Apply glue under
the two cords and use a clip to help hold
them against the back of the choker.
Center Area -- Button
Step
6: You now have a decision to
make:
You can make the second half of the Figure Eight
Choker moving left
to right (same as the first half).
That's
how these instructions are written.
You have the option of tying the knots right
to left. In that case, the loops
are made in the opposite
direction (clockwise
at the top, and counter-clockwise
on the bottom).
You also need to decide whether to add a button to
the center. Skip
the next 2 steps if you don't want one.
Charms
and pendants are added after the necklace is
completed.
To continue working left
to right, turn over the Figure Eight
Necklace, so the back
is face up.
Position the center area on your left. Make
sure the cords exit the upper
loop. You can tie another loop if necessary.
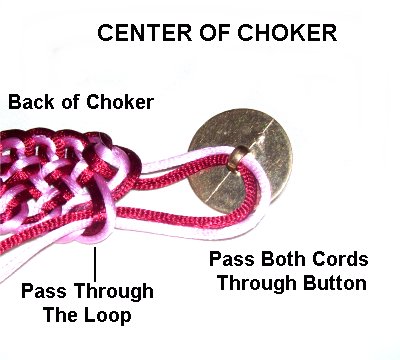
Make sure the
button is upside
down, so you see the shank,
since you are working at the back.
Pass the second half of both cords through
the button, left to right.
Pass them through the lower
loop of the Figure Eight knot, and pull
them toward you, so they come through front
to back.
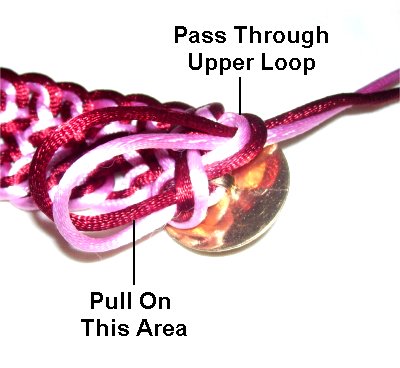
Pass the ends
through the upper
loop. Keep the cords between the
button and the material as you pull them
to the right. (see
left image below)
Tighten the two loops next to the button
by pulling on the ends in the area
indicated. Tighten one loop at a
time.
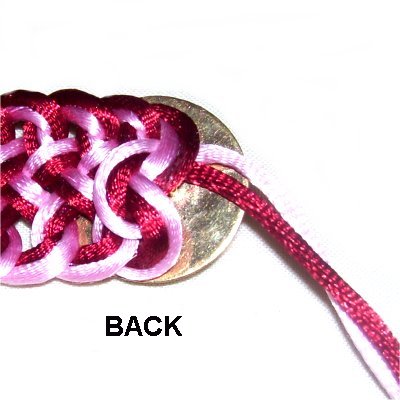
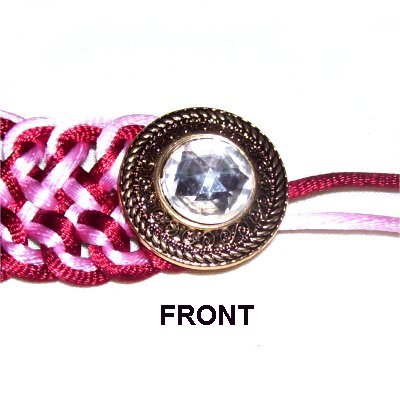
<<
This is a closer view of how the back
of the choker should look where the button
is attached.
This is the view of the front. >>
Step 7: Continue
on, tying more knots moving left
to right. Keep the back
facing upward while you work.
Stop when the second half of the Figure Eight
Choker is the same
size as the first half.
Second Part of Clasp
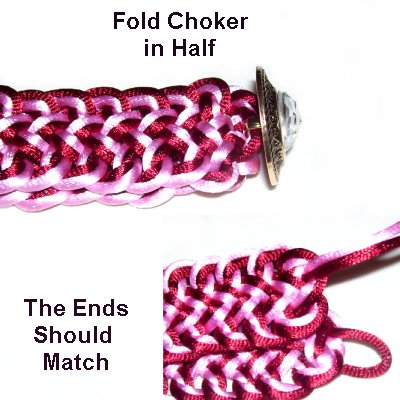
Step 8: You
will complete the clasp by adding a small button.
Skip the next steps if you decided to use a
different type of closure.
Fold the
Figure Eight Choker in half, so the button
in the center is vertical, and the ends match.
Add extra knots if necessary, so both
halves are equal.
For a necklace with no button, just try it
on to make sure it fits.
Add the button
for the clasp to both
cords, then repeat steps 5A -
5B.
Check to make sure the button fits through
the loop at the other end, and that the
ends are in the BACK
when you are through.
Step
9: Put
the necklace around your neck to be sure
it fits.Make any adjustments
necessary.
Repeat step 5C.
Cut off the excess material from both ends of the
Figure Eight Choker. You can add a little
more glue to the tips of the cords if necessary.
When using Satin material, you can melt the ends
with a flame to secure them.
You can now add a pendant or charms to the area at
the center (optional).
By
using any text or images on Free Macrame
Patterns, you are agreeing to ourTerms
of Use