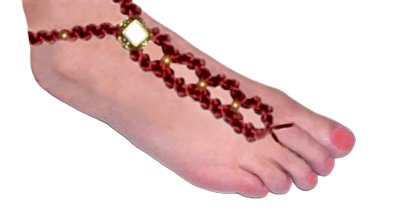
Description:
These Easy Barefoot Sandals feature only
two very simple decorative knots. Oval
shaped designs rest on the front of the foot, and
the ankle straps are knotted. The closure at
the back of the ankle is a simple bead clasp.
This Macrame pattern is designed in such a way
that you will need to use beads. They should
have holes large enough for two cords to pass
through EASILY, especially if you are using Satin
cord. A focal bead or button can be added to
the area near the straps.
Foot Jewelry needs to be comfortable. For
that reason, I recommend you use Satin cord to
make this design. It's luxurious and very
soft, but is also delicate, so do not push pins
through the material. Use the Cross
Pin Technique, or LEAN the pins
over the cords, to secure them.
Preparation:
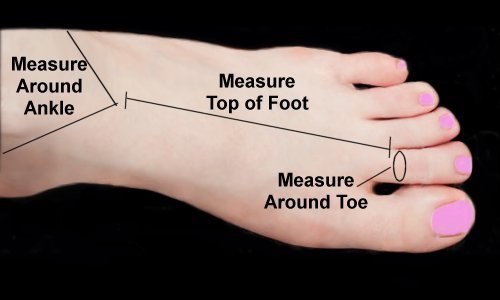
The first step to making these Easy Barefoot
Sandals is to measure your foot.
There are three areas to focus on: The area
where the toe loop will wrap around, the oval
design on the top of the foot, and the ankle
straps.
When the measurements are done, add all three
numbers to get the total
length.
Toe
Loop: Measure around the
second toe, then add 1-inch, so the knots
start just beyond the toe.
Oval
Design: Measure from the crease
near the toe to the place where you want
the straps to branch off.
Ankle
Straps: Measure from the branch
point to the back of the ankle, in both
directions.
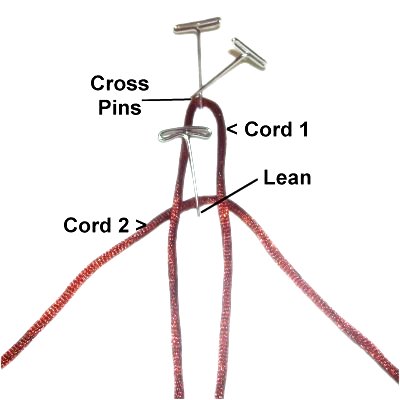
Step 1: Cut
two cords, at least 8 times the total
lengthyou need for your Easy
Barefoot Sandals.
Prepare the tips of the cords to prevent
unraveling. Satin Cord (nylon) can be
prepared by applying a flame to the tips.
Fold cord 1 in
half and secure it vertically on your
board. The Cross-Pin technique was
used in the example shown.
Fold cord 2 and place it under
the first. Secure it at the fold, by
leaning the pin backward over the
material.
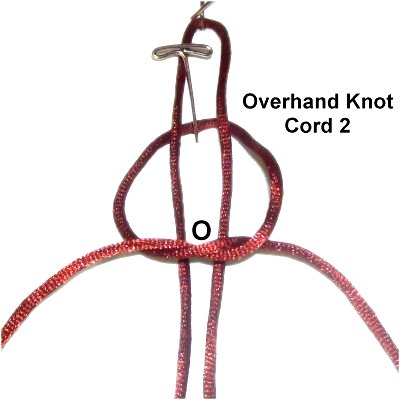
Use cord 2 to
tie an Overhand knot, placing it in front
(over) cord 1.
Tighten the knot as much as
possible.
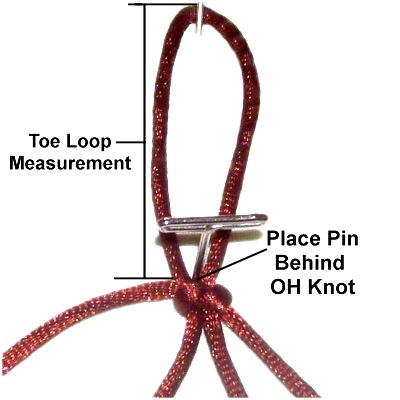
Measure cord 1
from the fold down to the Overhand
knot. Move the knot up or down,
until the toe
loop measurement is reached.
Place a pin behind
the Overhand knot, so it cannot slide
backward and change the size of the loop.
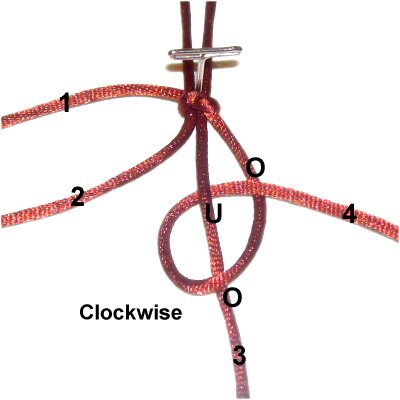
Step
2: Mentally number the four
cords.
Use cord
4 to tie a Half Hitch, by making
a clockwise
loop over
- under cord 3. As
you pull it right, pass over
cord 4.
Tighten the knot firmly.
Use cord
3 to tie the next Half Hitch onto
cord 4.
It's tied the same, only the loop is counter-clockwise.
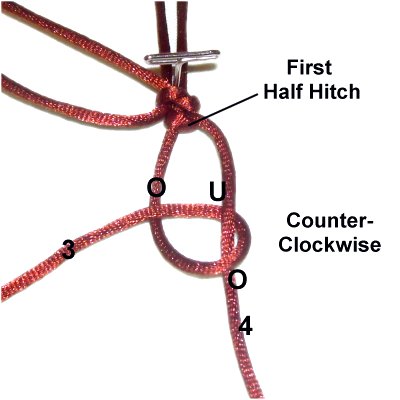
Step 2,
continued: Alternate back and forth
between cords 3 and 4 to tie four more Half
Hitches, for a total
of six.
Tighten each knot with one hand, while holding the
sennit firmly on the board. This will help
prevent twisting.
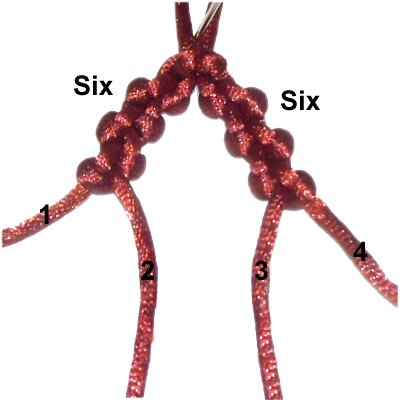
Step
3:Repeat
step 2 using cords 1 and 2.
The first Half Hitch should be tied with cord
1 onto cord 2.
Tie a total of six Half Hitches.
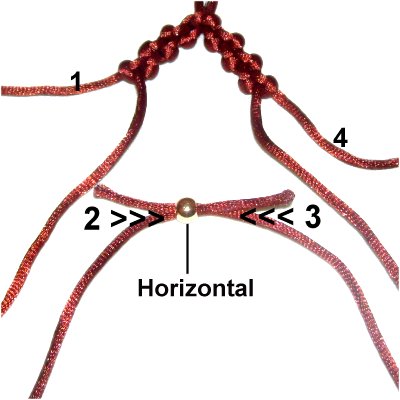
Step
4: Arrange the bead so the
hole is horizontal.
Pass cord 2 through it from left
to right. Pass cord 3 through
from right
to left.
Pull both cords to slide the bead up to
rest between the two Half Hitch sennits.
Step
5:Repeat
steps 2 - 4 at least two more
times.
Measure this area of the Easy Barefoot
Sandals as you progress, and stop when you
reach the Oval
Design measurement.
Try it on to see how it fits. Make
adjustments as needed.
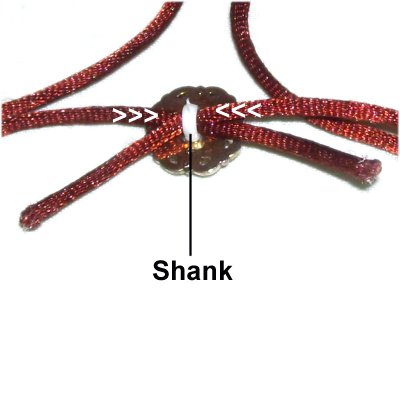
You can add a
different type of bead (focal bead) or
button after the oval shapes are done and
you are ready for the straps.
When using a button, pass cords 2 and 3
through the shank in opposite directions,
like you did the beads.
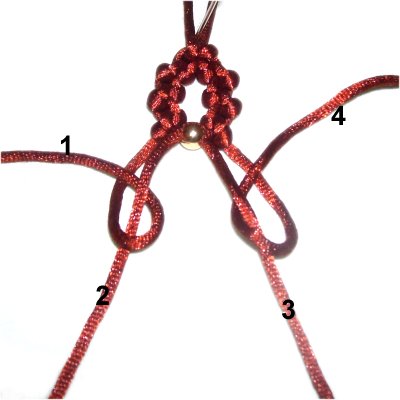
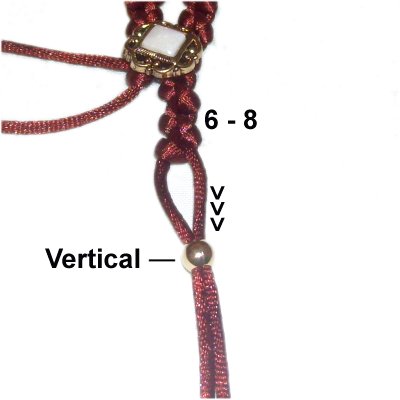
Step
6: To make the right strap,
tie 6 - 8 Half Hitches with cords 3 and 4,
as you did in step
2.
Step
7: Slide cords 3 and 4
through the hole in a bead, but this time
vertically
and in the same direction.
Step 8:Repeat
steps 6 and 7 several times,
until the length of the sennit is the ankle
strap measurement.
Step 9:Repeat
steps 6 - 8, using cords 1 and 2.
The first Half Hitch for each group of knots
should be tied with cord 1 onto cord 2.
Add a bead to each strap before moving on.
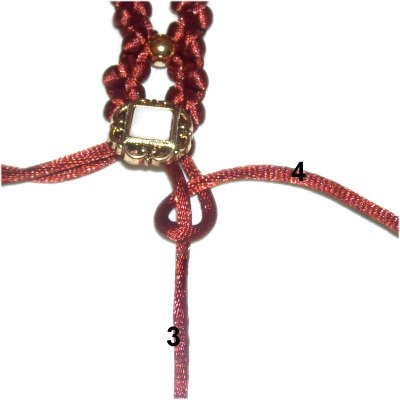
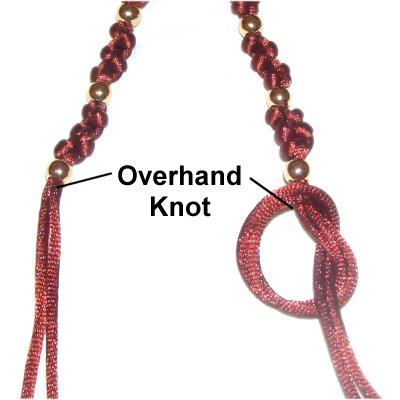
Step
10: Tie an Overhand Knot
with cords 3 - 4 as shown. Tighten
the knot so it rests against
the bead you added in the last step.
Do the same with cords 1 - 2.
Step
10: Start the bead clasp
for your Easy Barefoot Sandals by passing
cords 1 - 2 through the bead from left to
right. Cords 3 - 4 go through it
right to left.
Test the clasp by pulling the ends.
The bead should grip the cords, but they
should still be able to slide through
easily.
Important:
Make sure the cords are not twisted around
each other as you pass them through the
bead.
Checking this in the open position is
easier.
Step 11:
Put on the Easy Barefoot Sandal to see how it fits
(or measure it). Pull the ends to close the
straps around your ankles.
You can still remove the clasp, and untie the
Overhand knots, to adjust the size of the straps
to fit your foot. Add or remove Half Hitches
as needed.
Once the size is correct, remove it from your
foot. Pull the ends so the clasp is in the closed
position (bead rests against Overhand knots in
strap).
Step 12:
Move down at least 3 inches from the bead clasp,
and tie an Overhand knot with cords 3 - 4, as you
did in step
10. Do the same with cords 1
- 2.
You can add a tiny amount of glue inside these
knots if you wish, but keep in mind that glue will
often darken Satin cord permanently.
Important:
Before cutting off the excess material, measure
the Easy Barefoot Sandal (or try it on) one more
time.
After you cut off the excess, you can apply a
flame to the tips if using NYLON Satin Cord.
By melting the material, it's less likely that the
knot will untie.
Step 13:Repeat
steps 1 - 12 to make the second sandal.
By
using any text or images on Free Macrame
Patterns, you are agreeing to ourTerms
of Use