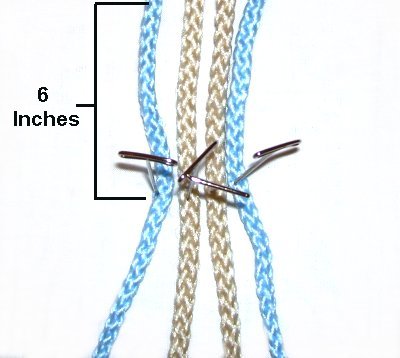
Step 1: Cut 4 cords,
each at least 7
times the finished length you
wish to make.
Secure them to your board, at least 6
inches below one end.
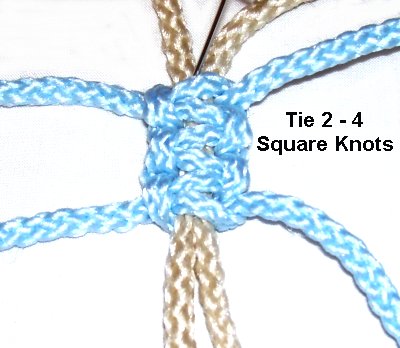
Step 2: Using the two
cords on the outside
as the working cords (blue),
tie 2 - 4 Square Knots.
The two cords on the inside (tan)
are the fillers
for this portion of the Double Bead
Bracelet.
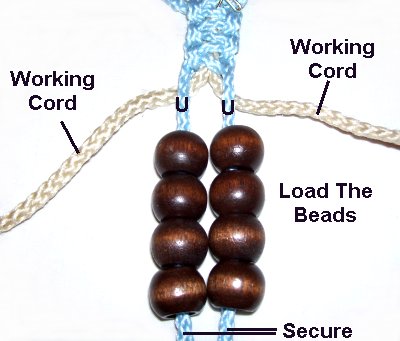
Step 3:The fillers
now become the working cordsfor the beaded portion (tan).
Move them to the right and left,
passing underthe cords previously used to
tie the SK. Those are the new fillers (blue).
Step 3,
continued: Load the beads onto
the fillers,
then secure the 2 cords so they are taut.
The number of beads will depend on the size of
the material as well as the beads. Start with 8
to 10 beads. You can add more later if there's
not enough for the size bracelet you are making.
It really helps if the beads have holes the
same size as the material. They won't slide
around as much, and you will have better
control.
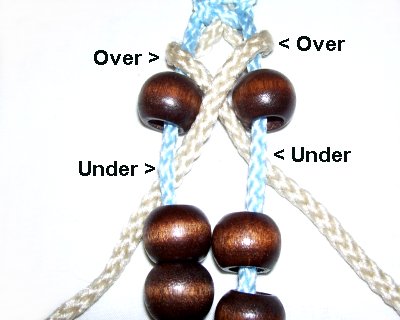
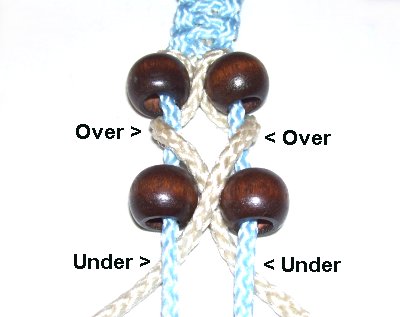
Step 4: Bring the working
cordsover
the fillers, crossing the ends right
over left.
Arrange two beads so they are lined
up with the crossed area.
Step 4,
continued: Make sure
the beads are resting below the place where the
working cords came over the fillers.
Move the working cords under
the fillers, just beyond the beads.
Important:
In order for the crossed weaving to work, the
working cords have to wrap under and over the
fillers above
and below the beads.
So if you complete each step by passing the
working cords under
the fillers, they are in position to be brought
over in the following step.
Also, it's important to crisscross the cords right
over left each time.
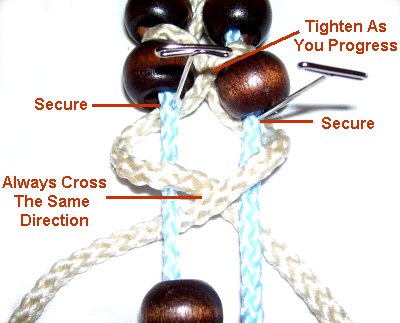
Step 5:Repeat
Step 4 -- Pass the working
cords over
the fillers, and thencross
right over left.
Slide the beads up. Position the cords
so they go under
the fillers just below the beads.
Repeat
Step 4 several more times,
tightening the working cords as
you progress. The Double Bead
Bracelet needs to be snug, so pull the
cords firmly and evenly.
It helps to secure the beads by
placing a pin just below them.
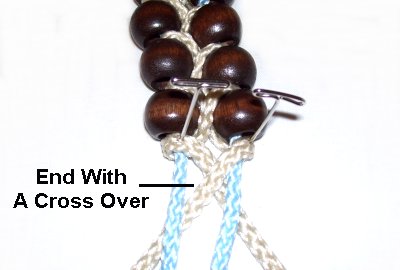
Step 6: Verify that the
bracelet is the right size, and stop
when you have added enough beads.
Make
sure you end with a cross over,
so the working cords come around the
fillers just beyond the last
beads.
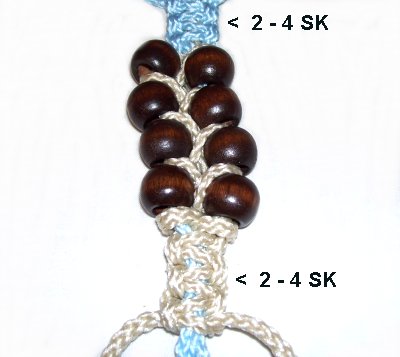
Step
7: Using the same working
cords, tie the same number of Square Knots
as in Step 2.
You can switch the colors if you wish.
Before
you make the Sliding Clasp, you can finish off the
two working
cords from each end. Move them to the inside
of the bracelet.
Work them under the SK to hold them in place.
Apply glue to secure the ends.
Your other option is to make the clasp around all
4 cords from each end.
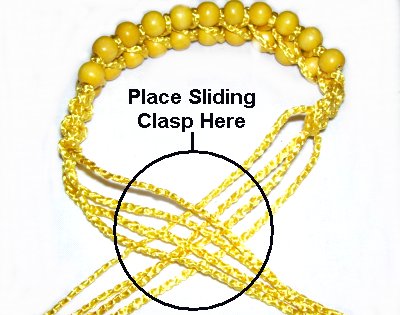
Step 8: To make the Sliding
Clasp, curve the Double
Bead Bracelet into shape, and crisscross
the ends. Use a separate piece
of material and tie the knots
for the clasp in the area shown.