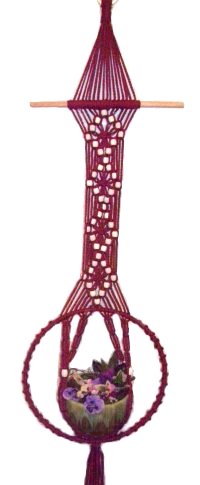
Description: The
Diamond Drop Planter is unique in the
fact that it can be used as a wall
hanging, or can dangle freely like a
regular plant hanger.
Beads and knots are used to form
attractive diamond shapes above the
large ring. There is no real cradle,
just four "straps" that fit around the
pot, which rests on the ring itself.
This Macrame pattern is written for two
sizes.
The
small size is for plant
pots
up to 6 inches wide. The
finished height
is approximately 36 inches, not
including the fringe at the bottom.
The large
size will be over 45 inches
long. Use this size for plant pots wider
than 6 inches.
Small
Size: Cut 8 cords,
each 7 yards long. Cut 2 cords, 30
inches long.
Large
Size:Cut 8 cords, each 8
yards long. Cut 2 cords, 36 inches long.
Fold the long cords in half and pass them
through the small ring, matching the ends.
Gather the cords together in a bundle, just below
the ring.
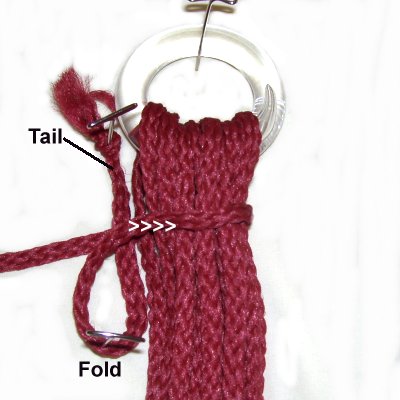
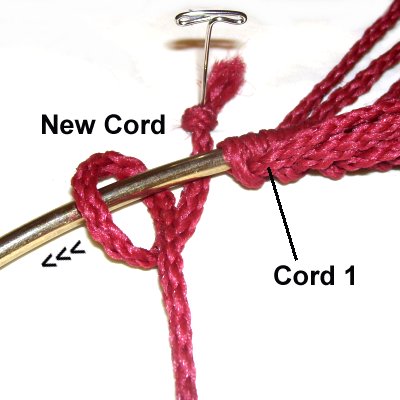
Step
1: Place a short cord to the left
of the bundle. Secure one end near
the ring (tail). Bring it down 2
inches, fold it, and move it back up (to
the left of the tail).
Wrap the end around the bundle of cords,
moving right
when you first begin.
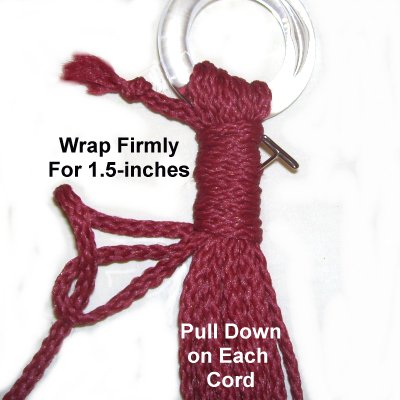
Wrap
firmly for 1.5 inches, moving
downward towards the folded area.
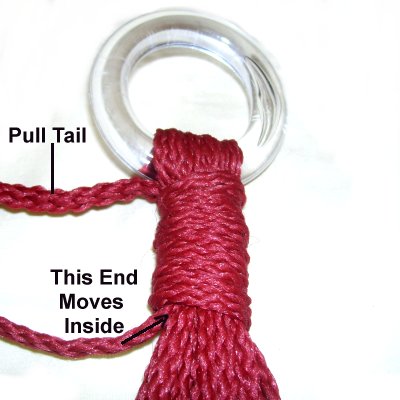
Pass the end through the folded area,
which looks like a loop.
Secure the
Wrapped Knot by pulling on the tail, at
the top
of the knot. The other end will move
inside the knot.
Pull down on each of the long cords, so
they tighten around the ring.
Step 1,
continued: Apply glue under both
ends (inside) and when it's dry, cut off the extra
material flush with the edges of the knot.
Step
2: Spread the cords and
organize them.
Measure 6
inches down from the bottom of
the Wrapped Knot. Apply a piece of
tape horizontally across the cords.
This is where the dowel for the Diamond
Drop Planter will rest.
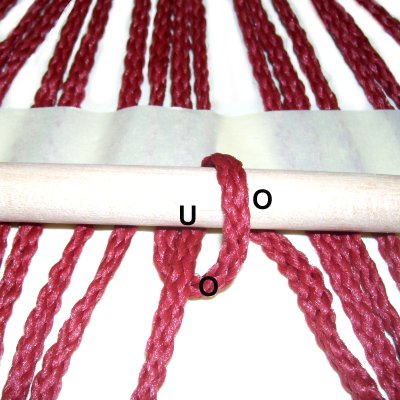
Place the dowel at the lower edge of the tape,
on top of the cords.
Start with cord
9, in the middle of the group.
Tie a Half
Hitch by moving the end over
- under the dowel, and over
the cord as you pull it down and to the
left.
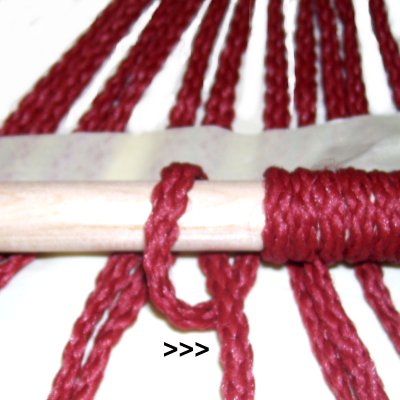
Tie two more knots to
the right (Triple
Half Hitch).
Attach cords
10 - 16 to the dowel in the same
manner.
Go back to the
center and attach cords
8 - 1.
When you make the Half Hitch the end needs
to be pulled down towards the right.
The next two knots are placed to the leftof the first.
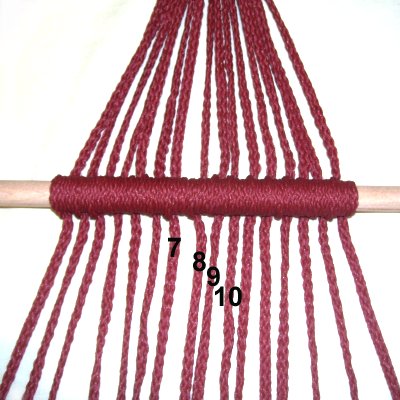
Before moving on, hang up this portion of the
Diamond Drop Planter, to verify the dowel hangs
evenly. Make adjustments if necessary.
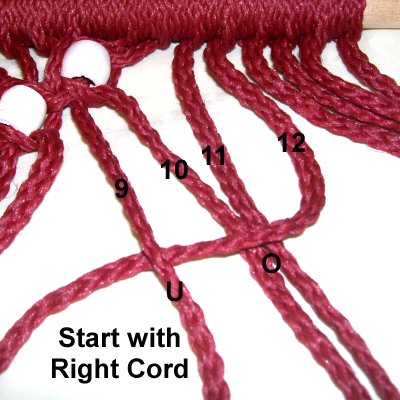
Bead Diamonds
Mentally number
the cords 1 - 16. The first Square
Knot will be tied with cords
7 and 10.
Cords 8 and 9 are the fillers.
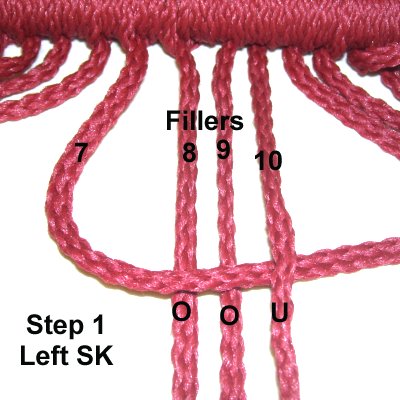
Below is the process for tying each SK on
the left
side of the Diamond Drop Planter:
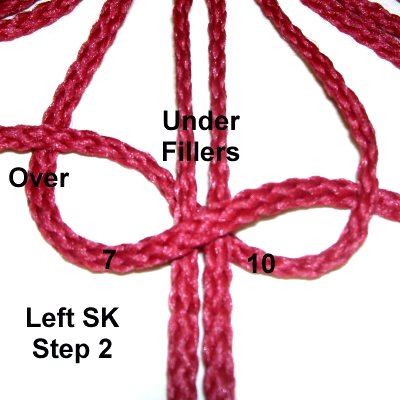
Step
3:
Left Square Knots
<<
Move working cord
7 to the right, over
the fillers and under
working cord 10.
Move working cord
10under
the fillers, and over
working cord 7, as you pull it out on the
left. >>
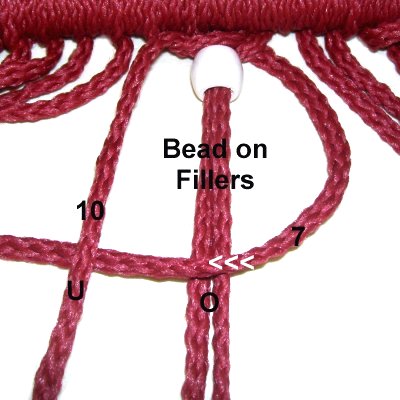
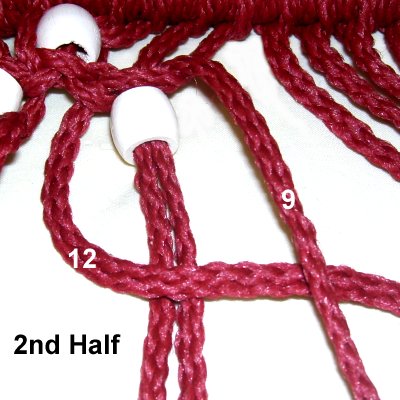
Apply the bead to cords
8 and 9 (fillers). Tie the second
half of the knot as shown below.
<<
Move
working cord
7 to the left, over
the fillers and under
working cord 10.
Move working cord
10under
the fillers and over
working cord 7. >>
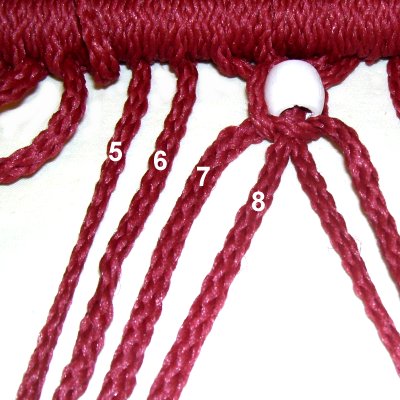
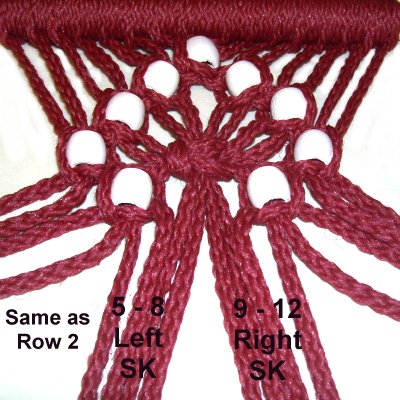
<<Row 2:Repeat the previous step using cords 5 - 8.
Make sure the knots in this
part of the Diamond Drop Planter are
tightened firmly, so they are close to
each other. >>
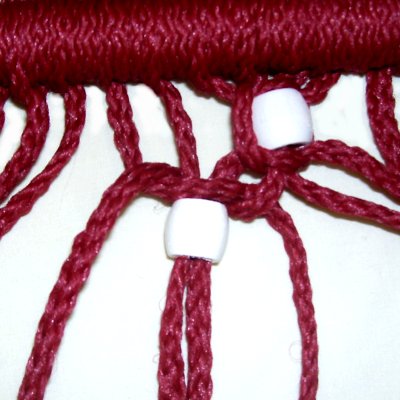
Row 3:
Repeat
step 3, using cords 3 - 6. Row 4:Repeat step
3, using cords 1 - 4.
Step
4: Right Square Knots
<<
On the right half of the Diamond
Drop Planter, always start with the
working cord on the right.
Apply the bead, and tie the second half,
starting with the working cord on the left.
>>
Row 2 (shown
above): Use cords 9 - 12.
Row
3:
Use cords 11 - 14.
Row 4:
Use cords 13 - 16.
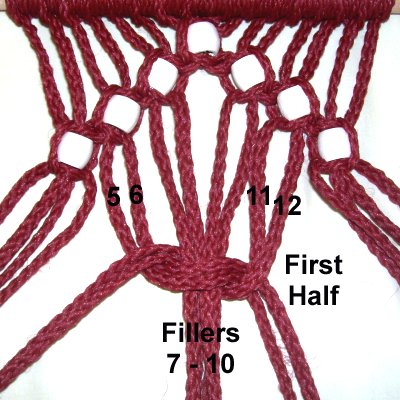
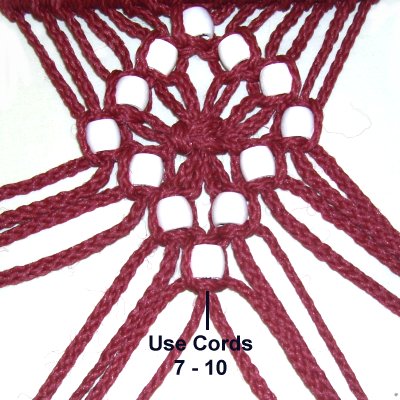
Step
5: Combine cords 5 - 6 on
the leftwith the cords numbered 11 - 12 on
the right. Tie a Square Knotwith the four
working cords. The
fillers are cords 7 - 10.
Arrange the cords neatly, so the Diamond
Drop Planter has a nice finished
appearance.
When you
tighten the knot, make sure the SK lines
up with the beads in the 4th
row.
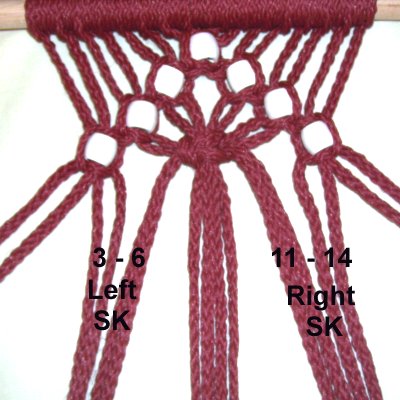
Step
6: To make the bottom of
the diamonds, follow the instructions for
steps 3 and 4, row
3:
Use cords 3 - 6 on the left, tying a left
SK.
On the right, use cords 11 - 14, tying a right
SK.
The next row
is tied the same as row
2 in steps 3 - 4.
On the left, use cords 5 - 8 (left
SK).
On the right, use cords 9 - 12 (right
SK).
To complete
the bead design for the Diamond Drop
Planter, use cords 7 - 10, and apply the
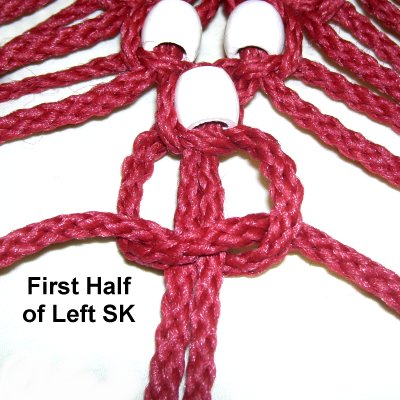
final beadwith aleft SK.
This last bead is considered the first one
(row 1) for the next design.
Make sure you start with Row 2,
and arrange the cords so they are straight.
After the
final bead is attached to this area of the
Diamond Drop Planter, tie the first halfof aLeft Square
Knot.
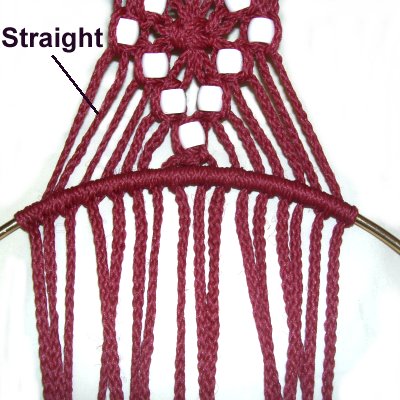
Large Ring
Step 8: Place
the large ring on top of the cords, after you
arrange them neatly.
(See
the images and information below).
Attach cords 9 - 16, followed by cords 8 - 1 (in
that order).
The knots need to change direction, as in step 2
(dowel).
Small
Size: Attach the cords with
Triple
Half Hitches.
Large
Size: Attach the cords with
Double
Half Hitches.
Make sure the
segments above the ring are straight with
a little tension.
This area of the Diamond Drop Planter
looks better if the slack is removed.
Step 9: Now
you will cover the ring with a Spiral
design. First, measure straight down from
the bead resting at the top center part of the
ring.
Place a piece
of tapeon the ring where you measured (bottom
center).
Small
Size:
Cut two cords, each 4.5 yards long.
Large
Size: Cut two cords, each 5.5
yards long.
Secure the new cord to the left
of cord 1, at the top of the ring.
Tie Half
Hitches along the left half of the
ring. After every 7 knots, rotate
the end all the way around, so the knots
spiral. (see
information below)
Keep
the knots close to each other.
Repeat this process on the right,
with the second cord.
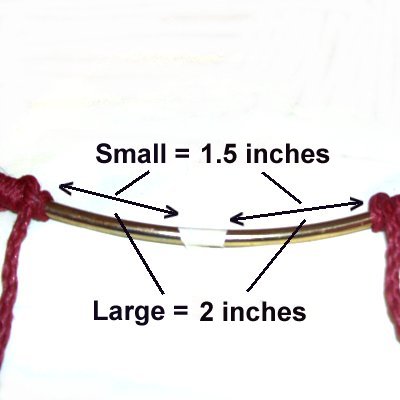
You need to
leave space at the bottom
of the ring, to attach the straps.
Small
size: Leave 1.5 inches to the
right and left of the tape (total of 3
inches).
Large
size: Leave 2 inches on either
side of the tape (total of 4 inches).
Finish off the short tails at the top
of the ring, by sliding them under the back of the
Half Hitches next to them. Apply
glue.
The Straps
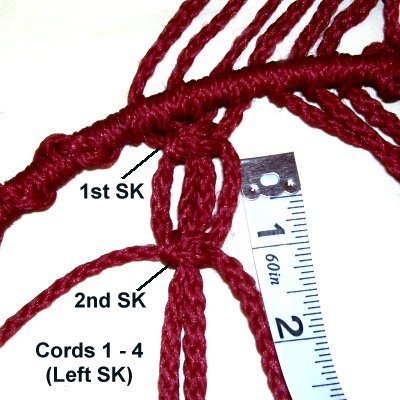
Step 10:
Separate the 16 cords into groups of 4.
The steps below show you how to make each strap
inside the ring of the Diamond Drop Planter.
Cords 1 - 4 are shown below, where you will tie left
SK.
Do the same with cords 5 - 8.
For cords 9 - 12 and 13 - 16, tie right
SK.
Tie one Square
Knot.
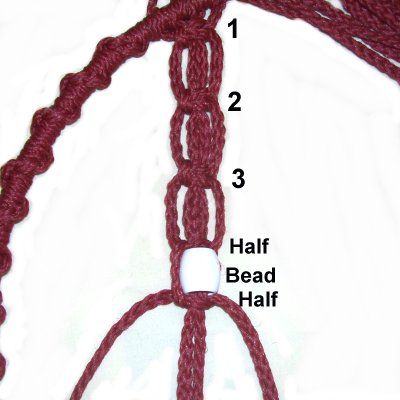
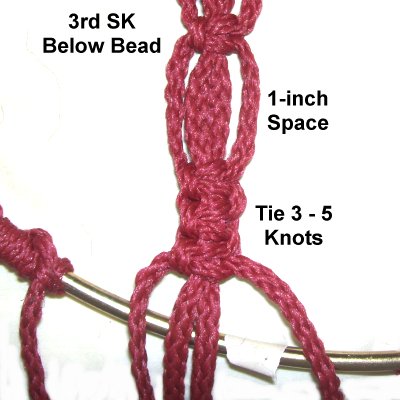
Move down 1-inch, and tie the 2nd SK.
Small Size Only:
Move down 1-inch and tie a 3rd SK.
This
Bead is optional.
Tie the first half of the SK, add the bead
to the fillers, and tie the second half.
Step 11:Repeat
step 10, tying the same number of SK with
1-inch of space between them.
Move down
1-inch and tie 3
- 5 SK.
Thestrap
should be very close to the bottom of the
ring.
Create
the remaining three straps.
Step 12:
Before securing the straps for the Diamond
Drop Planter, verify they are the right
size.
Place them around the pot you will be using (or
one of similar size). The pot should rest on the
bottom of the ring, with two straps in front and
back.
Check to see if the last SK in each strap is close
to the ring. Add more knots as needed.
Remember the
straps need to be tight enough to hold the pot
in place, so don't
add too many extra knots.
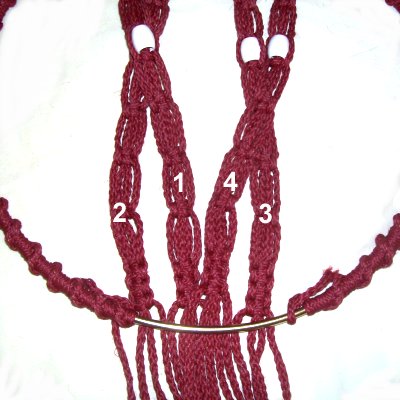
Step
13: Mentally number the
four straps. Place them under the
lower part of the ring.
Arrange them so 1 and 4 cross over2 and 3,
and are next to the tape on the lower ring
(center).
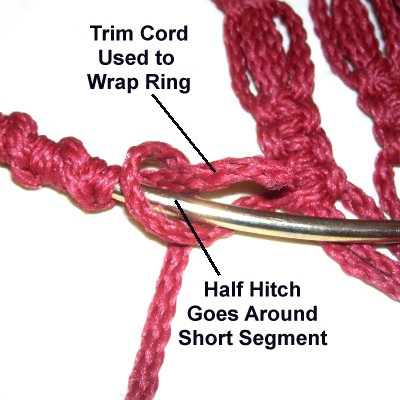
Remove the tape from the ring. Trim
the cords used to wrap the ring to
approximately 1.5 inches.
Start with strap
2 on the left,
and attach each cord to the ring with
Double Half Hitches. The first few
cords need to pass around
the 1.5-inch end of the cord used to wrap
the ring.
Attach the cords from straps 1 and 4, and
finish with strap 3. The last 2
cords pass around the short end on the
right.
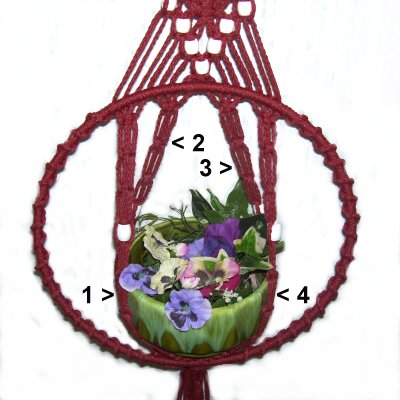
Finishing Touches
Place the pot
on the ring, and arrange straps 1 and 4 to
the front and sides. Straps 2 and 3
are in the back.
Does the
pot stay in place?Stretch
the straps to see if that helps.
Remove knots and backtrack to step 11 -
12, if you cannot get the pot to stay in
place.
Step
14: For the small
size, use the 30-inch cord.
For the large
size, use the 36-inch cord.
Tie a Wrapped knot around all the cords on
the ring, as in step
1.
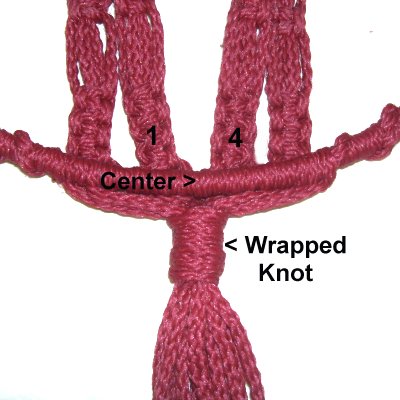
Make sure the knot is lined up with the center;
between straps 1 and 4.
Step 15: Trim all the ends so
they are even. Apply finishing knots, or melt the
tipsto
prevent unraveling.
Another option is to unravel each cord, or brush
the fibers to make a fluffed fringe.
The Diamond Drop Planter can be hung next to a
wall, or dangling freely.
By
using any text or images on Free Macrame
Patterns, you are agreeing to ourTerms
of Use