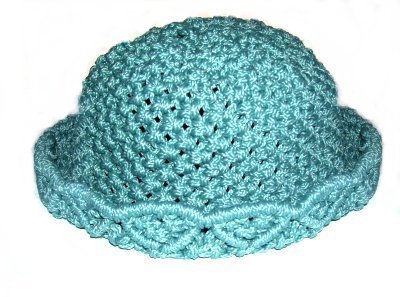
Description:
This Designer Hat features a rounded top
and a decorative brim with small triangles. You
can also use this Macrame design as a basket.
I recommend you use cord material that's not
excessively flexible, or it won't hold it's
shape. I used Bonnie Braid in the example
shown.
These instructions are written for a medium size,
28 inches around with a 1.5-inch brim. I
provided you with cord measurements if you wish to
make a smaller or larger hat.
This is an easy project, suitable for
beginners. If you are new to Macrame, be
sure to practice
the decorative knots listed below, before
you try making this custom hat.
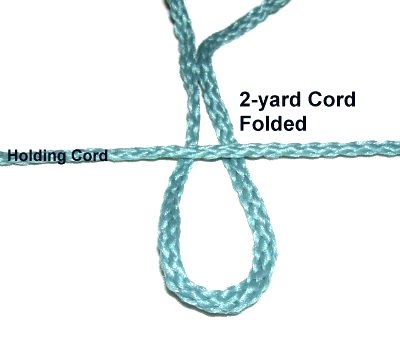
Step
1: For a medium
size hat (28 inches around x 5 inches tall), cut
56 cords, each 2 yards long.
Cut one holding cord 36 inches long.
For a 24-inch hat, cut 48 cords, 2 yards
long.
For a 32-inch hat, cut 64 cords, 2.5 yards
long.
For a Designer Hat above or below these
sizes, simply increase or decrease as needed
(2 cords per inch).
Make
sure the number of cords you cut is a multiple
of 4 (36, 40, 44, etc.).
Prepare the ends with tape,
to prevent unraveling.
Secure the holding
cord to your board horizontally,
making sure it's taut.
Fold one of the 2-yard cords in half, and
place it under
the holding cord, so it rests near the
middle.
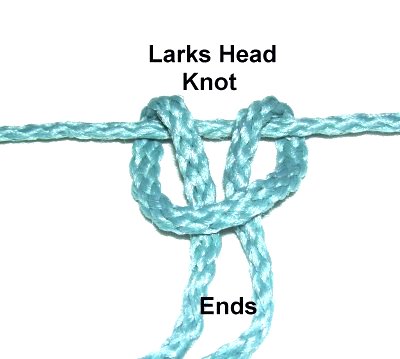
Step
2: To complete the Larks Head
knot, bring the ends over
the holding cord, heading downward.
Pass them under
the folded area. Tighten
firmly.
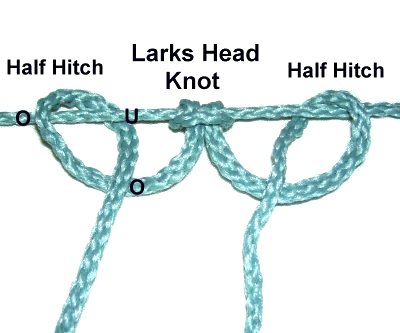
Step
3: Tie a Half Hitch with
each end by bringing the cord over
- under the holding cord.
As you bring it down, it should pass over
the cord you are working with.
Step 4: Repeat steps 1 - 3,
mounting the remaining cords to the holding cord.
Work from the middle moving towards the ends.
There should be an equal amount of cords both
directions.
Creating the
Brim
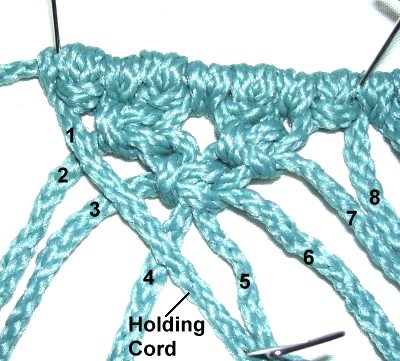
Step
1: To create the brim for your
Designer Hat, select the first
8 cords and mentally number them 1 - 8
(left to right).
Each of the triangle shaped designs are made with
8 cords, so divide them up now, before you get
started.
Tie a Square
Knot with cords 2 - 4. There is only
one
filler
- cord 3. Tighten it firmly so
it rests against the mounting knots.
Do the same with cords 5 - 7. The
filler is cord 6.
Step
2: Tie another Square Knot below
the first two, using cords 3 - 6 (two fillers
-- 4 and 5).
Tighten it firmly, so it rests against the
knots above.
Step
3: Move cord
1 along the left
edge of the three knots, which
form a triangle. Secure it so it's
taut, since it's a holding cord.
Attach cords 2 - 4 to it with Double Half
Hitches.
Step
4: Movecord 8
along the rightedge
of the triangle, and secure it.
Attach cords 5 - 7 to it with DHH.
Make sure you do not attach
holding cord 1, or the
design will be lopsided.
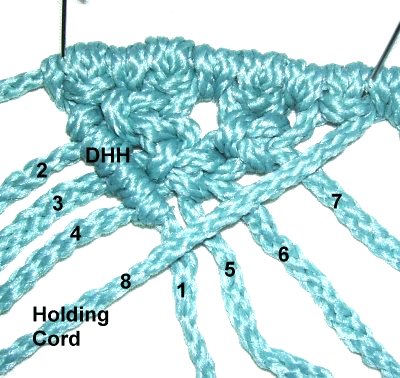
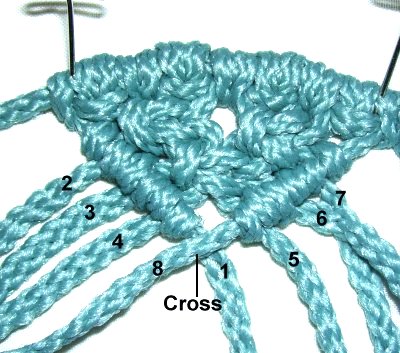
Step
5: Cross
the holding cords (1 and 8), and spread
all the cords out so you can see them
clearly.
Tie a Square Knot with cords
4, 8, 1, and 5. Cords 8 and
1 are the fillers. Tighten it
firmly, so the knot rests below the point
of the triangle.
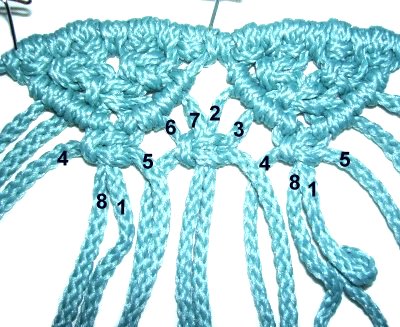
Step 6: Repeat steps 1 - 5,
making another triangle with the next 8 cords.
Tie a SK with
cords 6 and 7 from the first triangle, as
well as 2 and 3 from the
second.
Tighten it so it
lines up with the SK under each
triangle.
Step
7:Repeat
steps 1 - 6 with the other groups of
cords.
When you get to the last triangle shape for your
Designer Hat, you need to link it to the first
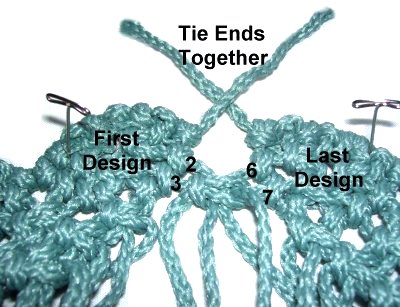
one, to form a circle.
Start by
turning the brim of the Designer Hat design upside down,
since the
front of the triangles are on theinsideof the hat right now.
Remember that the brim will be folded, so the
directions are reversed.
You can see this in the image below, which shows
the back
of the triangles, where you will be working.
Tie a SK with
cords 2 and 3 from the first
triangle, along with 6 and 7 from the last
one.
This is just like what you did in step
6, only the cords come from eachend
of the brim design.
Locate the ends of the holding cord used in the
mounting process. Tie one Overhand knot, add glue,
and tie a second one on top of the first.
Trim the ends to 2 inches, and weave them under
the mounting knots, applying glue to hold them in
place.
Remember they should be in the back
of the triangles, not the front.
Top Portion of Designer Hat
Step
1: To make the top portion, you will tie
rows of Alternating Square knots using four cords
per knot (2 working cords, 2 fillers).
It's best to start at the area where the two ends
were joined in step 7, and go all the way
around. Then alternate the cords for the
next row.
Keep the brim inward as you
create the hat.
Mentally number each set of four cords.
Cords 1 and 4 are the working cords, with 2 and 3
as the fillers.
To alternate for the next row, combine 3 and 4
with 1 and 2 from the next knot over. This
way the new knot will rest between
the two above it.
Step 2:
Stop tying ASK when Designer Hat measures at
least 7 inches from the lower edge of the
brim, to the row of knots you are working
on.
Remember, the brim will be folded, and you still
have a few more rows to tie for the top surface.
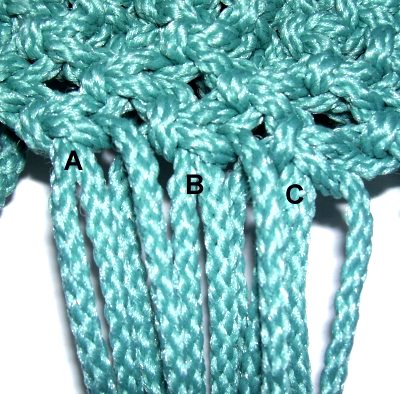
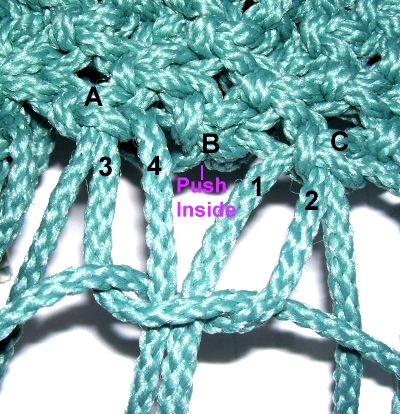
Step
3: Select 12 cords coming from three
ASK.
Mentally label each set of four cords A,
B, and C.
Push the four cords from set
B to the inside
of the Designer Hat.
Step
4: Use cords 3 and 4 from set
A (left), with cords 1 and 2 from
set
C (right).
Tie a tight SK with these four cords, across the
space left by the cords you
pushed inside.
Tighten firmly. This will make the
top of the hat more rounded.
Step 5:Repeat
step 4, dropping every
other knot by pushing it
inside. This will tighten the top
of the Designer Hat.
After you have gone all the way around, repeat
steps 3 and 4two
more times. When you are through, push
the remaining cords to the inside.
Step 6:Turn
the hat inside out. Remember that
the front
of the triangles are the inside,
so they will be seen along the lower edge while
you are working on this step.
Using two cords at a time, from different knots,
tie 2 very
tight Overhand knots.
If there are any large spaces, try to go across
the gap by choosing cords from either
side of it. Tie one knot, add fabric glue, and tie
a second knot next to the first.
Trim the ends after tying the knots. Since
the cords have tape on the ends, you can simply
cut it off to know which cords have been
used.
After all the knots are tied, allow the glue to
dry and cut off the excess material.
Turn the brim
of the Designer Hat to the outside,
folding it at the tip of the triangles.
By
using any text or images on Free Macrame
Patterns, you are agreeing to ourTerms
of Use