|
|
| |

|
|
Description:
This Cross Design is an easy Macrame
project suitable for older children and
adult beginners.
It features a Crown knot in the center and
Button knots at the end of each segment.
You can use any type of material to make
this decoration, but I recommend braided cord
so the knots are more sturdy.
Make sure you know how to tie all the
knots listed below before making this
item. |
|
|
| |
|
Supplies Needed:
- 2 mm to 4 mm cord material
|
| |
|
| |
|
Knots used in pattern:
|
| |
|
|
|
|
Center Crown Knot
|
| |
Preparation:
- Cut
4 cords, each at least 36 inches long
-
Cut 4 cords, each at least 60 inches long
Prepare the ends carefully, wrapping small
pieces of tape
around the tips of the cords.
|
| |
|

|
|
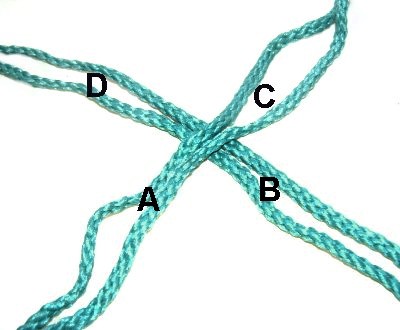
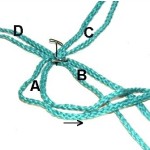
Step
1: Find the center of the
four 36-inch
cords.
Secure them to the project board so they
cross, forming an X shape as shown.
Mentally label the segments A - D.
The two cords in each area work together
as if they were one cord.
|
|
|
|
|
|
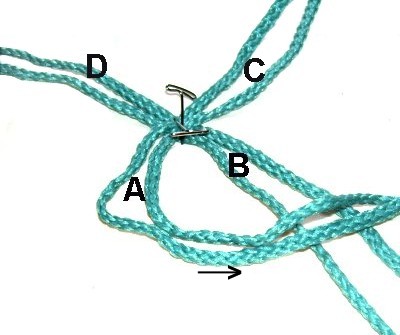
Step
2: Move segment
A to the right, so they rest on
top of segment B.
You can either fold them or curve them as
shown. Secure them to your board.
|
|
|
|
|
|
|
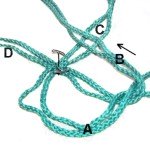
Fold segment
B backward and to the left, so
they rest on top of segment C.
Secure them to your board. |
|
|
| |
|
|
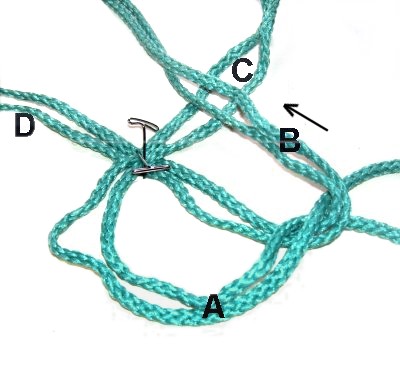
Fold segment
C to the left, so they rest
on top of segment D.
Secure them to your board.
|
|
| |
|
|

|
|
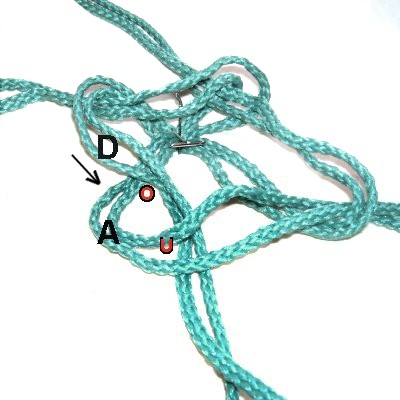
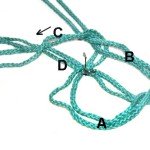
Fold segment
D forward and to the right,
toward segment A.
Move it through the curved
area of segment A, passing over
- under the two parts.
Pull all four segments gradually
to tighten the Crown Knot. |
|
|
|
| |

|
|
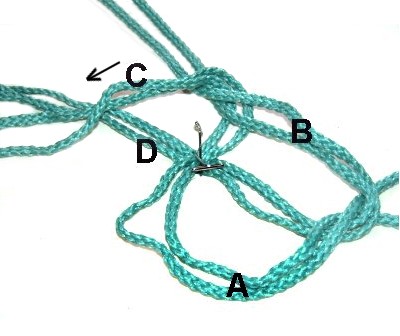
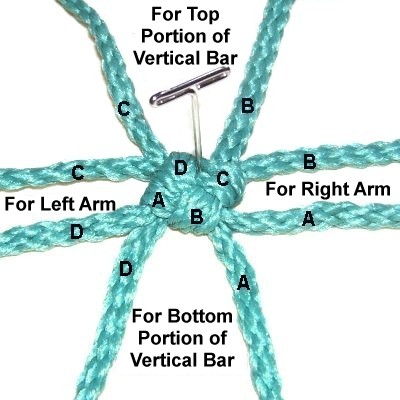
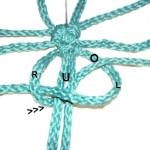
Step
3: Arrange
the cords as shown, with 2
cords in each of the four areas.
Secure the Crown Knot.
The cords in each area
should come from two different segments
(see layout details below).
|
|
| |
|
|
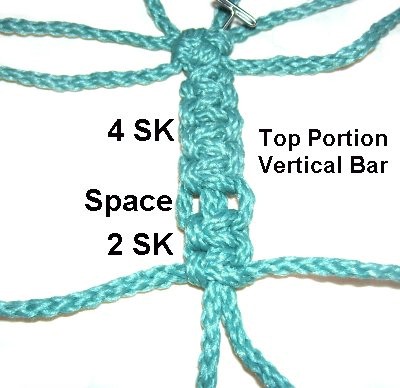
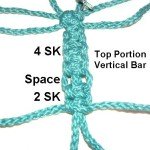
Layout
Details:
- Bottom
portion of vertical bar: Cords from
segments D and A
- Right Arm:
Cords from segments A and B
- Top portion
of vertical bar: Cords from
segments B and C
- Left Arm:
Cords from segments C and D
|
| |
|
|

|
|
Square Knot Design
|
| |
Each of the four areas of the Cross Design are
formed by Square Knots (SK). The
instructions below describe the 4-step process for
tying them.
Step 4: Turn
the board around so you work with the two cords
for the top
portion of the vertical bar.
The first SK you tie will be when you add
a new cord to the ones coming from the
Crown Knot, which will act as fillers.
|
|
| |

|
|
Place
a new 60-inch cord under the two coming
from the Crown Knot. Match the ends
to center the new cord.
Move the left
half of the new cord to the
right, passing over
the Crown knot cords (fillers). Pass it under
the right half of the new cord.
|
|
| |
|
|

|
|
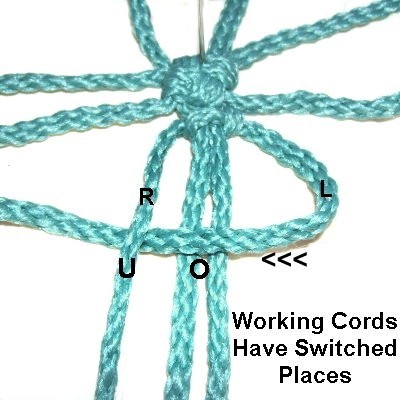
Move the right
half of the new cord to the left,
passing under
the fillers, and over
the left half of cord.
Pull both halves of the new cord to
tighten the first part of the SK.
Slide the knot backwards
so it rests against
the Crown Knot. |
|
|
|
|

|
|
The two
halves of the new cord have switched
places.
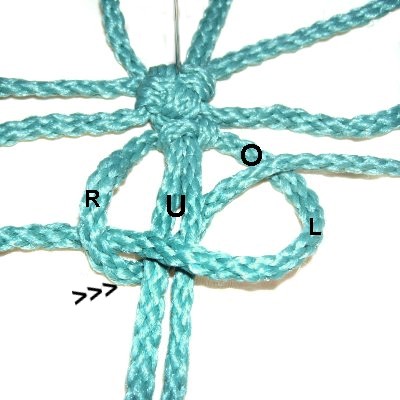
Move the left
half of the new cord to the left,
passing over
the fillers and under
the right half.
|
|
|
|
|
|
Move the right
half of the new cord to the
right, passing it
under the fillers and over
the left half.
Tighten
the SK
firmly. |
|
|
|
|
|
|
Step 5:
Tie three
more SK next to the first one, so
there is a total
of four for the top portion of
the vertical bar.
Make sure they are firmly tightened and
rest close together without gaps.
Leave a 1/4-inch
space, then tie two more SK. |
|
|
|
Step 6:
Turn the board around so you can make the bottom
portion of the
vertical bar
directly across from the sennit you just made.
Repeat steps 4
and 5, tying a total of 8
SK. Leave a 1/4-inch space, then
tie two more SK.
Turn the Cross Design so you can make the left
arm.
Repeat
steps 4 - 5, tying a total of 5
SK. Leave a 1/4-inch space, then
tie two more SK.
Repeat the same process to make the right
arm. |
|
|
|
|
|
| |
Square Knot
Buttons
|
|
|
Step
7: To complete each portion of the
Cross Design, you will make a Square Knot
Button.
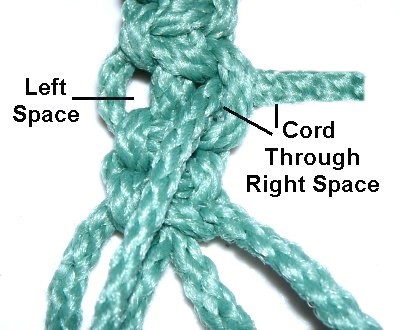
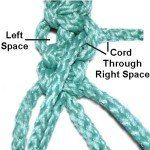
Look closely at the 1/4-inch area you left
open. There are actually two spaces, one to
the left and right of the filler cords resting in
the center.
|
|
| |
|
|
Pass the two cords on the left
backward and through the space on the
left.
The two cords on the right should pass
through the right space.
|
|
| |
|
|
|
|
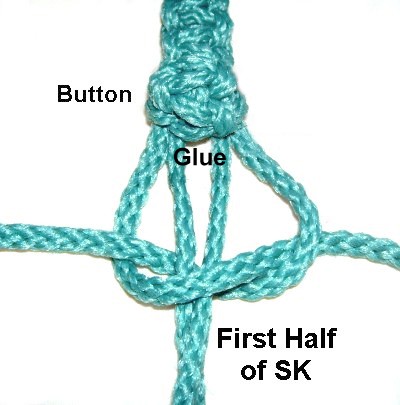
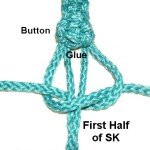
Step
8: Pull all 4 cords
forward, so the two SK roll into the
button shape. Organize the
four cords.
Tie a SK with the two cords furthest to
the left and right. This image shows
the first half.
Tighten firmly
after applying
glue next to the button, so the
Square knot will be on top of it. |
|
| |
|
|
|
|
|
Finishing Touches
|
|
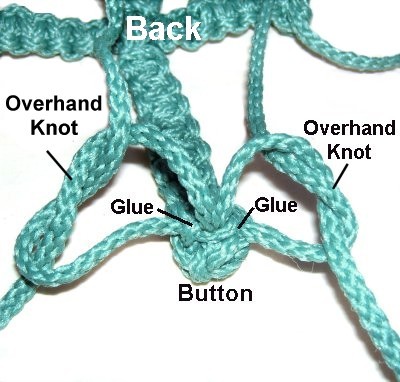
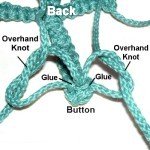
Step 9: Turn
the Cross Design upside down, so you are working
in the
back.
Organize the cords coming from one bar into two
pairs. |
|
| |
|
|
Tie an
Overhand knot with two cords. Apply glue
in the area shown, then tighten the knot
as much as possible. Repeat with the other
two cords.
Do the same in the other three areas of
the cross.
When the glue is dry, cut off the excess
material. |
|
| |
|
|
|
|
|
By
using any text or images on Free Macrame
Patterns, you are agreeing to our Terms
of Use
|
|
|
|
|
Have
any comments about the Cross Design? Contact
Me.
|
|
|
|
|
|
|
| |