Description:
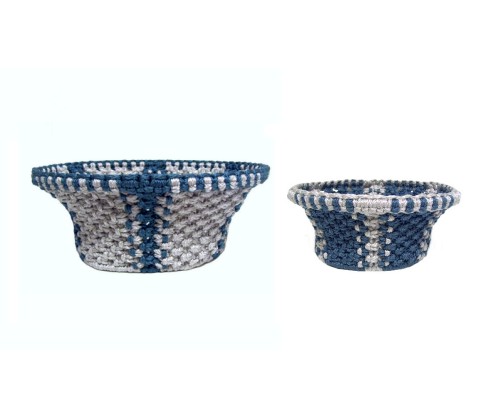
The Contrast Basket features two colors, with one
color used to form a striped design on the sides
and bottom. The image above shows two color
variations.
The mounting technique at the top of the basket is
unique. The Larks Head knots are surrounded
by a Square knot design made with a contrasting
color. This creates a more elegant
appearance and makes the rim of the basket stand
out more.
The bottom is flexible because there is no ring in
that area. The cords are unraveled and fluffed on
the inside of the basket. That provides a
soft cushion for fruits, vegetables, or other
sensitive items.
The striped design is made with Square knots
facing opposite directions, so be sure you can tie
both right and left SK before you get started.
Special thanks goes to Sharon Haddix for inspiring
me to create this unique design.
Supplies
Needed:
4mm Macrame cord (See total amount in
Preparation)
Step 1:
You start the Contrast Basket by choosing which
size you want to make, then use the chart below to
determine the quantity and length of the
cords.
Important:
The height of the basket is usually 1/2 the
width. Increase the length of the cords if
you plan to increase the height.
Contact
me for the formula, if you want to
make a size different than what is shown
below. I recommend the basket be at least 7
inches in size.
The measurements below have been recently updated
to make them more accurate. You may need to make
adjustments to the length of the cords if the ring
you use is thick plastic or wood rather than
metal.
Basket
Size
Ring
Size
Color A
Color B
Mounting
(Color B)
Total
Material
7
x 3.5
7 inches
30 cords
56 inches
10 cords
56 inches
5 yards
A = 50 yards
B = 25 yards
8
x 4
8 inches
36 cords
64 inches
12 cords
64 inches
5.5 yards
A = 70 yards
B = 30 yards
9
x 4.5
9 inches
42 cords
72 inches
14 cords
72 inches
6.5
yards
A = 90 yards
B = 40 yards
10
x 5
10 inches
48 cords
80 inches
16 cords
80 inches
7 yards
A = 110
yards
B = 50 yards
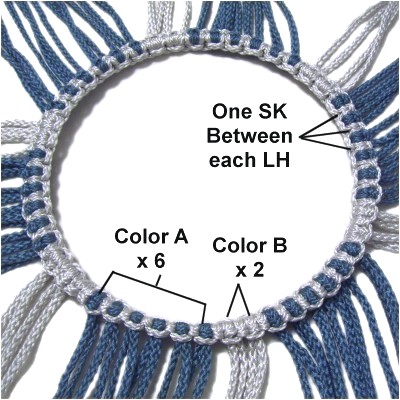
Mounting the Cords
Step 2:
Divide the working cords cut with color
A into groups of 6 cords. Divide
the color
B cords into pairs of 2 cords.
In the images for the Contrast Basket, color A is
blue and color B is gray.
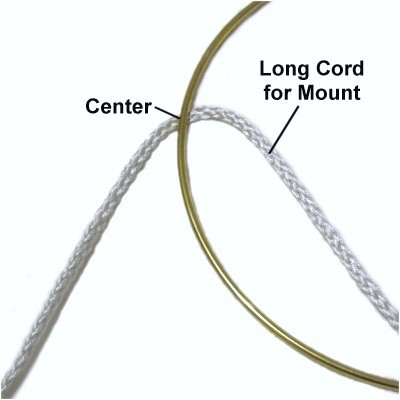
The long cord used for the Square knot mounting
technique is attached first (color B). It is
called the "mounting cord" in the instructions.
Fold the mounting cord
in half and place it under
the ring as shown.
The SK are tied vertically
along the ring. So you can hold the
ring between your knees while you work.
Tie the first
half of the Square knot:
Pass the left
halfover
the ring and under
the right half, heading right.
Then move the right
halfunder
the ring and over
the left half, heading left.
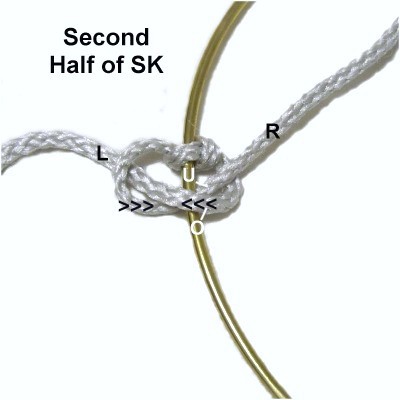
Tie the second
half of the SK:
Pass the left
halfover
the ring and under
the right half, heading left.
Pass the right
halfunder
the ring and over
the left half, heading right.
Tighten the knot.
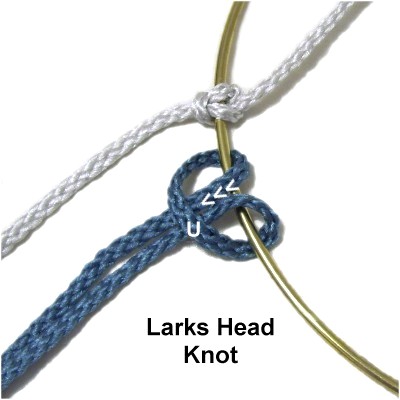
Step
3: Place one group of six color
A cords close to you.
Fold one in half and slide it under
the ring.
The fold should be on the outside
of the ring, with the remainder inside
it.
Complete the
Larks Head knot by both halves over
the ring and under
the folded area.
Tighten the knot, then slide it next to
the Square knot.
Step
4: Tie the next SK with the mounting
cord, placing it on the other
side of the Larks Head knot so it's
surrounded.
Make sure the mounting cord is not
twisted, and rests under
the head when you tighten it.
Step
5:Repeat
steps 3 and 4 with the remaining
five color
A cords in the group, tying one
SK between each one.
Then mount two color
B cords, followed by six more
color A cords. Continue this pattern
until all the working cords are on the
ring.
Important:
After you mount the last working cord, tie only
the first half
of another Square Knot, so the cords remain evenly
spaced.
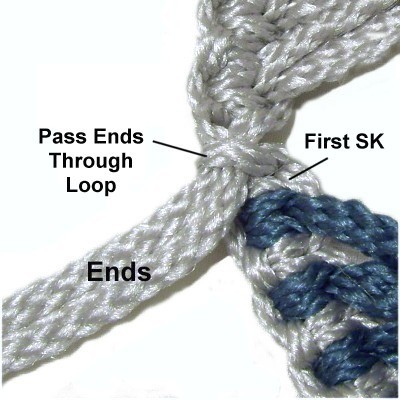
Locate the loop in the back
of the FIRST SK you tied onto the ring.
Pass the ends
of the mounting cord through that loop,
and pull firmly. The first SK and
the last 1/2 SK should be touching
each other.
Tie the ends together and finish them off
in the manner most appropriate for your
material.
Contrast Basket Design
Step
6: Tie the first row of
Square Knots using groups of four
cords. Start with four color
B cords, then move all the way
around the design.
Tighten the knots firmly so they are close
to the mounting knots.
Important:
The first row of ASK for the Contrast Basket can
be done while the ring is flat on your board.
The remaining rows should be made with the ring upright
or hanging from a hook in the ceiling.
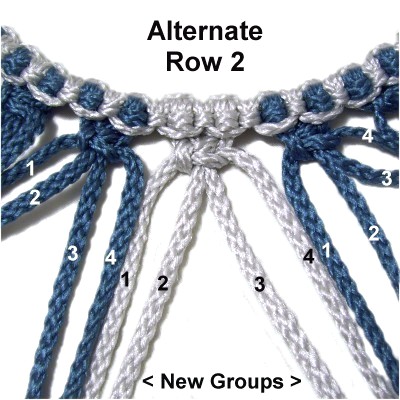
Step
7: For the next row, you
need toalternate
the cords. So locate one group of
four color
B cords as well as a group of
color A cords on bothsides
of it.
Mentally number the cords in each group.
Then combine cords 3 and 4 from one SK
with cords 1 and 2 from the SK next to
it. These are the new groups for the
second row of the Contrast Basket.
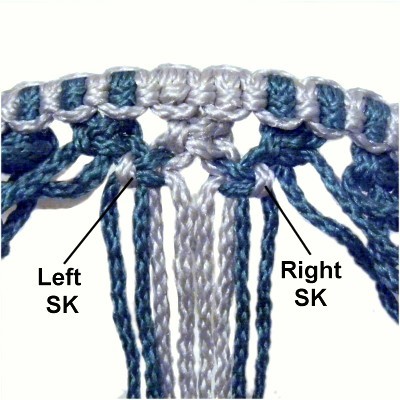
Tie a LEFT SK
with the new group on the left.
Tie a RIGHT SK with the group on the
right.
The heads
of these square knots should be
color B. Make adjustments
if they are not.
Designer's
Tip: The rows of ASK need to be
close to each other, or the Contrast Basket will
sag.
After each SK is tightened, pull the fillers
firmly to eliminate any gaps between the rows.
Step
8:Repeat
steps 6 and 7 several times,
until you have tied enough rows to result
in a height 1/2 the ring size. So
for an 8-inch ring, the height should be
at least 4 inches.
Stop on an even
numbered row, where the colors
are combined to form the stripes.
Lower Edge and Bottom
The lower edge of the
Contrast Basket is made so you can fold the cords
to create the bottom. This will create a flexible
design, which is important if you are using it for
fruits and vegetables. You can attach the cords to
another ring if you prefer a more rigid
bottom.
Step 9:
Measure the basket all the way around
(circumference) close to the last row of Square
Knots. Add
6 inches to that measurement, then cut
one holding cord to that length.
Arrange the
holding cord horizontally,
close to the last row of ASK.
Move the holding cord as needed so one end
is 3 inches from the place where you start
the next step.
Step
10: Mentally number the
four cords coming from one SK.
Attach cords 2 and 3 (fillers) to the
holding cord with a single
Half Hitch. Attach cord 4 with a double
Half Hitch.
Do not
attach cord 1 until the next step,
so it's the LAST one you tie onto the
holding cord.
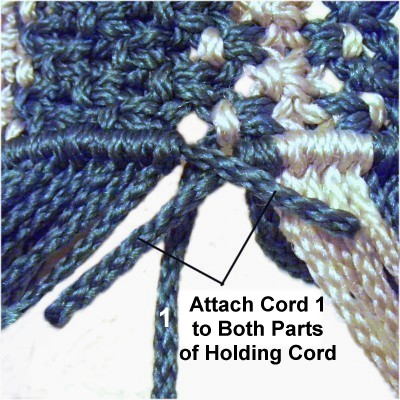
Step
11: Attach the remaining
cords in the same manner. Cords
1 and 4 from each SK should be
attached with a double
Half Hitch.
Attach cord 1 from the SK you started
with, passing it around BOTH parts of the
holding cord. Make sure you tie a double
Half Hitch.
Step
12: Turn the Contrast
Basket upside down, then tie the two ends
of the holding cord together. The knot
should rest inside
the basket.
Shorten the ends so they are easy to
identify. You should not use them to
make the bottom.
From this point onward, you will be making the bottom
of the Contrast Basket. You should work on
it with the basket upside down on your work
surface rather than hanging.
As you tie each row of ASK, you move from the edge
(step 11) heading toward the center. You
fold the cords so they are horizontal. The sides
of the basket are vertical.
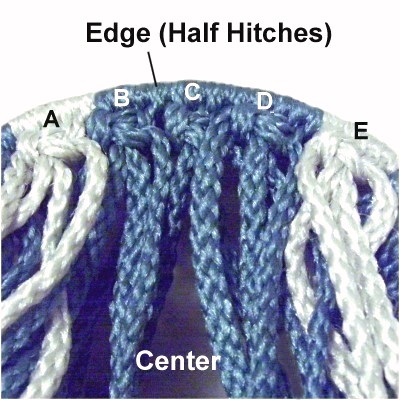
Step
13: Tie one row of ASK with
groups of four cords. Start with
four color
B cords, keeping the same pattern
as the rest of the basket.
Mentally label the five knots starting
from a color
B on the left to another one on
the right (total of 20 cords). In this
image they are labeled A - E.
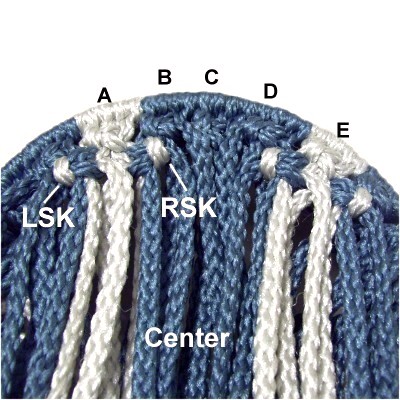
Step
14: Alternate the
cords for row 2, tying only the knots with
combined
colors, which come from the knots
labeled A + B and D + E.
Remember to make the left and right SK as
you did the rest of the basket.
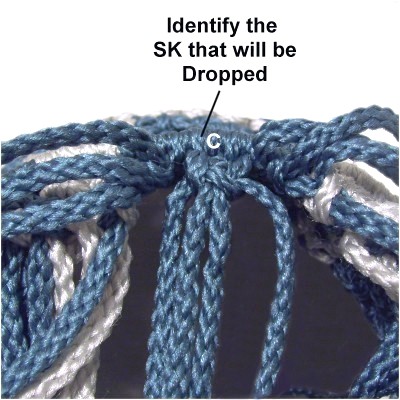
Step
15: Identify the four cords used
to make knot C, which is color
A. These four cords will be
dropped
(no longer used), to keep the bottom of
the Contrast Basket flat.
Push all four cords inside
the basket. It helps to use a clip
or tape to keep them out of the way.
Locate cords 3 - 4 from knot B with 1
- 2 from knot D.
These are the only cords left in the
20-cord group, since the others have been
used or dropped.
Tie the SK
with the cords you just located from the
knots labeled B and D.
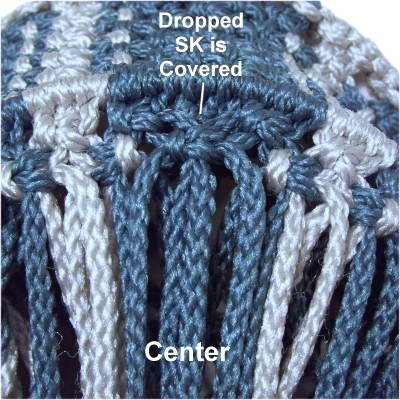
Pull the cords as you tighten to move all
the knots closer together. The
dropped SK should be covered, so the gap
is as small as possible.
Adjust the tension as needed, so the knots
lie flat.
Step 16:Repeat
step 14 and 15 with the remaining cords,
to complete row 2 for the bottom of the Contrast
Basket.
Make sure you work with groups of 20, which should
consist of:
Four color B cords (knot A)
Twelve color A cords
Four color B cords (knot E)
Step
17: Tie the remaining rows,
moving toward the center.
Drop color
A cords every row, or every two
rows (depending on size).
See
designer's tip below.
Designer's
Tip: The number of rows you tie
will depend on the size of the basket.
For the smallest size (7-inch), drop one SK in
each section every
row.
The larger sizes (8 -10 inches) will require you
to tie more rows, so you can drop cords every
other row.
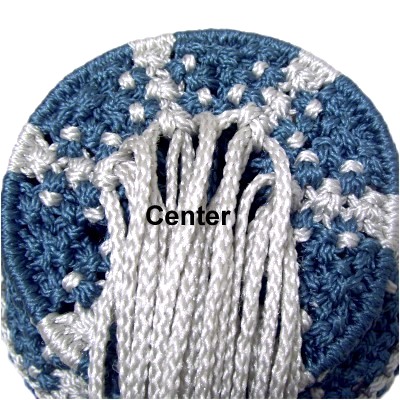
Step
18: Continue to drop color
B cords
every row,
tying enough knots to completely
close the bottom of the basket.
Make sure the bottom remains flat. You can
tie Square knots without fillers if
necessary.
Finishing Touches
Step
19: Push all the cords inside the
Contrast Basket. Turn
it inside out.
Trim the color
B cords down to 1-inch long, then
unravel them.
Do the same with the color
A cords closest
tothe
color B cords.
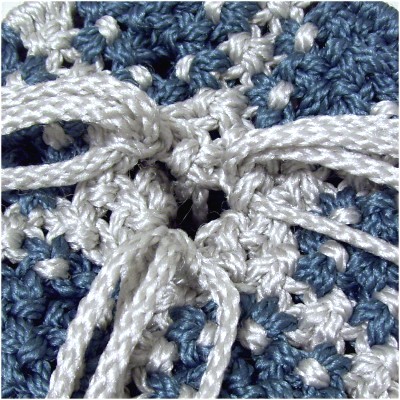
The cords
further back from the center need to be
brought closer to the others. This
includes the ends of the holding cord
(from step 12).
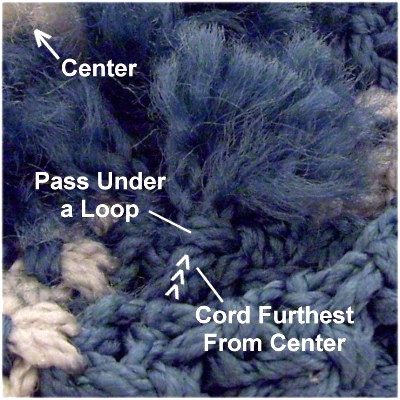
Pull each cord under one or more loops,
heading toward the center. Apply glue to
hold them in place.
When the glue
is dry, trim the cords to 1-inch and
unravel each one to create the soft
bottom.
Turn the basket back to the way it's
supposed to be, and you're done.
By
using any text or images on Free Macrame
Patterns, you are agreeing to ourTerms
of Use