|
|
| |
|
|
|
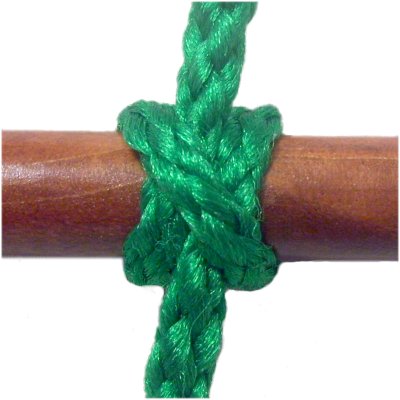
Description: The Clove Hitch is
a common Macrame knot, which has several
variations that can be used in Macrame
projects. It provides a good strong hold,
which is why it's so popular.
The Double Half Hitch
is often considered the same knot, especially in
vintage Macrame books. But the focus here is
on the BACK of the knot, where the crossed
elements are visible.
Important:
The instructions on this page show the cord
secured below
the dowel in all the designs except for the Boa
Knot. In many Macrame patterns, you make the
knot starting with the cord above the
dowel. The over - under pattern may
also be different, depending on the direction the
knots are tied.
The variations described on this page are
sometimes called constriction
knots, because they have a strong hold
and snake-like coils or twists.
Variations Described Below:
- Basic Design
- Constrictor Knot
- Clove Loop
- Boa Knot
|
| |
| |
| |
|
|
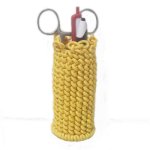
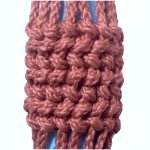
The Paracord
Container is made with the
Clove Hitch, so is a good project to help
you practice this knotting technique.
Click on the image or link to visit the
page. |
|
| |
| |
|
|
|
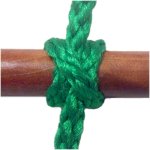
Spanish
Hitching features the Clove
Hitch.
The knots are tied a little differently,
but the basic concept is the same.
Click on the image or link to view the
page. |
|
|
|
| |
|

|
| |
Basic Design
|
|
 |
| |
|
To practice a basic
Clove Hitch, you need one cord, at least 18 inches
long.
You will also need a dowel (or other item) to hold
the knot.
In a Macrame project, you can attach this knot to
a round or square ring, a purse handle, or even a
holding cord. |
| |
| |
| |
|
|
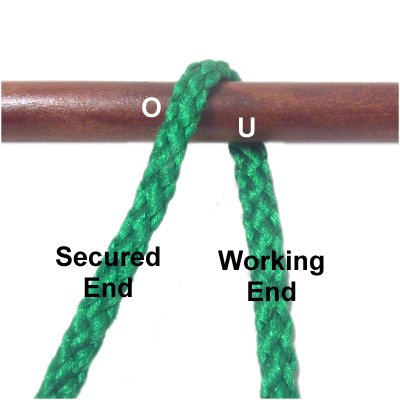
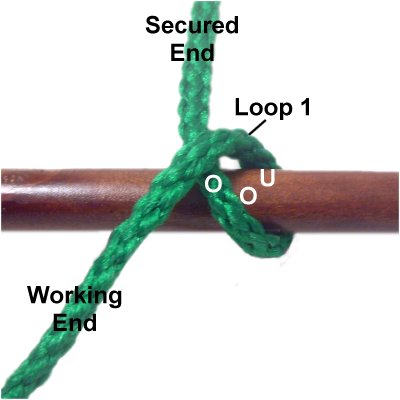
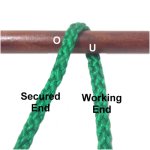
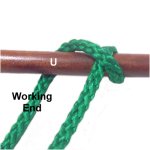
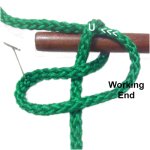
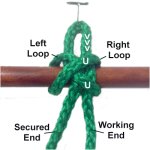
Step 1:
Secure one end of the cord to
your work surface or project board, in
front of the dowel.
Move the working end over
the dowel, then under
it. Pull it slightly to the right of
the secured end. |
|
| |
|
| |
|
|
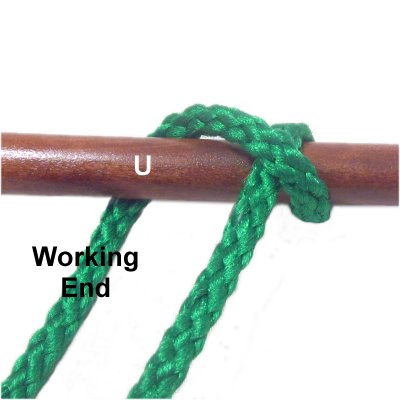
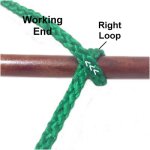
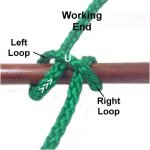
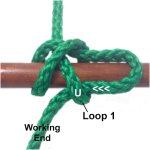
Step
2: To complete the right
loop, pull the working end backward
and to the left, crossing over
the secured portion.
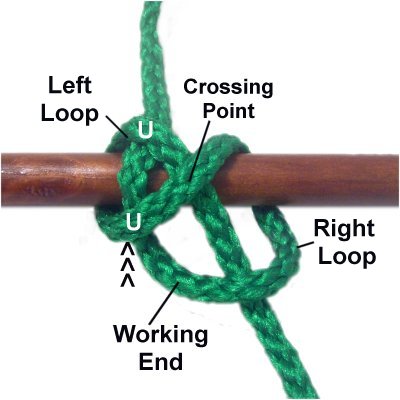
Designer's
Tip: Remember that a loop
always has a crossing point. |
|
| |
|
| |
|
|
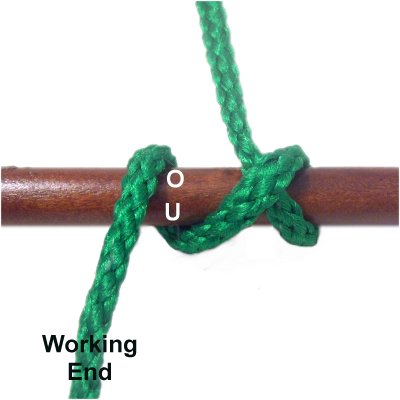
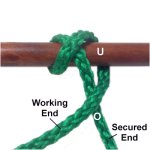
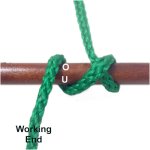
Step
3: Start the left
loop by moving the working end
under
the dowel, to the left
of the right loop.
|
|
| |
|
|
|
|
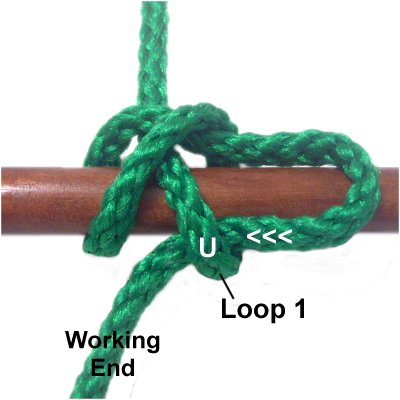
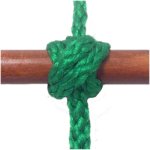
Step
4: Complete the left loop
by passing the working end under
the cord in the area between
the two loops, heading backward.
Pull both ends to tighten the Clove
Hitch, sliding the two loops close to
each other.
|
|
| |
|
|
|
|
|
Constrictor Knot
|
| |
 |
|
| |
The Constrictor Knot
is a variation of the basic Clove Hitch. The
primary difference is that it's designed to be
placed near the end of a dowel. You can
include this design when using the basic knot,
since they look the same.
To practice, you need one 18-inch cord, as well as
a dowel to hold the knot. |
| |
| |
|
|
|
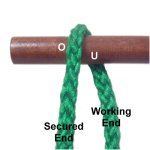
Step
1: Secure one end of the
cord in front of the dowel.
Bring the working end of the cord over
the dowel, then under
it.
The cord should rest approximately 1-inch
from the left end of the dowel. |
|
|
|
|
|
|
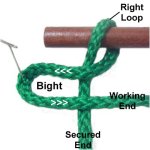
Step
2: To complete the right loop,
pull the working end to the left, passing
over
the secured end.
Bring it back to the right to form a bight,
and secure it where it curves. |
|
|
|
|
|
Step
3: Move the working end up to the
right loop.
Pass it under
the segment that rests on top of the
dowel, heading right
to left. |
|
|
|
|
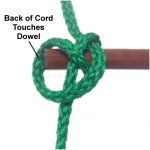
Step
4: Slip the bight over
the end of the dowel.
Make sure the top surface of the cord
remains face up, and the back surface
touches the dowel.
Tighten the Clove Hitch by pulling on
the ends.
|
|
|
| |
|
|
|
|
Clove Loop
|
|

|
|
|
This interesting variation of the Clove Hitch is
the one most often used for mounting
cords. It has a moveable
picot loop at the top, and the two ends exit the
knot below
the dowel.
It's best to use this technique when you have
other knots being tied below it, so the loop
cannot be accidentally pulled out.
To practice, you need one cord at least 25 inches
long, as well as a dowel (or other item) to hold
the knot. |
|
|
|
|
|
Step
1: Secure one end of the cord in
front of the dowel.
Make the left
loop by passing the working end over,
then under
the dowel.
Bring the cord to the right, crossing over
the secured end. |
|
|
|
|
|
|
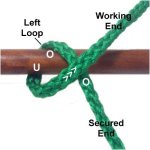
Step
2: Move the working end under
the dowel, to the left
of the first loop.
Bring it over
the secured end as you pull it to the
left. |
|
|
|

|
|
Step
3: Bring the working end under
the left loop, heading backward.
Make sure you stay to the left
of the crossing point between the two
loops. |
|
|
|
|
|
Step
4: Secure the working end
1-inch above the dowel. Bring it
forward, passing under
the right
loop.
Make sure you stay to the right
of the crossed area in front.
Tighten the Clove Hitch. Adjust the
picot loop by pulling on the working end.
|
|
|
|
|
|
|
Boa Knot
|
|
|
|
|
The Boa Knot could also be called a Double Clove
Hitch because there are four loops instead of
two.
The resulting knot is very strong, and can be used
in large items like plant hangers. It can be
attached to rings as well as dowels and curtain
rods.
One of the key differences with this variation is
that the cord is secured above
the dowel. So this gives you an opportunity
to see how the Clove Hitch can be altered from the
basic design.
To practice, you need one cord, at least 36 inches
long. You also need a dowel. |
|
|
|

|
|
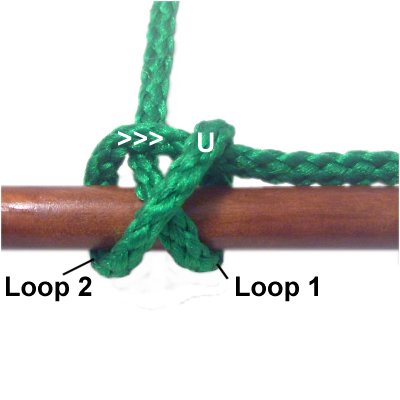
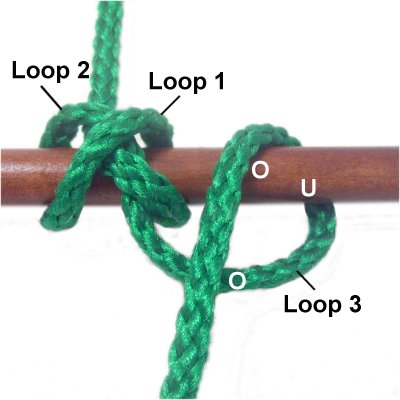
Step
1: Secure one end of the
cord behind
the dowel.
Bring it over
the dowel, then under
it.
Complete Loop
1 by crossing the working end over
the secured portion, heading left. |
|
| |
|
|
|
Step
2: Begin Loop 2 by passing
the working under,
then over
the dowel.
This takes place to the left
of Loop 1. |
|
|
|

|
|
Step
3: Complete Loop
2 by passing the working end over
the secured end, and under
Loop 1.
So you will be moving horizontally
from left to right, near the top
of the dowel. |
|
|
|
|
|
Step
4: Bring the working end
down near the bottom
of
the dowel, and pass it under
Loop 1, heading right to left. |
|
|
|

|
|
Step
5: Make Loop
3 by passing the working end under-over
the dowel, to the right
of Loop 1.
Cross over
the lower
area of the loop as you pull the
cord to complete the loop. |
|
|
|
|
|
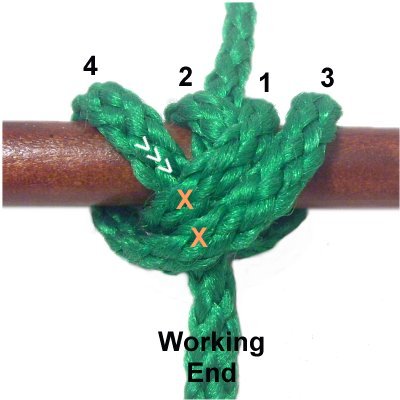
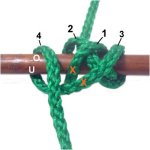
Step
6: Make Loop
4 by passing the working end
around the dowel (under
- over).
Locate the two segments that are marked
with an X in this image. They are to
the left of loop 1 and 3. |
|
|
|

|
|
Step
7: Make Loop
4 by passing the working end
around the dowel (under
- over).
Pass the working end under
the segments marked with an X.
Tighten the knot gradually.
|
|
|
| |
| |
|
|
|
| By using any
text or images on Free Macrame Patterns, you are
agreeing to our Terms of Use |
|
|
|
| Have
any comments about the Clove Hitch? Contact Me.
|
|
|
|
|
|
|
|