|
|
| |
 |
| |
| |
|
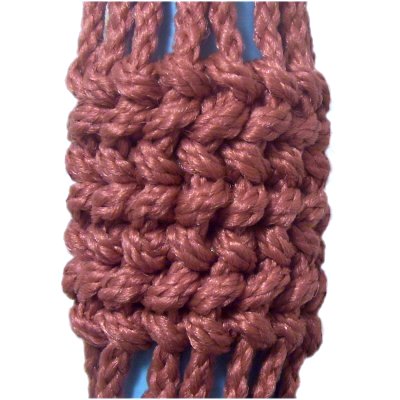
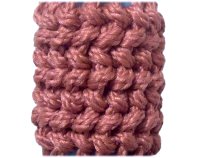
Description: Spanish Hitching
is a unique way to cover thick dowels and other
tube shaped objects. You can also cover
wine bottles and drinking glasses with this
technique.
This Macrame design features the Clove Hitch,
which is the same as the
back of a Double Half Hitch. So
you see the crossed elements rather than a
bar. The knots are tied alternating in two
directions.
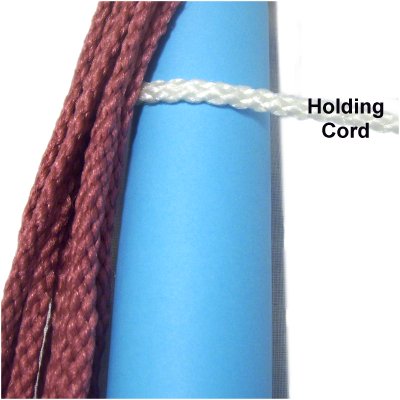
Since the knots used in this design are hitches,
they need to be attached to a holding cord,
which wraps around the item you are
covering.
|
| |
| |
|
| |
Right Clove Hitch
|
| |
 |
|
|
| |
|
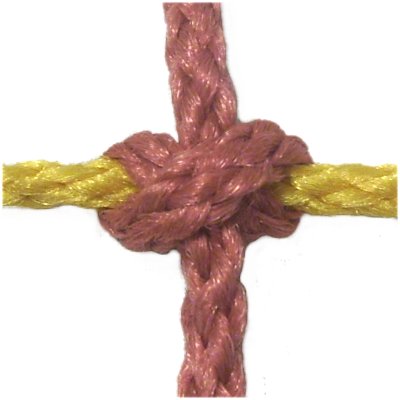
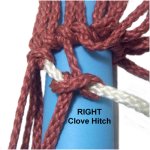
To properly create Spanish Hitching, you need
to know how to tie the Clove Hitch in both
directions.
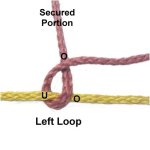
The first one you will learn is the RIGHT Clove
Hitch. The first loop is on the right,
followed by the one on the left.
Secure a holding cord to your board
horizontally, with tension. That's the
gold cord in the images shown.
Secure a working cord vertically to your board
(rose color in images).
|
|
| |
| |
|
|
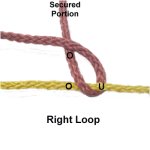
Right
Loop: Move the working
cord over
- under the holding
cord, rotating counter-clockwise.
Complete the loop by passing it over
the secured portion of the working cord,
as you pull it to the left.
|
|
| |
|
|
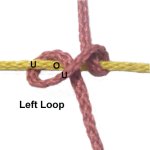
Left Loop: Pass the working
cord
under
- over the holding
cord, rotating
clockwise.
Complete the loop by passing it under
the diagonal segment of the working
cord, between the two loops.
|
|
|
| |
|
|
|
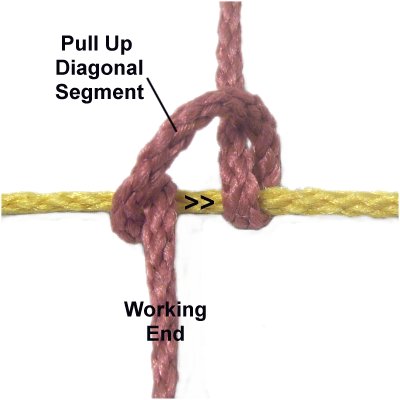
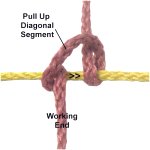
The best way
to tighten the knots in Spanish Hitching
is to pull up on the diagonal segment in
the center area. That will tighten
the first loop.
Then pull on the working end to tighten
the second loop. Slide the
second loop close to to the first one. |
|
|
| |
|
|
|
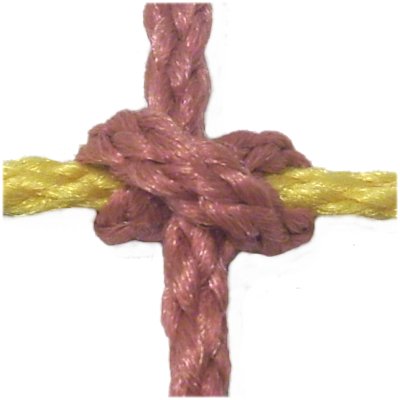
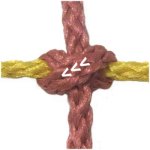
This image
shows the diagonal area in the center of
the RIGHT Clove Hitch. It runs from
upper right to lower left (arrows).
|
|
|
| |
|
|

|
| |
Left Clove Hitch
|
|

|
|
|
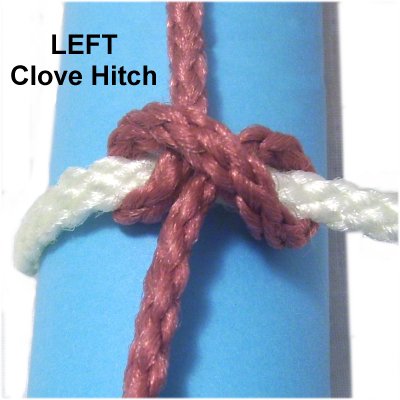
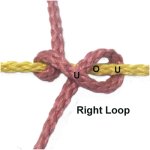
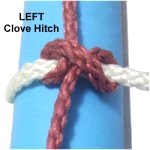
| In Spanish Hitching, you alternate the direction
you tie the knots. So now you will learn to
tie LEFT Clove Hitches. |
|
| |
| |
|
|
Left
Loop: Pass the working cord over
- under the holding
cord, rotating clockwise.
Complete the loop by passing it over
the secured portion of the working cord,
as you pull it to the right.
|
|
| |
|
|
|
Right Loop: Move the
working cord under
- over the holding
cord, rotating counter-clockwise.
Complete the loop by passing it under
the diagonal segment of the working
cord, between the two loops.
|
|
|
| |
|
|
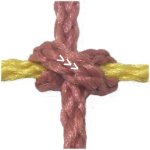
Tighten the
Clove Hitch by pulling on the center area
to tighten the first loop. Then pull
on the working end to tighten the second
loop.
The diagonal segment starts on the upper
right, and down to the lower left
(arrows). |
|
|
| |
|
|
|
| |
Spanish Hitching Design
|
| |
| |
|
Now it's time to work on the actual Spanish
Hitching design. Note that these instructions
are for practicing only.
When using this technique in a Macrame project,
the holding
cord needs to be longer than usual,
since it wraps around the item being
covered. You will need to measure the
circumference of the container all the way
around. Multiply that by the number of rows you
will be tying, which depends on the size
material you are using:
- 2mm size material -- 6 rows per inch
- 4mm size material -- 3 rows per inch
- 6mm size material -- 2 rows per inch
The length of the working
cords is the same as what you would
normally need, which is 3.5 x the length you are
making (top to bottom). Double that if you
are folding the cords when you mount them to the
item being covered.
Step 1: To practice, cut at
least 10 working cords, each 30 inches long. You
may need more, depending on the tube size.
Cut one holding cord, at least 36 inches long.
In the images below, that's the white cord.
Secure the holding
cord to the back of a
paper tube. It should start out vertical.
Curve it horizontally when you are ready to
begin.
Use tape or a rubber band to secure the working cords
to the top
of the tube, so they are vertical.
Spread them out so they will cover the entire
tube.
|
| |
| |

|
|
Bring the holding
cord around to the front
of the tube
(left to right), under the
working cords.
You can secure it, or hold it in one
hand while tying the knots with the
other hand.
The first row of knots should be as
close to the top as possible.
|
|
| |
|
|
|
Step
2: Tie a LEFT Clove Hitch
with each working cord, onto the holding
cord.
Keep the holding cord horizontal as you
tighten each knot. |
|
|
|
|
Step 3:
When you get to the back, pass the holding
cord around the secured tail once or
twice, then bring it back to the front of the tube
in preparation for the next row.
You can pull the holding cord to remove the slack,
if the knots have gaps between them. |
|
|
| |
|
|
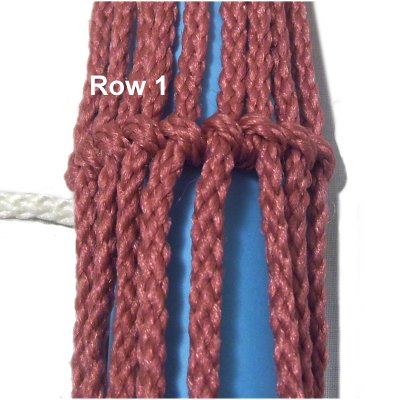
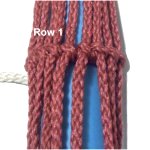
This shows what
the first row of Clove Hitches will look
like when you are through.
Make sure the row is straight, so the
Spanish Hitching looks neat. |
|
| |
|
| |
|
|
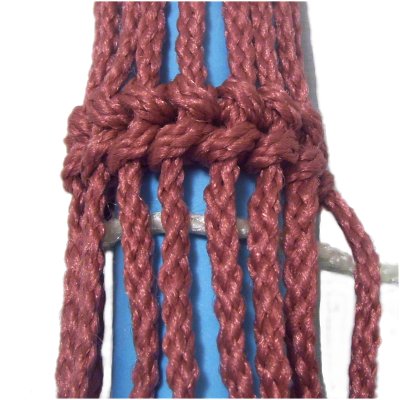
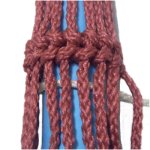
Step
4: Wrap the holding
cord around the tube, passing under
the working cords close to the first row.
Attach each of the working cords to it
with a RIGHT Clove Hitch, moving left to
right. See
tip below. |
|
| |
|
| |
Designer's
Tip: Because you are moving left to
right, it gets awkward to tie the right Clove
Hitches.
The best solution is to tie the knot loosely
with the holding cord arranged diagonally, as
shown in the image above.
Then bring the holding cord up to rest close to
the first row, and arrange it horizontally.
Tighten the knot by pulling up the diagonal
segment in the center, followed by the
working end.
|
| |
|
| |
|
|
By tightening in this manner, the two
rows will be close together, which is an
important part of Spanish Hitching.
|
|
| |
|
| |
|
|
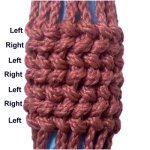
To continue, wrap the holding
cord around, and tie the 3rd
row with left
Clove Hitches.
The 4th row is tied with right
Clove Hitches.
Just keep alternating if you wish to make
more rows.
|
|
| |
| |
|
|
|
By
using any text or images on Free Macrame
Patterns, you are agreeing to our Terms
of Use
|
|
|
| |
|
Have
any comments about Spanish Hitching? Contact
Me.
|
|
|
| |
|
|
| |