|
|
| |
|
|
|
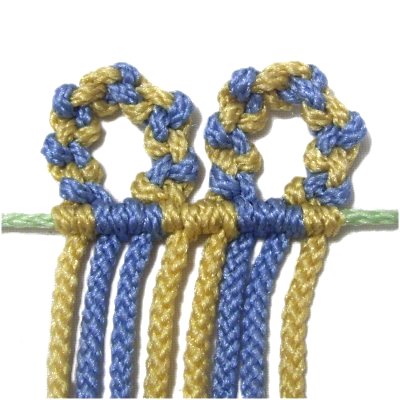
Description:
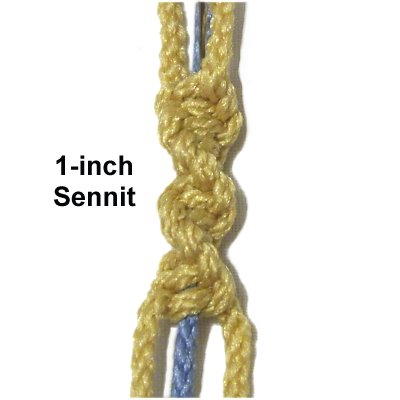
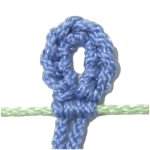
The Chain Picot Mount features a short sennit,
rather than a single knot. It is folded to
form a loop, which is called a picot or
scallop. The sennit is then mounted to a
holding cord, ring, or dowel.
This takes place at the beginning of a Macrame
project, so you need to have a plan as to which
style will best suit your needs.
The first design described below is considered a
vintage technique, which was used in Macrame
patterns of the early 1900's. The
other two are variations that show how other knots
can be used in the same way.
The Double Half Hitch
is an important part of these designs, so be sure
you know how to tie them.
|
| |
| |
| |
 |
| |
Alternating Half Hitch Mount
|
|
|
| |
Description:
The "official" Chain Picot Mount found in old
Macrame books is made with the Alternating Half
Hitch.
Using two colors is helpful, especially if you are
a beginner.
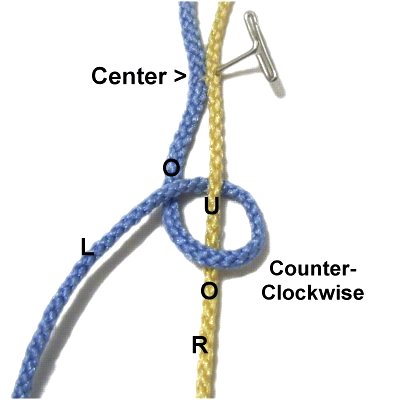
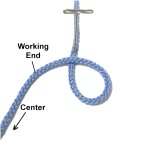
Preparation: To practice, arrange
two working cords vertically on your board.
Secure the cords at the center,
which is where you will start the knots.
You also need one holding cord for step 5. |
|
| |
| |
|
|
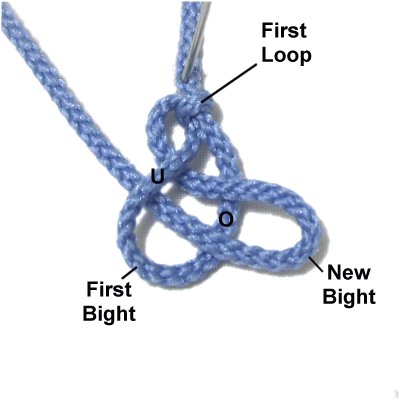
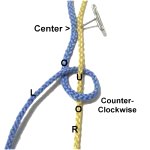
Step
1: Make a counter-clockwise
Half Hitch with the left
cord, by passing it over
- under the right cord.
As you pull it left, pass over
to complete the loop.
Tighten firmly, so the knot rests near the
pin. |
|
| |
|
|
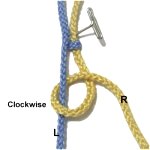
Step
2: Use the right
cord to make a clockwise
Half Hitch onto the left cord.
|
|
| |
|
| |

|
|
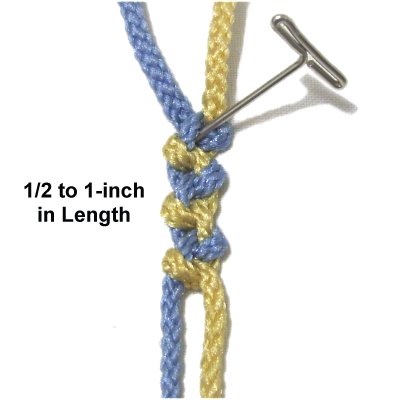
Step
3: Repeat
steps 1 and 2 several times to
make a sennit approximately 1/2-inch to
1-inch in length.
The Chain Picot Mount can be any size, so
use your judgement as to how tall you need
it to be for your project. |
|
| |
|
| |
|
|
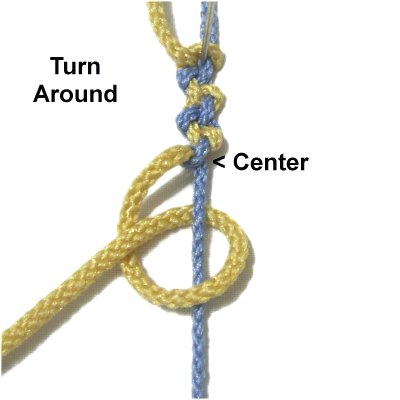
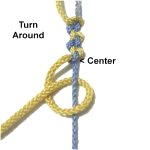
Step
4: Turn the entire sennit
around on your board.
Repeat
steps 1 - 3 with the other half
of the cords, starting at the center
again.
Tie the same number of knots.
|
|
| |
|
| |
|
|
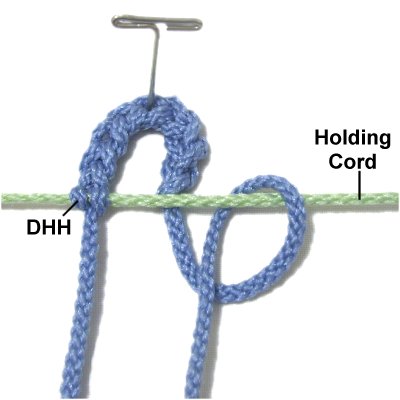
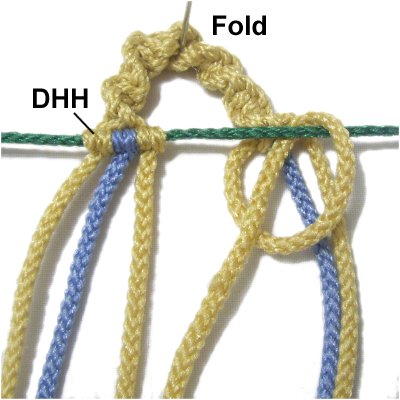
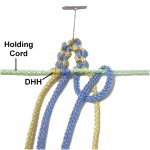
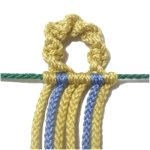
Step
5: Secure the holding
cord to your board horizontally,
stretching it so it has tension.
Fold the sennit in half and place it
next to the holding cord, sliding the
cords under
it.
Attach each half of the working cords
to the holding cord with a Double Half
Hitch (DHH).
|
|
| |
|
|
|
|
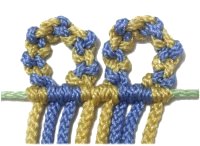
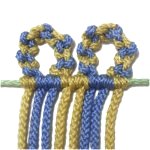
Step
6: Repeat
steps 1 - 5 to repeat the
Chain Picot Mount with more cords
(optional).
|
|
| |
|
|
|
|
|
Chain Sennit Mount
|
 |
| |
|
Since the Chain Picot
Mount can be made with other types of knots, I've
added this one for you to experiment with.
The knot that is used to make the loop is called
the Chain Sennit,
Caterpillar Sennit, or Slipknot Chain.
This design will
not work with 6mm material, because it's too
bulky.
You need one working cord at least 36 inches
long. Place it vertically on
your board. Mark the center with a piece of tape.
For 2mm size material, measure 4.5 inches backward from
the center and place a pin to mark the spot.
For 4mm material, mark the spot 9 inches backward
from the center. |
| |
| |
| |
|
|
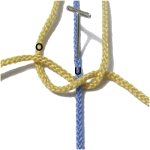
Step
1: Make a counter-clockwise
loop next to the pin.
The working end of the cord used to make
the loop is the portion that leads to the
center (forward from the pin). |
|
|
|
|
|
|
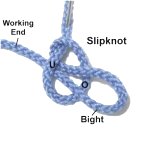
Step
2: Fold the working end to
make bight, and pass it through the loop from below
(under
- over).
Pull the bight
firmly to tighten the first loop around
it. Make sure it rests next to the
pin.
Then pull the working end to make the
bight smaller.
|
|
|
|

|
|
Step
3: Fold the working end to
make a new bight, and pass it through the
previous one from below.
Pull the new bight to tighten, then pull
the working end to make it smaller. |
|
|
|
|
|
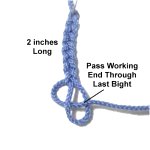
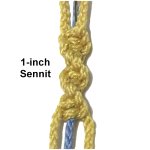
Step
4: Repeat
step 3 several times, until the
sennit is approximately 2 inches long (for
a 1-inch picot).
Pass the working
end through the last bight to
complete the knot. Pull firmly to
tighten.
|
|
|
|

|
|
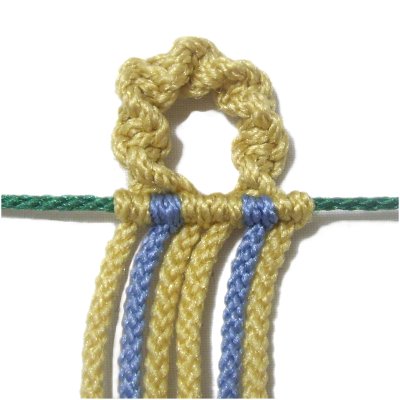
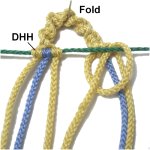
Step
5: Arrange a holding cord
horizontally on your board. Fold the
sennit and place it next to the holding
cord, with both halves of the working cord
under
it.
Attach them with Double Half Hitches.
This Chain Picot Mount can now be repeated
with other cords, if you wish to practice
again.
|
|
|
|
|
|
|
Spiral Stitch Mount
|
|
|
|
|
Description:
The Spiral Stitch
can also be used to make the Chain Picot Mount.
This design is different than the two you just
practiced. The knots twist to form a spiral.
It's also made with three cords.
Unfortunately, this means you can't use it for
Macrame projects made with 6mm
material. You may need to make it
larger than usual when using 4mm material.
I recommend you practice before deciding whether
this design is best for your project.
Preparation:
To practice, you need two working cords at least
36 inches long. You also need one filler and
one holding cord. They can be 12 - 18 inches
long.
Arrange the filler cord vertically, secured at the
center. Place one working cord on each side
of the it, matching the centers. |
|
|
|

|
|
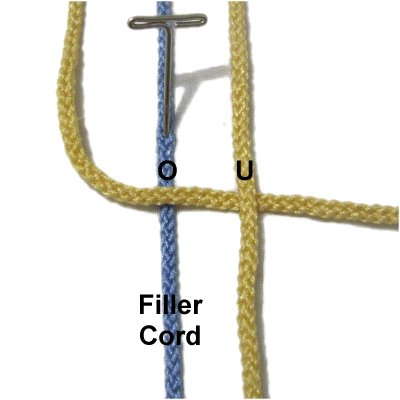
Step
1: Start the Half Knot by
moving the left
working cord over
the filler, and under
the right working cord. |
|
|
|
|
|
|
Step
2: Move the right
working cord under
the filler, and over
the left working cord.
Tighten the Half knot firmly, so that it
rests against the pin at the center.
|
|
|
|
|
|
Step
3: Repeat
steps 1 and 2 five times, then
twist the sennit so the working cords
switch places.
Then tie more Half knots, until the sennit
is 1-inch long. Twist again as
needed.
For 4mm size material, increase the size
to 1.5 inches.
|
|
|
|

|
|
Step
4: Turn the sennit around,
and go back to the center.
Use the other half of the cords to tie the
same number of Half Knots. |
|
|
| |
|
|
|
Step
5: Secure a holding cord
horizontally. Fold the sennit in
half at the center, and place it next to a
holding cord, with the cords under
it.
Attach each cord to the holding cord with
a DHH.
This variation of the Chain Picot Mount
can now be repeated with other cords
(optional). |
|
|
|
| |
| |
|
|
| By using any
text or images on Free Macrame Patterns, you are
agreeing to our Terms of Use |
|
|
|
| Have
any comments about the Chain Picot Mount? Contact
Me. |
|
|
|
|
|
| |
|