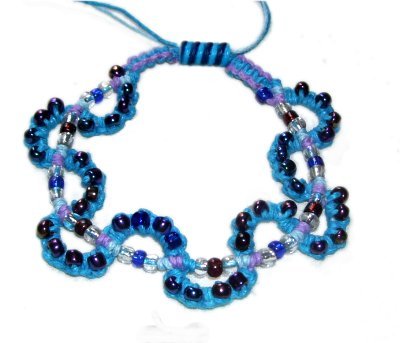
Description:
The Caterpillar Bracelet features a
series of Buttonhole Scallops that alternate on
both sides of a center line. Seed beads are
added so they rest on top, as well as between, the
scallops.
Note: In
the image above, the bracelet design was resting
flat on a surface.
It's important to use beads in the area between
the scallops, or they will be really skinny.
The beads should be the same height
( vertically from hole to hole).
The material used in the example was 1mm Hemp
cord.
Important:
Make sure you use a project board small enough to
turn around easily.
This Micro-Macrame pattern is rated Moderate only
due to the size of the materials used. The
process is relatively easy, so beginners with
experience can make this jewelry item.
Cut one holding
cord 30 inches long. This will run
through the center of the Caterpillar Bracelet.
Cut one working
cord 3 yards long for a 7-inch
Bracelet. For larger sizes, cut the cord
longer (15 inches of material for every 1-inch
increase in size).
Cut two cords for the core,
each 50 inches long. Increase for longer
bracelets.
Prepare the ends with glue to prevent fray and to
stiffen the cord for beading.
In the images shown, both the holding cord and
working cord are blue.
For the core of the Buttonhole Scallops, light
blue and lavender
were used.
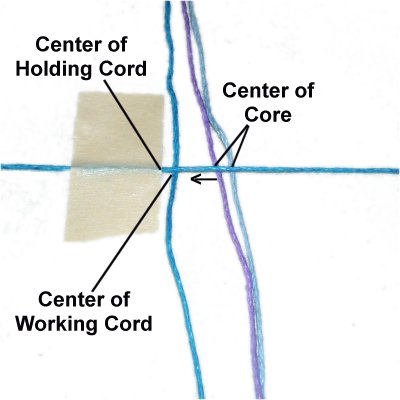
Step 1:
Place the 30-inch holding
cord on your board horizontally.
Secure it with tension in a manner that can be
easily removed. Place a piece of tape at the
center
of the holding cord.
A great way to secure the fine cords used in the
Caterpillar Bracelet is to wrap them around T-Pins
several times and then use tape to hold the end to
your board. This way you can remove the cord
from the pin easily.
Arrange the working
cord vertically next to the tape,
match the ends to center it, and secure
the upper portion.
Do the same with the two cords from the core,
placing them to the right of the working
cord.
All three cords should be close
together.
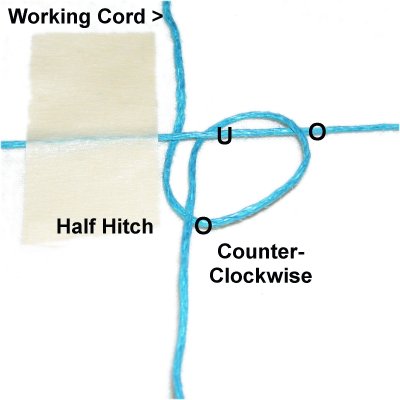
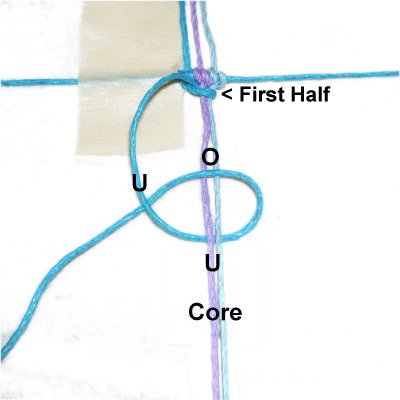
Use the lower
portion of the working
cord to tie a counter-clockwise
Double Half Hitch onto the holding
cord.
The image shows the first knot. The
2nd is to the right of the first.
Repeat with the two cords for the core.
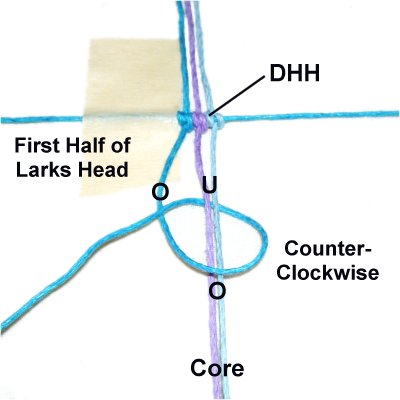
Step
2: Use the working
cord (left) to tie the first half
of the Larks Head knot.
Rotate counter-clockwise,
over
- under the core,
and over
the working cord.
Tie the second
half of the knot by making another counter-clockwise
loop.
Pass under
- over the core
and under
the working
cord (opposite of first half).
Both steps equal one Larks Head knot.
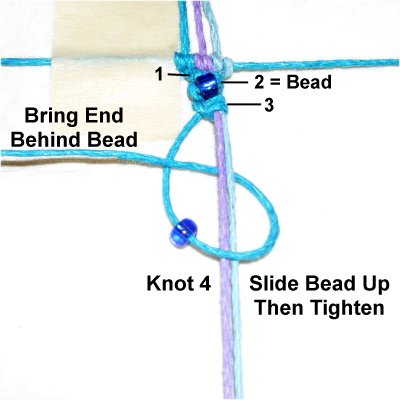
The Beads for the Caterpillar Bracelet are
attached on all the even
numbered knots (2, 4, 6, 8,
etc.). The image below shows knot 4
begin tied.
Attach the bead
to the working cord, and tie the first
half of the Larks Head.
Important:
The loose end of the cord should be pulled
behind
the bead.
Make sure you slide the bead up first, and
then tighten the knot.
Tie the second half of the knot in front
of the bead.
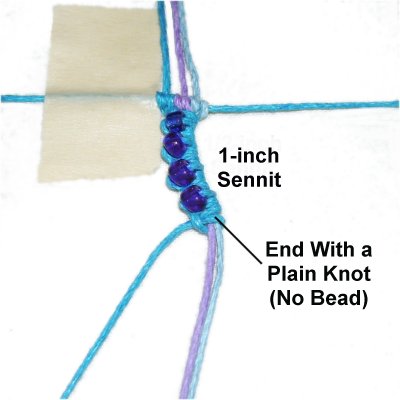
Tie enough
Larks Head knots to make a 1-inch
sennit.
The last knot tied should have no bead.
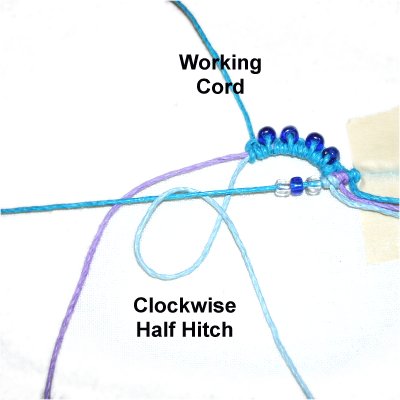
Step
3: Turn
the project board around so the
scallop is above the holding cord.
Attach 3 - 5 beads to the horizontal
holding cord (not the working
cord or core).
Use your judgement in deciding how many --
the more you add, the wider the scallops
will be.
Form the
scallop by bringing the two cords for the
core
down, under
the horizontal holding cord.
Attach both cords with a clockwise
Double
Half Hitch (the image shows only
one).
Make sure they rest against the
beads.
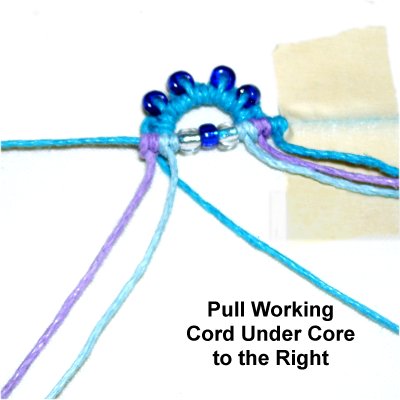
Step
4: Move the working cord
down, passing it under
the core, and to the right.
Now it's in the right position to start
the next scallop for the Caterpillar
Bracelet.
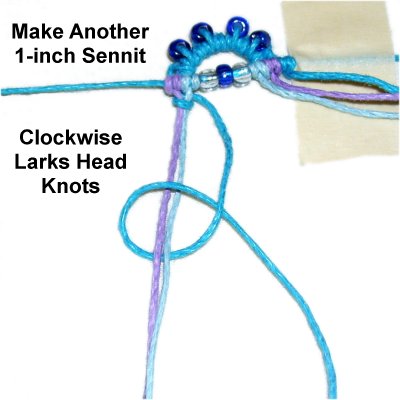
Make another
1-inch sennit of Larks Head knots as in
step 2.
The only change is that the loops are made
in a clockwise
direction.
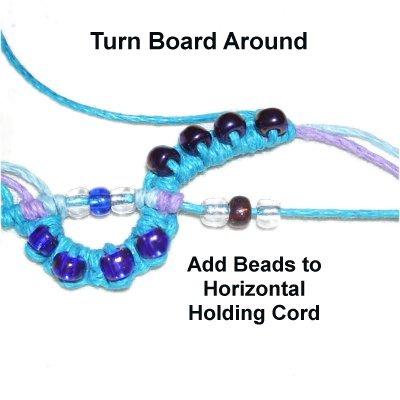
Turn
the board around again.
Add the beads to the horizontal holding
cord.
Make sure they are the same size as the
others, so the scallops are similar in
shape.
Form the 2nd
scallop by bringing the cords for the core
under the horizontal holding cord.
Attach both of them with counter-clockwise
Double Half Hitches.
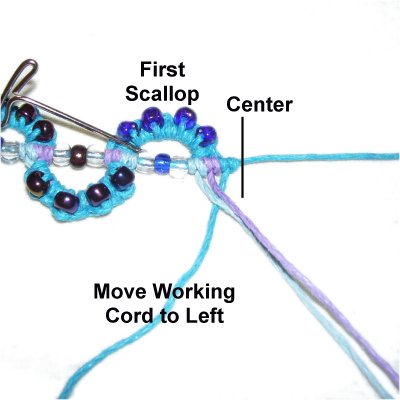
Step
5: Bring the working
cord down under the horizontal
holding cord as well as the core, placing
it on the left.
It's now in it's original position, and
ready for the 3rd scallop of the
Caterpillar Bracelet.
Design Tip:
Here is the key to remembering which side of the
core the working
cord should be placed:
Prior to ODD numbered scallops -- left
Prior to EVEN numbered scallops -- right
Repeat
Step 2, creating the 3rd
scallop.
The Larks Head knots are tied rotating counter-clockwise.
Step 6:
Continue on, repeating steps 3 and 2 to make more
scallops.
Stop when the first half of the Caterpillar
Bracelet measures half the
finished length, and subtract 0.5 inches.
For a 7-inch bracelet, half is 3.5 inches.
Subtract 0.5 inches = stop at 3 inches.
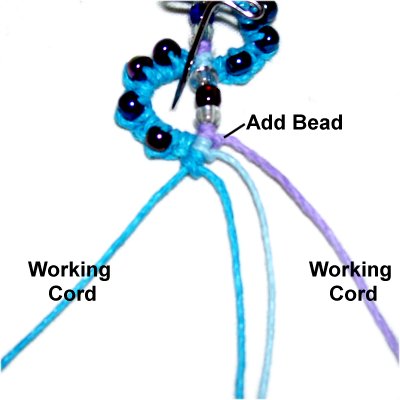
After the last
scallop is tied, attach all
3 cords to the holding cord with
DHH (include working cord).
Step
7: Go back to the center of
the Caterpillar Bracelet and remove the
tape. Turn the bracelet around, so
the first scallop you made is at the top.
Move the working cord to the left of the
core, and start the process again. Repeat
steps 2 - 6.
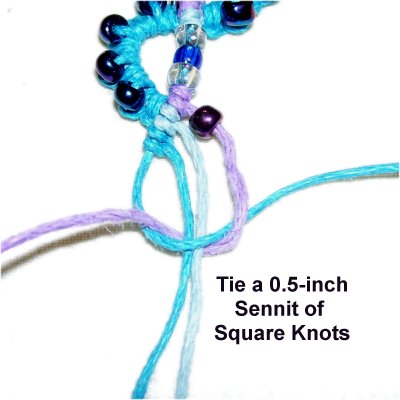
When the
scallops are done, turn the bracelet so
it's vertical.
Organize the cords at one end so the two
on the outside
become the working cords for the
band.
That should turn out to be one that made
up the core, and the horizontal holding
cord.
Tie
a sennit of Square Knots with the working
cords around the two between them.
Stop when it measures 0.5 inches in
length. Repeat this process at the other
end of the bracelet.
Put the
bracelet on your wrist tomake sure it
fits properly. Add or
remove knots as needed.
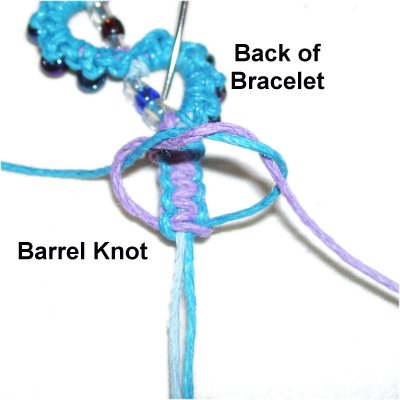
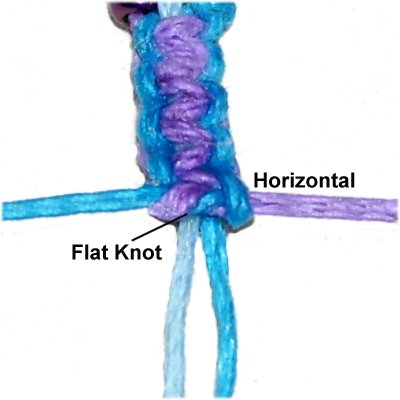
Step
8: Flip the Caterpillar
Bracelet over so you are working in the
back.
Tie a Barrel knot with the two cords used
to make the Square Knot (working cords).
See
Below for tightening instructions.
While
tightening, keep the cords horizontal.
This produces a flat knot rather than a
round one.
Apply glue before the knot is fully
tightened.
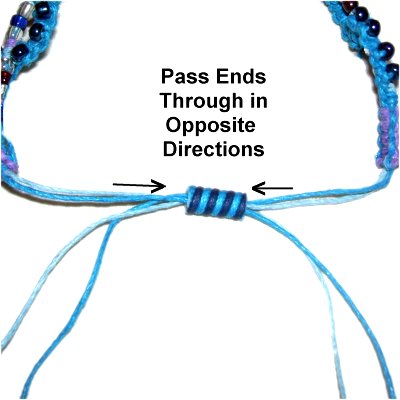
Step
9: Pass the remaining 4
ends through the bead for the clasp, in opposite
directions.
Put the bracelet on your wrist and pull
the ends to close it. Then open it
wide enough to get your hand out.
Hold it steady and measure the distance
between the bead and the last Square knot
tied in the band.
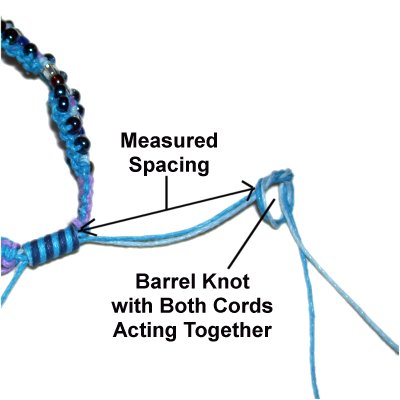
Close the
Caterpillar Bracelet. The
measurement you got in the last step is
the spacing you need between the bead and
the finishing knot.
Leave the correct amount of space, and
then tie a Barrel knot with both cords
acting together as if they were one
cord. Apply glue while tightening it
into a round
shape.
Step 9,
continued: Repeat the Barrel knot
for the other two ends, making sure the spacing is
the same.
By
using any text or images on Free Macrame
Patterns, you are agreeing to ourTerms
of Use