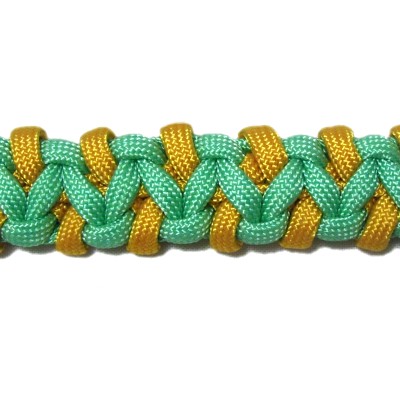
Description:
The Caged Solomon Bar features the Square
Knot, but loops are made with the filler cords,
which makes it unique. This design looks
best with two colors, so the loops stand out.
Both the front and back look nice, so this knot
could be used to make a Macrame belt that's
reversible. The image above shows the front
of the knot. As you make it, you are looking
at the back.
There is a loop at the top that you can use as a
clasp for a bracelet or belt. At the bottom,
you tie a button knot or add a regular button or
bead to the filler cords.
You can start this design in the center and work
in both directions, if your project works out
better that way. There will be no loop.
Beginners new to Macrame should learn how to tie
the Square Knot
before trying this variation.
Parachute cord is used in the example shown.
Please read Cord Preparation
if you plan to use it, so you know how to treat
the tips to prevent unraveling.
The video gallery contains tutorials for a
wide variety of combination knots and
techniques.
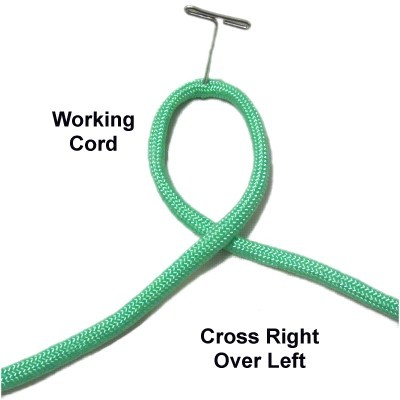
Step
1: To practice, cut two cords at
least 60 inches long.
The cords should be at least 8
x the finished length you are planning to
make if you are using the Caged Solomon Bar in a
project.
Make a loop in
the center
of the working
cord, crossing right over
left.
Fold the
filler cord in half and arrange it around
the crossing point of the loop.
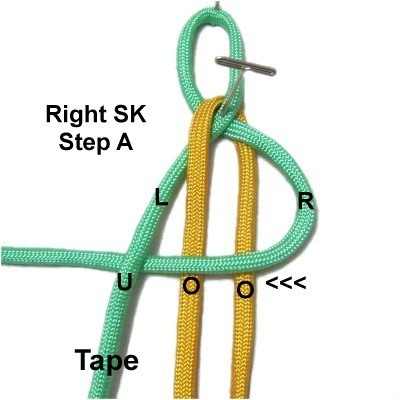
Step
2: Mentally label the two halves
of the working cord where they rest now.
Mark the left
half with a piece of tape.
Right
SK Step A: Curve the right
half of the working cord over
the fillers, heading left.
Bring it under
the left half of the working cord.
Right
SK Step B: Move the left
half of the working cord under
the fillers, heading right.
Pass it over
the curved portion of the right half as
you pull it out on the right.
Tighten
firmly and adjust the size of the
loop.
Designer's
Tip: The reason you marked the left
half of the working cord is because the
filler cord is ALWAYS folded around that segment
(next step).
Also note that as you make the Caged Solomon Bar,
each half of the SK begins by moving the right
half of the working cord (steps A and
C).
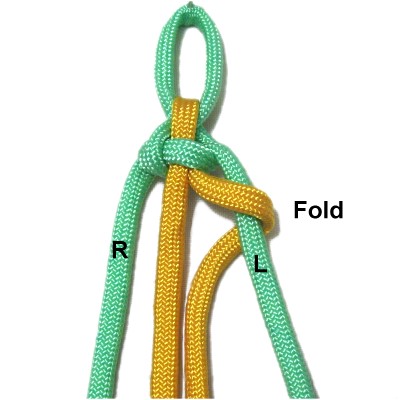
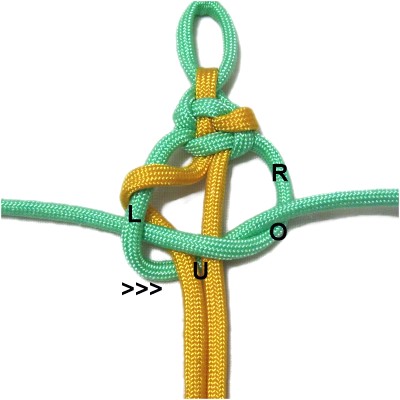
Step
3: Fold the right
half of the filler cord around
the left
half of the working cord, which
is now on the right. It should be
almost horizontal.
Bring it back to where it started,and curve it so it's vertical
again.
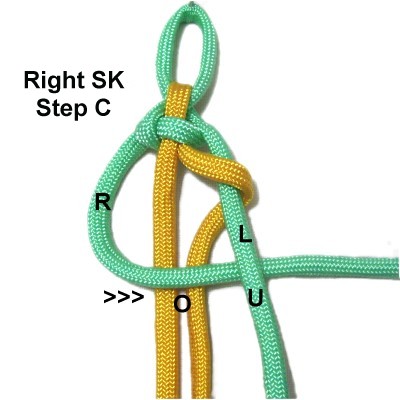
Right
SK Step C: Move the right
half of the working cord to the
right.
Bring it over
the fillers and under
the left half of the working cord.
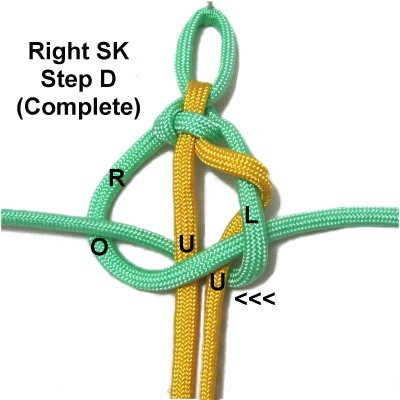
Right
SK Step D: Move the left
half of the working cord under
the two fillers, heading left.
Pass it
over the right half as you pull
it out on the left.
Tighten the SK firmly. Then tighten
the folded portion of the filler cord.
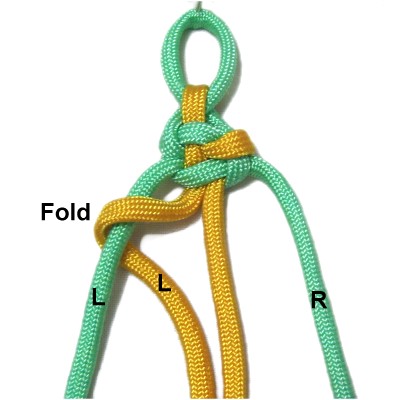
Step 4:
Fold the left
half of the filler cord
around
the left
half of the working cord.
Bring it back to where it started,curving it so it's vertical again.
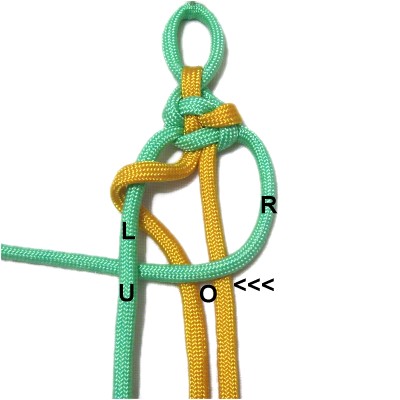
Right
SK Step A: Move the right
half of the working cord over
the fillers, heading left.
Move it underthe left half of the working cord.
Right
SK Step B: Move the left
half of the working cord
under
the two fillers. Pass it over
the right half as you pull it out on the
right.
Tighten the knot first, then pull the left
filler to tighten the folded portion.
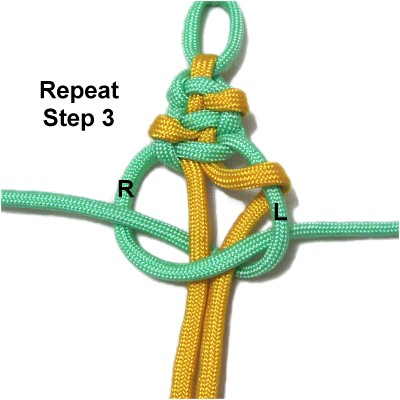
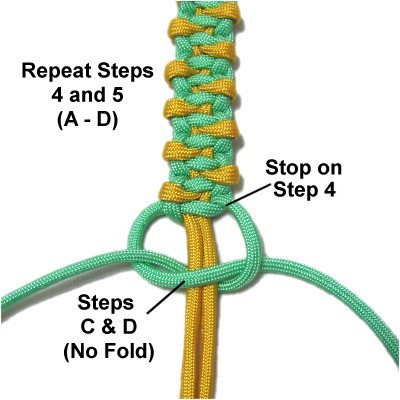
Step
5:Repeat
step 3, folding the right half of
the filler, and tying Steps
C and D of the Square knot.
Step
6:Repeat
steps 4 and 5 several times,
until the Caged Solomon Bar is the size
you want to make.
Stop
on Step 4. Then tie the
second half of the SK without folding the
filler (Steps C and D).
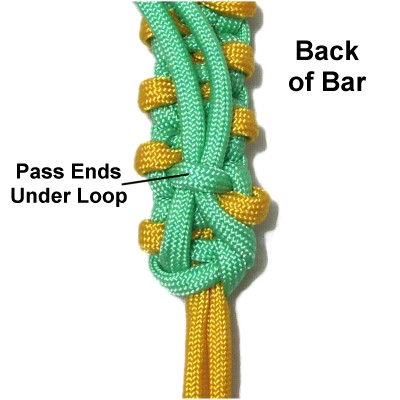
Step
7: To finish off the ends
of the working cord, pass them under one
of the loops in the BACK of the bar, which
is the portion you see as you work on it.
Apply glue, then cut off the excess.
Melt the stubs if using Paracord
material.
Step
8 (Optional): You can tie a
button knot with the fillers, or add a
button or bead, if you need a clasp.
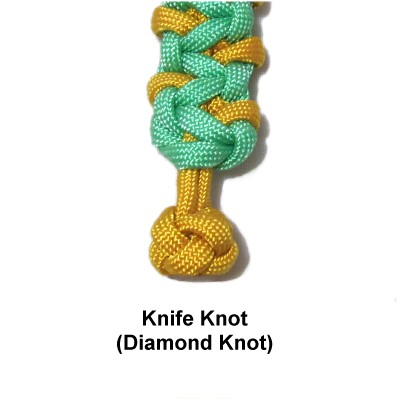
The Knife Knot,
also called the Diamond Knot, is shown
here.
By
using any text or images on Free Macrame
Patterns, you are agreeing to ourTerms
of Use