Description:
This Buttonhole Bracelet is unique in the
fact that it uses only one decorative knot.
My goal was to find a way to make a bracelet
design that featured the Buttonhole Stitch, which
is a vintage technique. As I created it, I
found I did not need any other decorative knots.
This is a great Macrame project for older kids and
teens who have some experience. But younger
children may be able to make this design with help
from an adult.
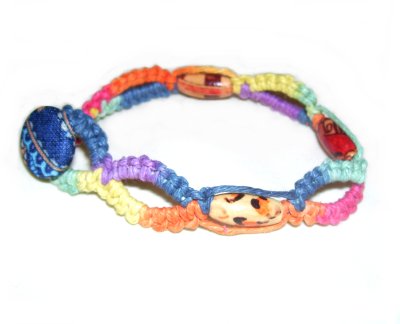
The material I used in the example shown is
rainbow Hemp, where the colors change. This
is sometimes called "variegated" cord. The
beads were wood, painted with unique patterns
(optional).
<<<
To purchase the Rainbow Hemp shown, go to our
online store by clicking on the green banner
(Click on Cord Material and 1mm)
Supplies
Needed:
1mm to 2mm cord materials
One shank button for the clasp
Beads (holes large enough for 2 cords) --
optional
Preparation:
Cut two cords, 72 inches long (2 yards).
This will give you enough material to make up to
an 8-inch size Buttonhole Bracelet.
Prepare the ends with glue, which makes applying
beads easier. Apply beeswax
to condition the material.
Buttonhole Clasp
The directions for the Buttonhole Clasp
are shown below, but if you want more information,
click on the link.
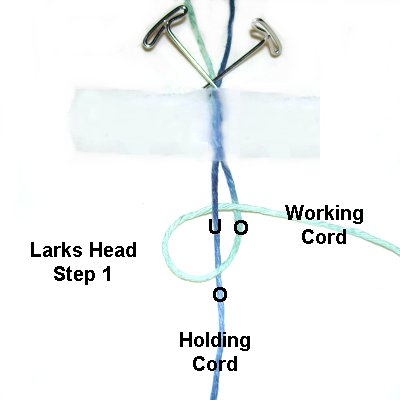
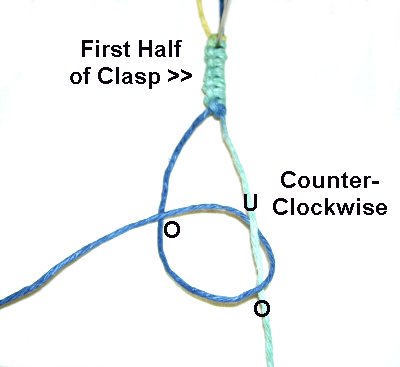
Step 1:
Match the center of both cords. Arrange them
on your board vertically, as shown.
Secure them with a piece of tape at the center, as
well as with pins.
The working cord
for this part of the Buttonhole Bracelet is on the
right.
The Cross Pin Techniqueis a great way to secure fine cords, but you
can also wrap the cords around the pins.
<< Rotate the working
cord clockwise,
over
- under the holding cord. As you
pull it right, pass itoverthe
working cord.
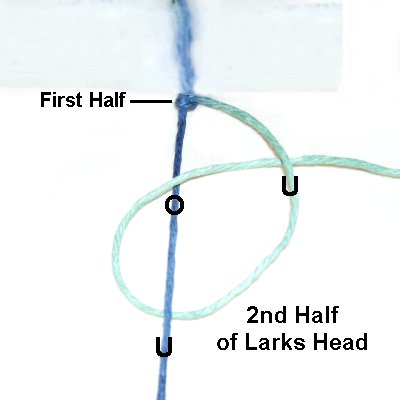
For the second half, bring the working
cord under
- over the holding cord, and then
under
the working cord. >>
Both
steps = one Larks Head Knot
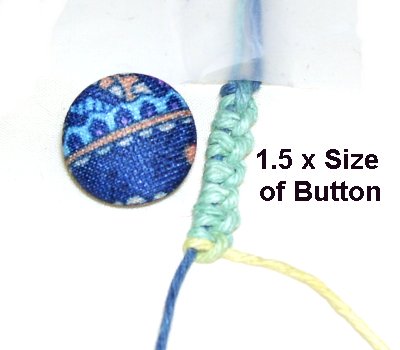
Tie several
more knots, until the sennit (chain)
measures 1.5 times the size of the
button.
So for a 1-inch button, tie 1.5 inches of
knots.
Step
2: Remove the tape and
pins. Turn the first half of the
clasp around, so the working cord is on
the left.
Tie the same number of Larks Head knots,
rotating counter-clockwise.
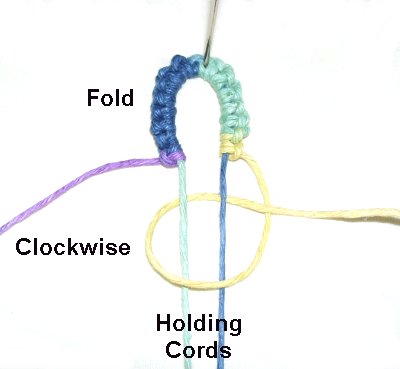
Step
3: Fold the Buttonhole
Clasp, forming a loop. Organize the
four cords as shown. The two ends of
the holding cord are between those from
the working cord.
Use the right working cord to tie a
vertical Larks Head knot onto both
holding cords. Rotate clockwise.
Pull the end firmly
when tightening.
Note:
This portion of the Buttonhole Clasp is usually
tied with a Square Knot. In this case,
I changed things so you use Larks Heads instead.
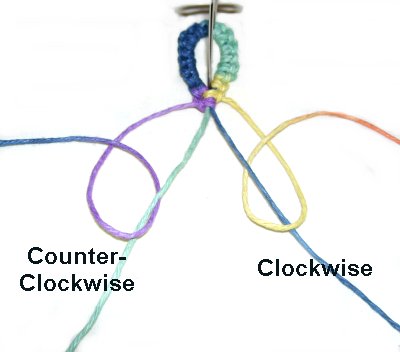
Tie another
Larks Head knot, using the left working
cord. Rotate counter-clockwise.
Tighten the knot firmly.
The clasp for your Buttonhole
Bracelet is finished, so now you will work
on the main area.
Double Buttonhole Design
The technique used
next is called the Double Buttonhole. You
are simply tying two chains of Larks Head knots
resting side-by-side.
Step
4: Divide the cords
into two sets. Use the same
working cords to tie 7 Larks Head
knots onto the other two strands.
On the left, rotate counter-clockwise
as you tie the knots.
At the right, rotate clockwise.
Design
Tip: You can change the shape of
the buttonholes by tying fewer knots. The
designs will have a more rounded shape than what
you see in the example.
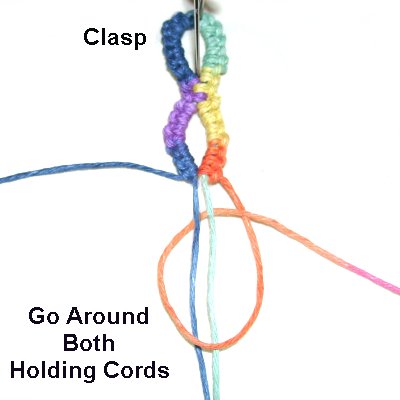
Step
5: After the buttonhole
design is the shape and size you want,
close it the same as you did in step
3.
Each working cord should pass around both
holding cords.
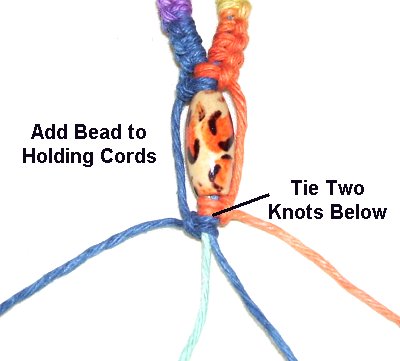
Step
6: The Buttonhole Bracelet
looks really good with beads, but this
step is optional.
To add them, slide both
holding cords through the holes.
Bring the working cords around the beads.
Tie two Larks Head knots below, as in
steps 3 and 5.
Step
7:Repeat
steps 4 - 6 one more time, with the same
working cords you've been using.
Then switch
the cords as shown below.
Important:
If you don't think the working cords are long
enough to tie another set of knots, switch the
cords now,
before repeating the steps again. (see below)
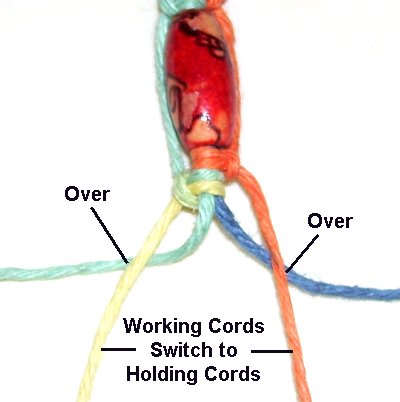
Switching
Cords: Move the holding
cords to the sides, since they
will now become the new
working cords.
Bring the old working cords over
the new ones, before using them to hold
the knots.
After you have
switched the cords, continue to repeat steps 4 -
6, until the Buttonhole Bracelet is the size you
want. Make sure you stop on step 5.
Important:
As you tighten the two Larks Head knots to
complete the last buttonhole design, apply
glue to the holding cords.
Completing the Clasp (Button)
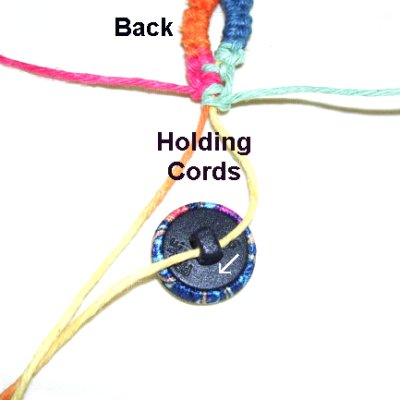
Step 8: Turn
the Buttonhole Bracelet over, so you work at the back,
as you add the button for the second half of the
clasp.
<<
Pass the holding cord on the right
through the button's shank from right
to left.
Pass the left
holding cord through from left
to right.
>>
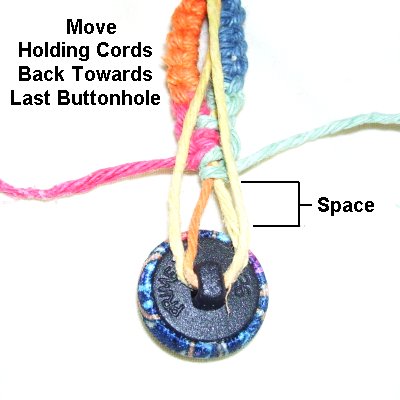
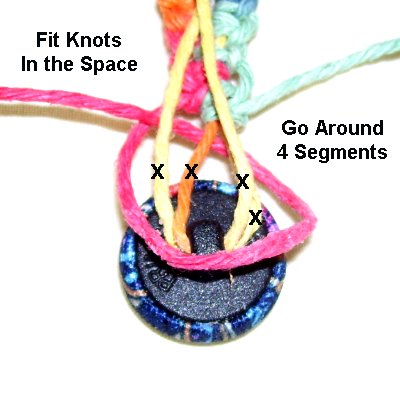
Adjust the
placement of the button so there is spacebetween
it and the last knots tied in the
bracelet.
The
space needs to be large enough for 2
knots.
Move the holding
cords back towards the buttonhole
designs.
Use eachworking
cord to tie one Larks head,
fitting it into the space.
Make sure you bring it around all four
segments of the holding cords (marked with
X
in this image).
Apply glue before tightening each
half of the knots. Cut off the
excess material when the glue is dry.
By
using any text or images on Free Macrame
Patterns, you are agreeing to ourTerms
of Use