Description:
These Butterfly Earrings feature two Chinese
knots; the Brocade knot and the Chinese
Button. You can make the upper loops
larger than the bottom, for a butterfly
shape. Or you can make them all equal size,
for a flower.
The knots I chose to make these earrings are a bit
complex, so you should practice
tying both knots before attempting this
Micro-Macrame project.
Satin cord was used in the example shown.
When using this material, do not pass pins through
it. Instead,lean
the pins or use the cross-pin technique,
to secure the loops and folds.
There are two variations of the Chinese Button
knot. I recommend you make the more
traditional 5-loop variation for the top of your
Butterfly Earrings, following these instructions:
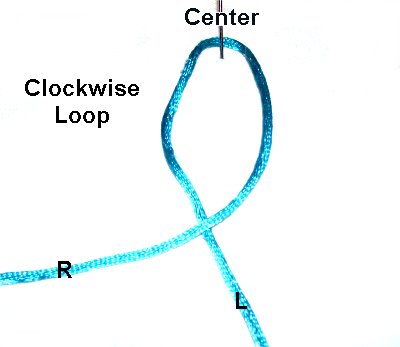
Step
1: Cut one cord, at least
45 inches long. Secure the center to
your board. Pass the right half over
the left, to form the first loop.
Secure
the left
half to your board.
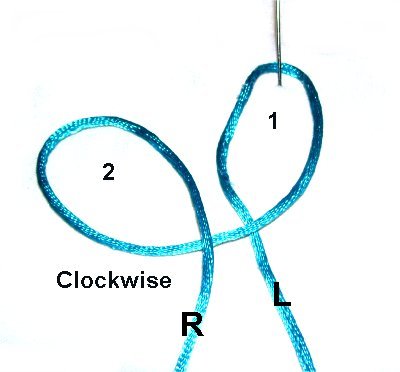
Step
2: Make the second
loop with the right
half of the cord, rotating clockwise.
It should rest to the left of loop 1.
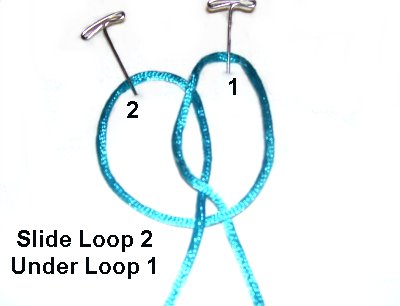
Step
3: Slide loop 2 underthe left edge
of loop 1, forming three spaces.
Secure theright halfof the cord to your board.
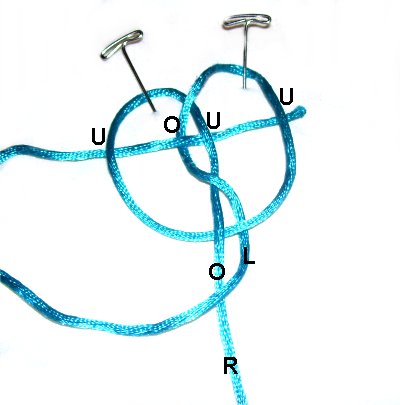
Step
4: Use the left
half to make the 3rd clockwise loop.
Start by passing it over
the right half of the cord.
Pass it through loops 2 and 1, heading
left to right.
Weave it under
- over - under - underthe four segments.
Step
5: To make the 4th loop,
rotate the left
half clockwise.
Move the cord over
the first three segments. This includes
the right
half of the cord.
Move itunder
the two segments at the bottom (loops 2
and 3).
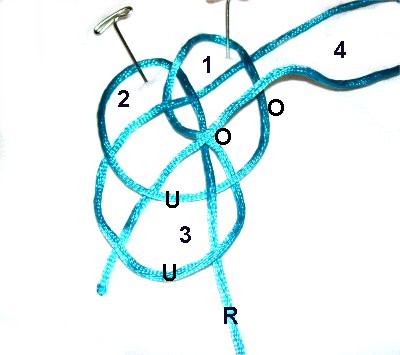
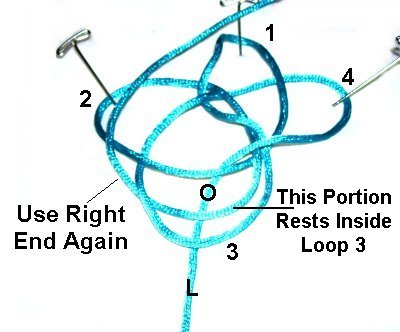
Step
6: Use the right
end again, passing it over
the left half of the cord.
Make sure this portion rests inside
Loop 3 as shown.
Bring it up towards loop 1 at the top of
the Butterfly Earrings design.
Step
7: To make the 5th loop,
bring the right
end down, passing under
the top of Loop 1. Pass it over
the next three segments.
Pass it under
the three segments at the
bottom.
Step
8: Tighten the Button knot
in the order the loops were made, starting
with loop 1.
When it's almost completely tightened,
pull up a small portion of the material,
to form a tiny loop at the top.
Design
Tip:When choosing which
portion to pull for the loop, try to select an
area that does not lead directly to one of the
ends.
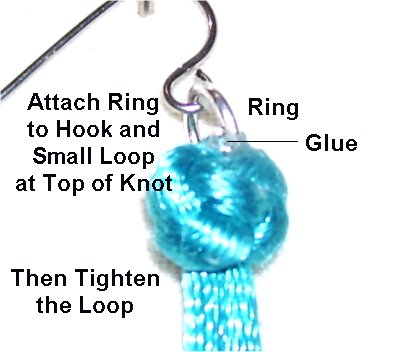
The purpose for the loop is to attach a ring so
the Butterfly Earrings dangle more freely.
Step
10: Open the jump or split
ring and pass it through the loop in the
material. Attach the hook and then
close the ring.
Step 11:
Position the split in the ring so it will
be covered by the material. Add a
small amount of glue to the area around
the ring, and then tighten the button knot
firmly.
Instructions for Brocade Knot
The body and wings of
the Butterfly Earrings are made with the Brocade
knot. It's complicated, so make sure you
have practiced first.
Bight =
Narrow Fold
Loop =
Circular with crossed area
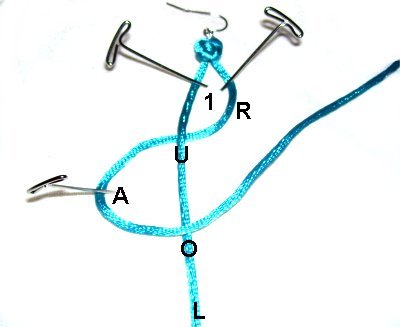
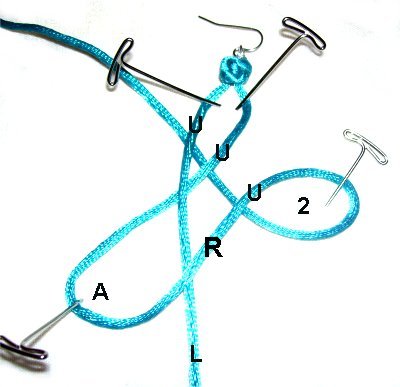
Step
12: Secure the button knot to
your board. Lean the pins over the
right and left ends, as shown in this
image, if using Satin. Secure the left
end as well.
Cross the right end under
the left, to make loop
1. Bring the cord back to
the upper
right, passing over
the left end (Bight A -
diagonal).
Design
Tip: It's important to position the
loops and bights as shown in the images, since
some need to be resting on a specific angle.
Step
13: Make loop
2 in a clockwise
direction. The end goes under
to make the crossing point.
Move the right end under
both parts of loop 1, so the end rests at
the top
left area of the Butterfly
Earrings design.
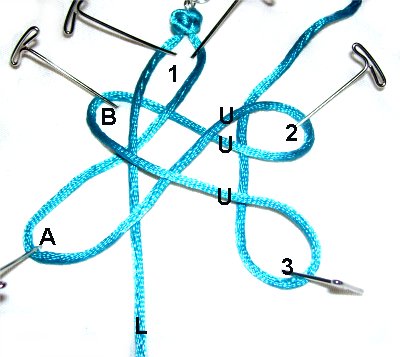
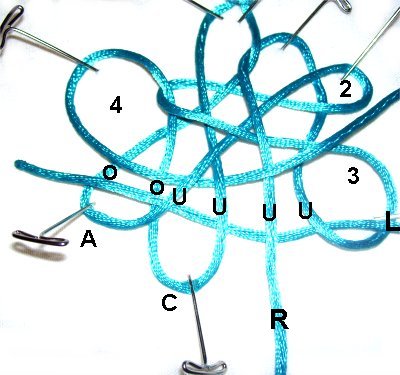
Step
14: Move the right end
down to the right
lower area of the design.
This creates bight
B, which is diagonal.
Rotateclockwiseto make
loop
3. Pass the end under
to make the crossing point. Move the
end under
both parts of loop 2.
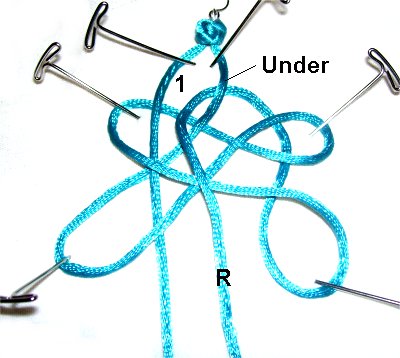
Step
15: Pass the right end
through loop
1under
the right portion of it.
Bring the end straight
downover
all the other segments, and secure it.
Important:
The second half of the Brocade knot is where all
the weaving takes place. So you need to be
able to see all parts of the Butterfly Earrings
design.
Enlarge the loops if necessary and secure
each loop and bight.
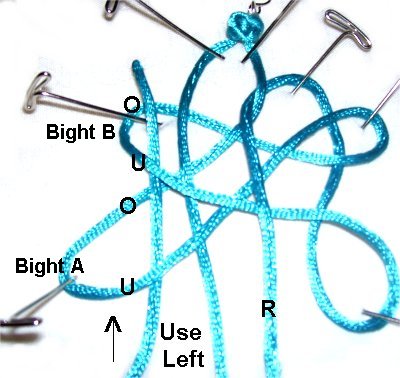
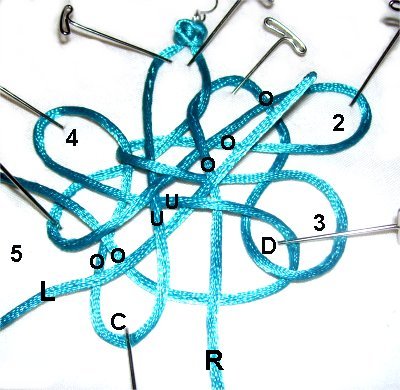
Step
16: Pass the left end
through Bights
A and B, going under
- over - under - over as
shown. This should all take place
along the left
side of the knot.
This creates Bight
C, which is vertical. (See next
photo).
Step
17: Rotate the left end
around counter-clockwiseto make loop
4.
Weave left to right, through bights
A and C, passing over
- over - under - under.
Pass it over
the right half of the cord, and over
the edge of loop
3.
Step
18: Bring the left end
back to the left, weaving under
loop 3 and the right half of the
cord.
Pass through the bights under
- under - over - over(same
path as previous step).
This will create Bight
D(horizontal).
Design Tip:Notice how in each step of weaving, when
the cord passes through the bights, it's the same
path in both directions. Step 18 is simply
done in reverse.
The only time the pattern is different is at loop
3 and the right end.
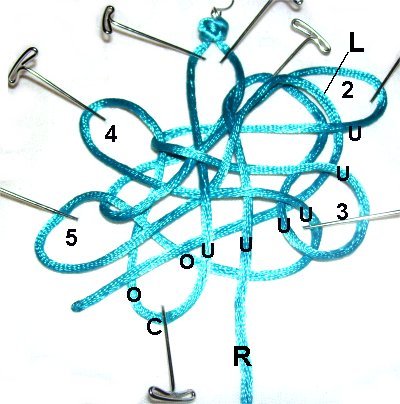
Step
19: Rotate the left end
around counter-clockwise
to form loop
5.
Weave it over
- over - under - under, through bights
C and D.
Pass it over
the right end, and the remaining segments,
heading towards loop
2.
Step
20: Weave the left end
back to the left, passing under
loop 2.
Pass it under
all the remaining segments except
for the last two, where it goes
over.These
two segments are below and to the right of
loop
5.
Design Tip:
In the previous step, you passed the end over
these same two segments as you started the
weaving.
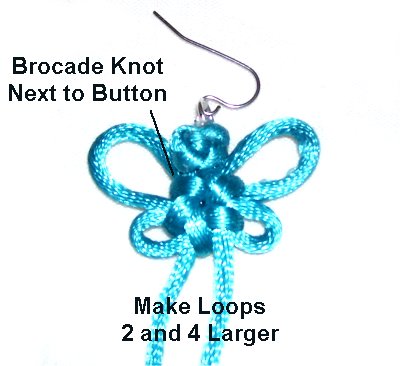
Step 21:
The best way to tighten the Butterfly
Earrings is to secure only the five
LOOPS. Remove the rest of the pins.
Start with loop
1 and reduce the size by removing the
pin, tighten, and then secure again. This
way you won't lose the loops in the
process.
The first three loops are connected, so tightening
one will change the size of the others. The
final step is to pull on the right end.
Loops 4 and 5 are connected, and lead to the left
end.
As you tighten the knot, make loops 2 and 4 larger
than 3 and 5 (for a butterfly shape). Keep
them the same size if you prefer to make a
flower.
Reduce
the size of loop 1 all
the way, so the top of the
Brocade knot is against the button.
Tighten the whole knot firmly, so the
center portion of the Butterfly Earrings
is round and compact.
Finishing Touches
Step 22:
You have several options for finishing the
Butterfly Earrings. I chose to apply light
weight beads with a rounded end.
You can use any type of finishing knot, beads,
buttons, or charms.
Here are
instructions for the finishing technique I
used in the example:
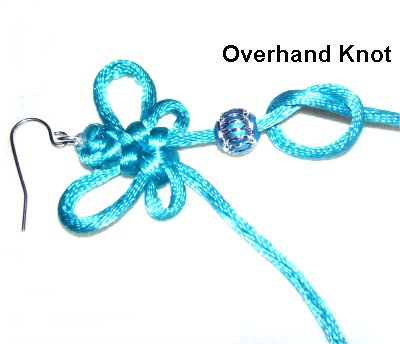
Apply a bead
with a hole large enough for 2
cords to pass through easily,
since you bring the end through a
second time.
Tie an Overhand knot where you want
the bead to rest.
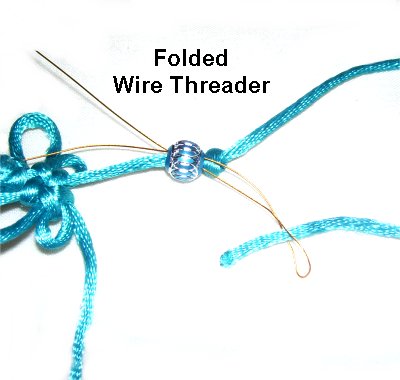
Fold a piece
of thin wire in half to make a
threader. Pass it through the hole
in the bead, with the ends close to the
butterfly. Pass the end you
are working with through the threader,
near the fold.
Pull the ends of the wire, so the cord
comes back through the bead. If
you can't get it through, you need a
bead with a larger hole.
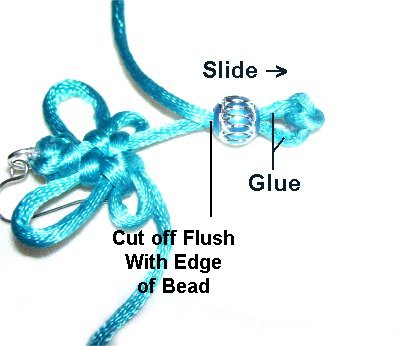
Slide the bead
so you have access to the area near the
Overhand knot. Apply glue and then
slide the bead next to the knot, so the
glue is on the inside.
Let the glue dry for a while, then cut off
the excess material flush with the bead (on
the side closest to the Butterfly
Earrings design).
By
using any text or images on Free Macrame
Patterns, you are agreeing to ourTerms
of Use