|
|
| |
| |
|
|
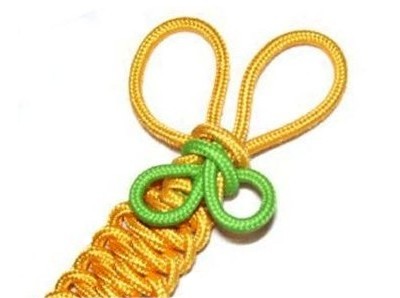
Description:
The Butterfly Bookmark is the easiest
project in Macrame for Kids.
It's suitable for children 6 years and older,
but some younger children may be able to
create it with assistance.
You can modify this pattern by first making
the butterfly, then attaching it to a key
ring or bracelet design rather than creating
the bookmark. |
|
| |
|
| |
|
Supplies Needed:
- 2 mm to 4 mm cord material
|
| |
|
|
Knots in Pattern:
|
|
| |
|
| |
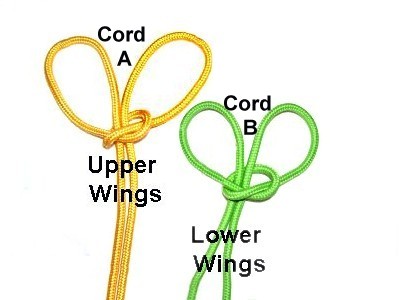
The Butterfly
|
| |
Preparation:
Cut
2 pieces of material, each 90 inches long.
Apply glue or tape to the ends so they dont
unravel. Mentally label them cord A and B.
In the example shown, 2 mm size Paracord was used
to make this project.
Should you decide to use the material, please
read Cord Preparation.
Near the bottom of that page are instructions to
properly prepare it for knotting.
|
| |
| |
 |
|
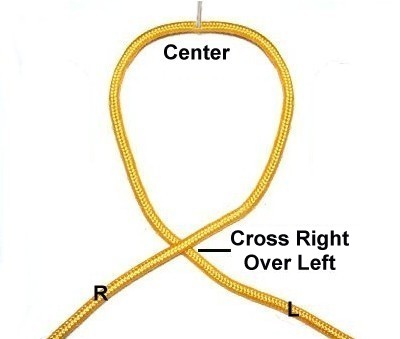
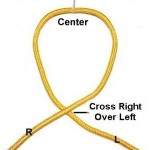
Step 1: Secure the
center of cord
A to your board.
Make a loop, crossing the right half of
the cord over
the left.
|
|
| |
|
| |
 |
|
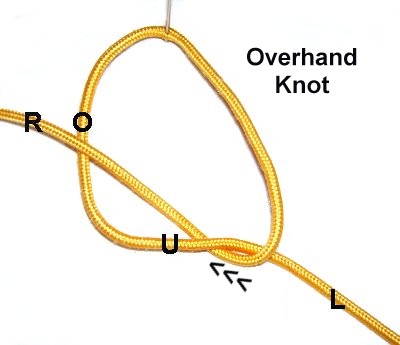
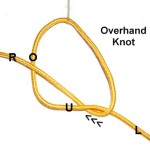
Step 2: Move the right
half of the cord under
the left half near the crossing point,
then over
the left side of the loop.
Tighten the Overhand knot until the
opening is about the size of a quarter.
|
|
| |
|
| |
 |
|
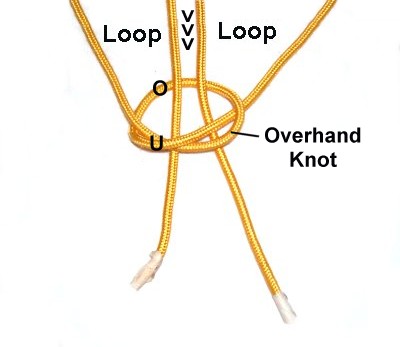
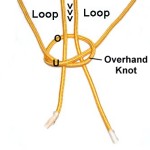
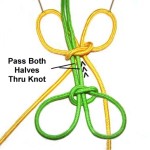
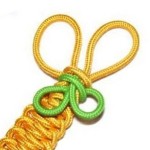
Step 3: Pass both
halves through
the Overhand Knot from the top (over
- under).
This will form two loops, which are the
upper wings of the butterfly.
Tighten the Overhand Knot further, but
still leave a small amount of space.
|
|
| |
|
| |
 |
|
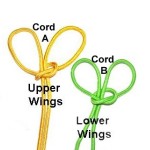
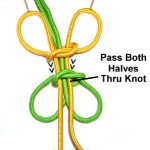
Step 4: Repeat
steps 1 - 3 to make the lower
wings with cord
B.
Adjust the size of the loops for both
sets of wings.
The loops for the lower half of the
butterfly should be smaller than those for
the upper half.
|
|
| |
|
|
Step 5:
Secure cord
A to your board with the working ends
heading forward (toward you).
Place cord
B closer to the front of the board
with the working ends heading backward.
Make sure the crossed
areas of both knots are face up.
Designer's
Tip:
- Forward = Toward
the front of the board
- Backward = Toward
the back of the board
|
|
|
| |
 |
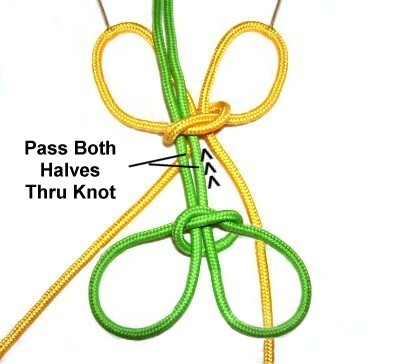
|
Pass both halves of cord
B through the Overhand Knot in
cord A, heading backward.
They should pass under
the crossed area of the Overhand knot.
|
|
| |
|
| |
 |
|
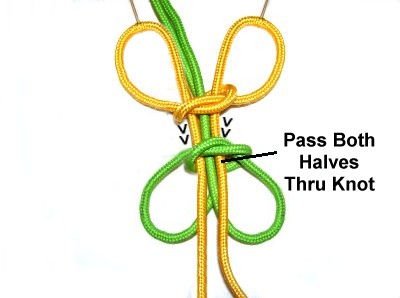
Step 6: Pass both halves
of cord
A through the Overhand knot in
cord B, heading forward.
|
|
| |
|
|
|
|
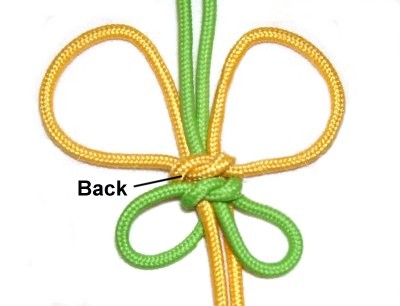
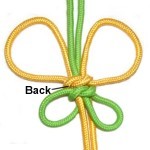
Tighten both
Overhand knots firmly.
Adjust the size of the loops as needed.
The back
of the Butterfly Bookmark is the side where
the crossed
areas of the Overhand knots are
located. |
|
|
| |
|
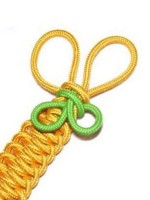
Step 6,
continued: You can stop here and
simply tie Overhand knots in both halves of cord
B (for the antennas). Secure the
knots with glue and cut off the extra material.
Both halves of cord
A can be used to attach the butterfly to
a belt, package, key ring, etc.
Make sure you finish off the tips of the cords in
the best method for the material you are using.
|
| |
| |
|
| |
Creating the
Bookmark
|
| |
| |
 |
|
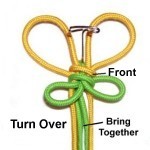
Step 7: Turn over the
Butterfly Bookmark so the front
is facing upward.
Move both halves of cord
B forward,
so they rest between the two halves of
cord A.
The cords should all be together in a
group so you can use them to make the
bookmark.
|
|
| |
|
| |
|
Step 8: The two halves of cord
B are the holding
cords, which means the knots made with
the other cord are attached to them.
Both halves of cord
A are the working
cords.
|
|
|
| |
 |
|
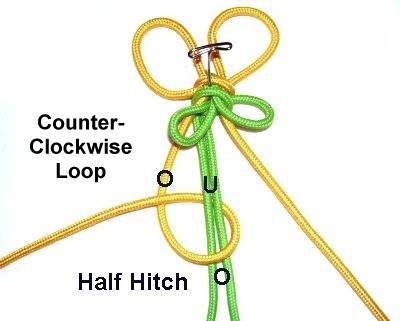
Use the left
working cord to make a Half Hitch
in a counter-clockwise
direction:
You make a loop over
- under the holding cords. As
you pull it left, pass over
the working cord to complete the loop.
|
|
| |
|
|
|
|
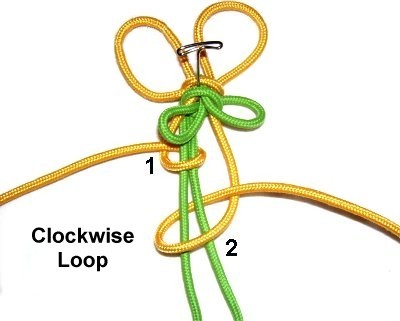
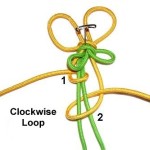
Use the right
working cord to make the next Half
Hitch in a clockwise
direction:
Make the loop over
- under the holding cords, and over
the working cord.
|
|
|
|
| |
 |
|
Step 9: Repeat
step 8 several times.
Stop when the Butterfly Bookmark is the
size you want, or you are running out of
material (working cords).
You still have two knots to tie.
|
|
| |
|
|
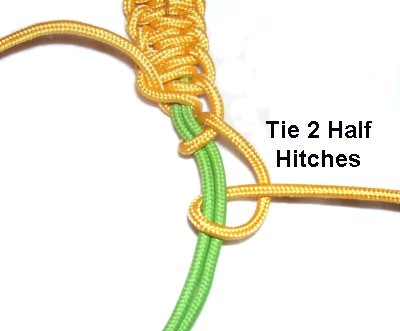
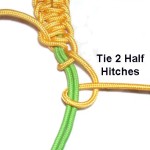
Step 9,
continued: Use each half of the
working cord to make two Half
Hitches instead of one. Before you tighten the
knots, apply glue to the holding
cords.
Tighten the knots firmly, so the glue is on the inside. |
|
|
| |
|
|
Finish off the
ends of both cords by applying beads
followed by Overhand knots.
Another option is to weave them into the
woven area made by the Half Hitches.
Make sure you weave them into the BACK of
the bookmark portion.
|
|
| |
|
|
|
By
using any text or images on Free Macrame
Patterns, you are agreeing to our Terms
of Use
|
|
|
|
| Have
Comments about the Butterfly Bookmark? Contact
me. |
|
|
|

|
|
|
| |