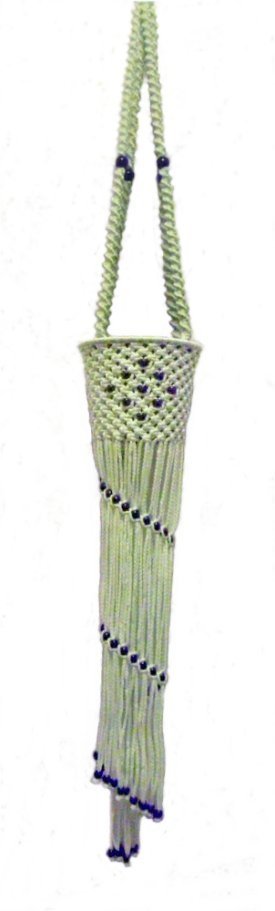
Description: The
Beaded Skirt Hanger is unique in the
fact that the focus is on the fringe
rather than the top area or the long
sennits.
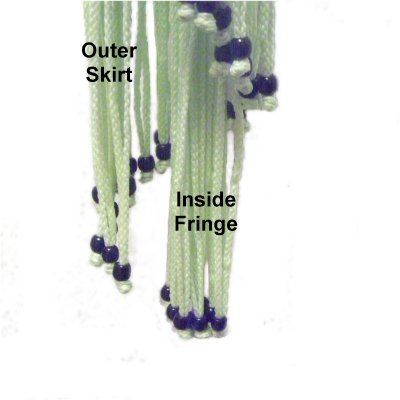
The outer fringe is called a "skirt"
because it is not gathered. The
beads are arranged in a spiral, and the
cords are connected to each other.
Then they transition to a beaded fringe,
following the same gradual spiral.
The inner fringe is also beaded, and
there are beads in the spirals above the
basket.
This Macrame Plant Hanger is
approximately 54 inches long, and is
made for plant pots that are 6 inches
wide at the top edge.
This Macrame project is suitable for
beginners who have experience with the
knots. It is very time consuming
to balance the tension of the cords when
you add the beads to the skirt.
Supplies Needed:
4 mm cord material (200 yards)
One 2-inch ring
One 7-inch ring
12 mm Beads (100+) -- hole size 5
mm - 6 mm
Four 20 mm beads -- hole
size 8 mm - 10 mm (for spirals)
Cut 1 cord, 36 inches long (no preparation
needed)
Prepare the tips of the cords with tape,
compressing the cord as you do so to make
beading easier.
Top Section
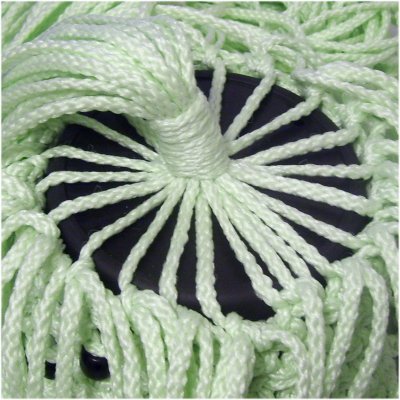
Step 1: To begin the top
section of the Beaded Skirt Hanger, locate the
center of one 8-yard cord. Hold
the 2-inch ring upright and fold the cord over the
bottom of it, as shown in the images below.
The center should be touching the ring.
Do the same with the remaining 8-yard cords.
You can place some of the cords on top of others
if necessary.
Locate both halves of the cords furthest to the
right and left (working
cords). The other cords are fillers.
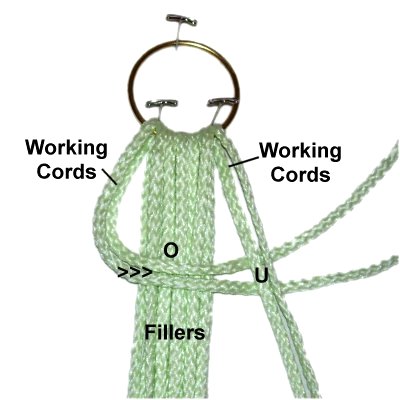
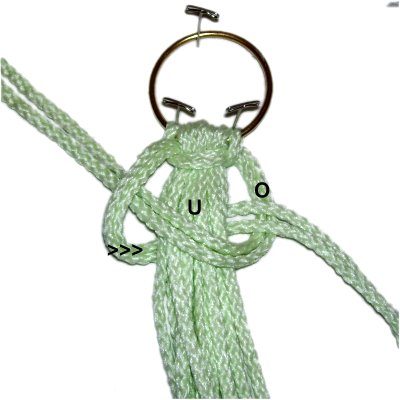
Tie a Square Knot as described below:
Square knot Instructions
Move the left
working cords to the right, passing over
the fillers and under
the right working cords.
Move the right
working cords to the left, passing under
the fillers and over
the left working cord.
Pull the working cords to tighten the
first half of the Square Knot. Make
sure the cords are neatly arranged.
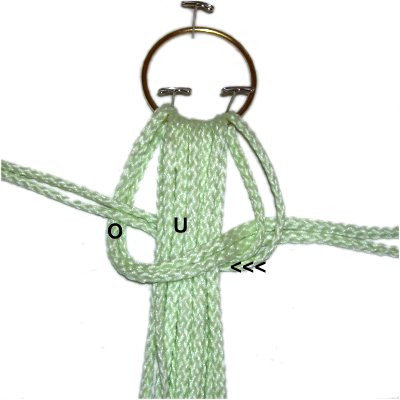
The working cords have switched places, so you
now make the second half of the SK in the opposite
direction:
Move the left
working cords to the LEFT, passing over
the fillers and under
the right working cords.
Move the right
working cords to the RIGHT, passing them under
the fillers and over
the left working cord.
Tighten the Square Knot firmly, while
holding the filler cords taut. It
should rest as close to the ring as
possible.
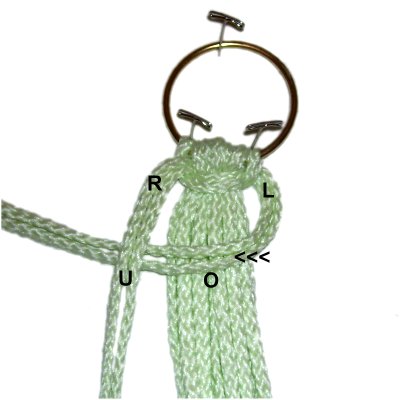
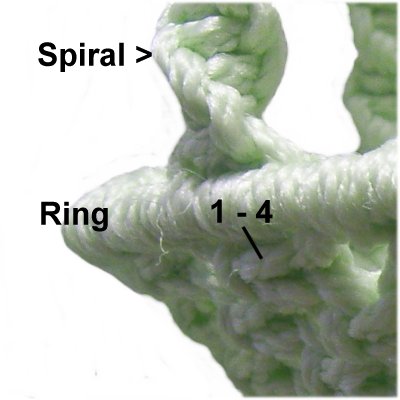
Step 2:
You will be creating a total of 4 long Spiral
sennits for the top section of the Beaded Skirt
Hanger.
Start by dividing the cords into four groups, each
with four cords. Mentally number the
cords in one group and push the others aside for
now.
Roll up each cord in the group you selected and
use a rubber band to secure it.
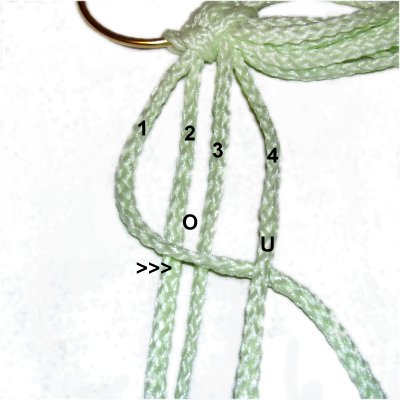
The Spirals are made by tying the first
half of a Square knot, which is called a
Half Knot. Tie the first one as described
below:
Move cord 1 to
the right, passing over
cords 2 - 3 (fillers) and under
cord 4.
Move cord 4 to
the left, passing it under
the fillers and over
cord 1.
Pull the working cords to tighten the knot
firmly.
Tie four more
Half knots (total of 5).
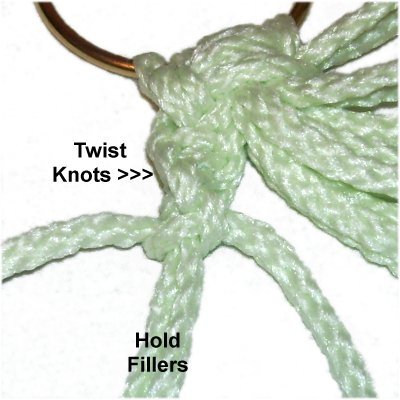
Twist the knots
to the right, while
holding the fillers taut.
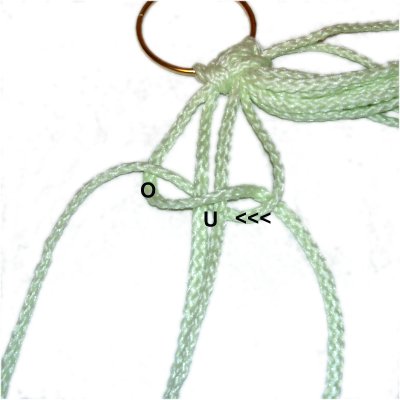
Step 2,
continued: Continue creating the
Spiral sennit by tying five Half knots, then
twisting them. Push the knots close
together to eliminate any extra space. The top
portion of the Beaded Skirt Hanger should be neat
and firm.
Stop when the sennit measures 10
inches.
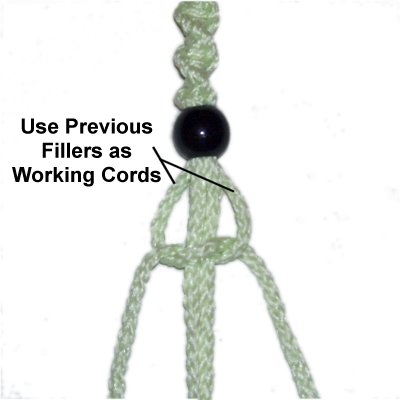
Slide all 4
cords through a 20mm bead. Arrange
the working cords in front of the fillers.
The purpose for the bead is to disguise
the area where you are switching
cords.
Switch cords,
so you use the previous fillers as the new
working cords (cords 2 and 3).
Tie another Spiral sennit measuring 10
inches.
Step 3:
Repeat step 2 with the other three groups
of cords.
When you reach the place where the bead is
attached, compare the sennit you are working on
with one that's finished. Make sure the
beads are resting at the same level. It
helps if the sennits are dangling from the ring
(upright).
Measure the sennits carefully, so they are all exactly
the same length. The basket for the
Beaded Skirt Hanger will not be level if they
are different sizes.
The Basket
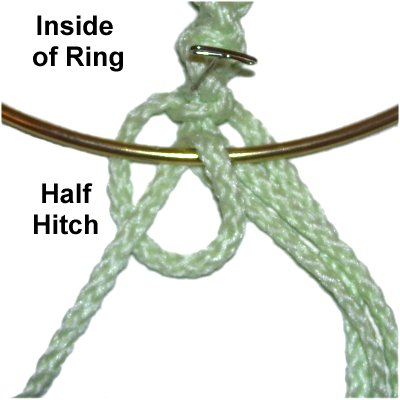
Step
4: Place the 4 cords from
one Spiral under
the 7-inch ring, then attach them with
Double Half Hitches.
This image shows only the first Half
Hitch. The second one will be to the right
of it. Tighten all the knots
firmly, so the last knot in the Spiral touches
the ring.
Step 4,
continued: Repeat the same process
with the remaining cords. Arrange each group
so they are the same distance apart on the
ring.
Hang the Beaded Skirt Hanger from a hook in the
ceiling or wall. Check to make sure the ring
is level.
Push the knots in the Spirals closer together if
the ring is not level. Usually that's
all you need to do, but if necessary you can
remove the DHH and measure the sennits again.
Make adjustments as needed.
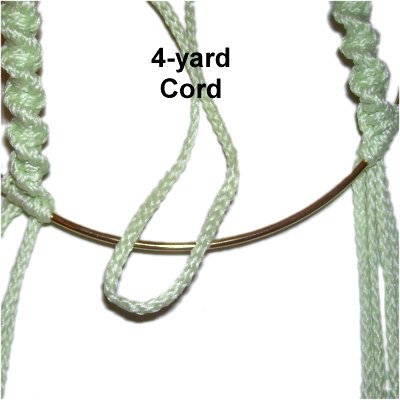
Step 5:
Now you will attach the 4-yard cords to the ring,
placing them between the Spiral sennits using
REVERSE Larks Head knots:
Fold one cord
in half and place it on
top of the ring as shown.
The folded area should be heading toward
you.
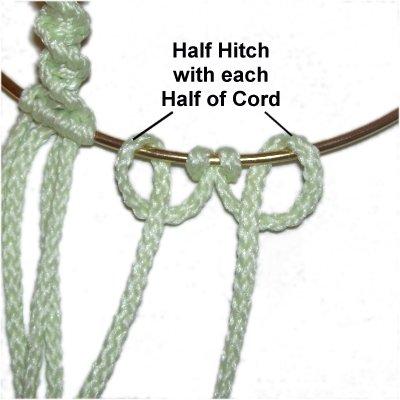
Bring both
halves underthe ring and over
the folded area as you pull them towards
you.
Tighten the reverse Larks Head knot
firmly.
Tie a Half
Hitch with each half of the cord onto the
ring. Tighten firmly.
Mount 7 more cords with a reverse Larks
Head and two Half Hitches, placing them
next to the one you just mounted.
Step 6:
Repeat step 5, mounting the remaining
4-yard cords. There should be 8 cords
between each of the Spirals.
You can add extra Half Hitches if needed to
completely cover the ring.
Step 7: I recommend you
hang the Beaded Skirt Hanger from the ceiling,
then determine which will be the back and front of
the basket.
Each section (side, front, back) is the area between two Spirals.
Locate the 4
cords just below the LEFT Spiral sennit
for the area you want for the front
of the Beaded Skirt Hanger. Mark the
spot with a small piece of tape.
Mentally number them 1 - 4.
Whenever you begin counting, always start
with those four cords.
Row 1:
Tie a row of Alternating Square Knots (ASK),
starting with cords 1 - 4. Make sure the knots are
firmly tightened, and rest as close to the ring as
possible.
Row 2:
Tie the next row beginning with cords 3 - 6.
Row 3:
Tie this row starting with cords 1 - 4.
Row
4: Tie ASK with cords 3 - 6
and 7 - 10.
Add a bead to cords
12 - 13, and tie a Half Knot
(first half of SK) with cords 11 -
14.
It should rest against
the bottom of the bead when tightened.
Continue tying ASK until you reach the back
of the Beaded Skirt Hanger.
Add a bead to cords 52 - 53, and tie a Half Knot
below with cords 51 - 54.
Complete the rowby tying ASK with the remaining cords.
Row 5: Tie the ASK beginning
with cord 1,
and do not add any beads.
Row
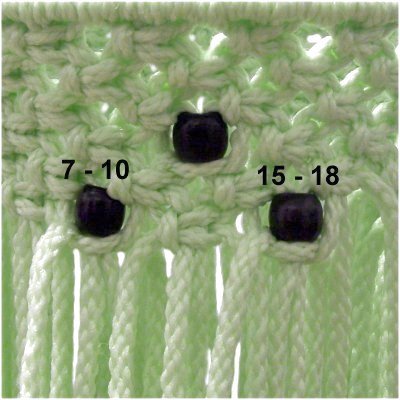
6: Tie the first ASK with cords 3
- 6. Add a bead to cords 8 - 9, and
tie a Half Knot below it with cords 7 -
10.
Tie the next ASK with cords 11 - 14.
Add a bead to cords 16 - 17, and tie a
Half Knot below it with cords 15 - 18.
Continue tying ASK until you reach the back
of the Beaded Skirt Hanger.
Place a bead on cords 48 - 49, and tie a Half Knot
with cords 47 - 50.
Tie the next knot with cords 51 - 54. Place
a bead on cords 56 - 57, and tie a Half Knot with
cords 55 - 58.
Finish the row by tying ASK with the remaining
cords.
Row 7: Repeat row 5 (no
beads).
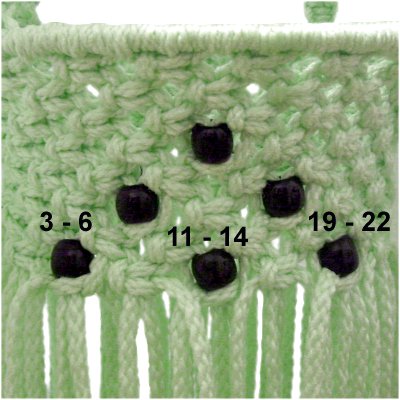
Row
8: Add a bead to cords 4 -
5, and tie a Half Knot below it with cords
3 - 6.
Tie the next ASK with cords 7 - 10.
Add a bead to cords 12 - 13, and tie the
Half Knot with 11 - 14.
Tie an ASK with cords 15 - 18.
Add a bead to cords 20 - 21, and tie the Half
Knot with cords 19 - 22.
Continue tying ASK until you reach the back
of the Beaded Skirt Hanger.
Place a bead on cords 44 - 45, and tie the Half
knot with cords 43 - 46. Tie the next
ASK with cords 47 - 50.
Add a bead to cords 52 - 53, and tie the Half Knot
with 51 - 54.
Tie an ASK with cords 55 - 58. Add a bead to
cords 60 - 61, and tie the Half Knot with cords 59
- 62.
Complete the row by tying ASK with the remaining
cords.
Row 9:Repeat row 5 (no
beads).
Row 10:Repeat
row 6.
Row 11:Repeat row 5 (no
beads).
Row 12:Repeat
row 4.
Row 13:Repeat row 5 (no
beads).
Row 14:
Tie another row of ASKwithout adding beads.
Row
15: Tie a final row of ASK to
complete the basket for the Beaded Skirt
Hanger.
As you do so, apply tape to the right
working cord for each knot (to
mark them).
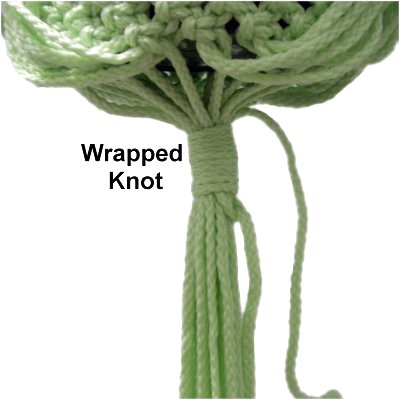
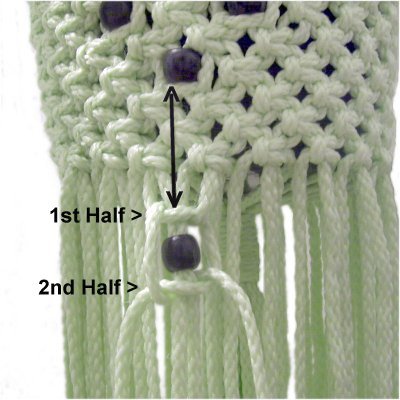
Step
8: Gather the marked
cords into a bundle, and keep them
neatly organized (see next image).
Use the 36-inch cord to make a Wrapped
Knot around the group of marked
cords. Make it at least 1.5 inches
long, and wrap firmly (but not
tightly). You
need to be able to move the knot.
Place the
6-inch pot inside the basket. Move
the Wrapped Knot until it touches the
bottom of the pot. It's easier to do
this with the basket upside down on a
table.
Make sure the knot rests in the center and
the cords are all balanced and neat.
Beaded Skirt and
Fringe
Step 9: To make the outer
(skirt) fringe for the Beaded Skirt Hanger, you
will be placing beads to form a spiral
pattern. The knots are connected,
which is different from a regular fringe.
You start in the center back area and use groups
of 4 cords. The right working cord for one
knot is shared with the next knot, linking them
together.
In the area between the bottom of the basket and
the row of beads, the cords should be as straight
as possible. Here is how I recommend you tighten
the knots after adding the beads:
Pull the four cords straight down so they
are taut.
After you tie the first half of the SK, make
sure it's resting at the same level as the
second half from the previous knot.
Tighten slowly and keep the knot level (not
tilted).
When you release the cords, they should be
straight. Remove the knot and try again
if the cords are bowing too much.
Sometimes pulling on the fillers will correct
the problem.
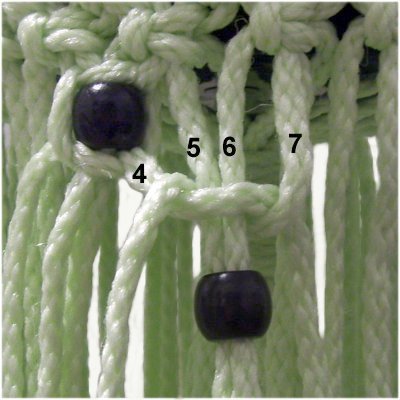
Locate the 4
cords that rest straight down from the
lowest bead in the basket. Two cords
should come from two adjacent knots.
Tie the first half of a SK with cords 1 -
4. Place a bead on the fillers
(cords 2 - 3), and tie the second half of
the knot below it. Tighten the knot
so the bead rests close to the bottom of
the basket.
The next group
of four cords consists of the right
working
cord from the first group, plus 3
free cords next to it.
So tie the first half of a SK with cords 4
- 7, add the bead to cords 5 - 6, and tie
the second half of the knot below it.
Listed below are the 4-cord combinations for the
rest of the Beaded Skirt Hanger.
Make sure the shared cord is always the right
working cord from the previous knot.
4-cord
Combination
Bead
Placement
>>>
4-cord
Combination
Bead
Placement
7 - 10
8 and 9
10 - 13
11 and 12
13 - 16
14 and 15
16 - 19
17 and 18
19 - 22
20 and 21
22 - 25
23 and 24
25 - 28
26 and 27
28 - 31
29 and 30
31 - 34
32 and 33
34 - 37
35 and 36
37 - 40
38 and 39
40 - 43
41 and 42
43 - 46
44 and 45
46 - 49
47 and 48
49 - 52
50 and 51
52 - 55
53 and 54
55 - 58
56 and 57
58 - 1
**
59 and 60
**
The last knot includes the first cord you started
with.
Step 10: Repeat step 9.
You can repeat again if you have enough beads, but
keep in mind you need to have
at least 12 inches of material for the
beaded fringe (measure shortest cords).
Step
11: A regular beaded fringe
begins right after the place where you
stopped in the last step.
You put the bead onto two cords, then
slide it down so it's slightly lower than
the previous bead. Usually that's 8
- 10 inches from the bead above it.
Tie an Overhand knot (or other finishing
knot) below the bead.
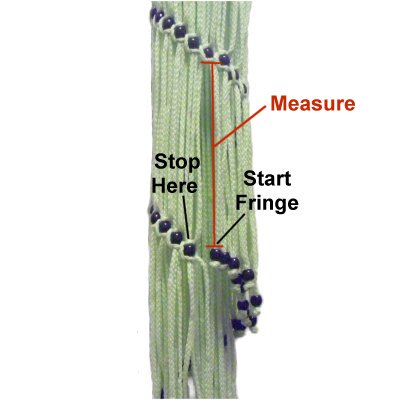
Step 11,
continued: Measure the
distance between this bead and the one above it
(red line on image above).
Then add beads to the other cords, measuring the
same distance each time so the spiral will
continue on the same slant.
Step
12: Move up to the Wrapped
knot under the basket. Select two
cords that rest next to each other.
Add a bead and slide it down to an area below
the last one in the skirt. Tie an
Overhand knot to secure it.
Repeat the same process with the other
cords.
Step 13:
Finish the Beaded Skirt Hanger by cutting off the
excess material from each Overhand knot.
When using Bonnie Braid or similar synthetic
material, you can cut off most of the excess and
leave a little stub.
Melt the stub with a BBQ lighter and push it
against the bottom of the Overhand knot.
This prevents the knot from untying.
By
using any text or images on Free Macrame
Patterns, you are agreeing to ourTerms
of Use