Use a piece of scrap cord to make a circle,
placing it over your head until it's the right
size. Then measure it, and make the
necklace to that size.
Cut two cords of each color, 2.5
times the finished length you plan to
make. So for a 24-inch necklace, you cut the
cords to at least 60 inches.
Prepare the tips to prevent unraveling.
Step 1:
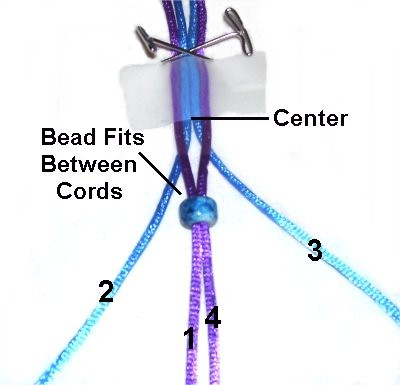
Locate the center of all four cords and secure
them to the board. Place a piece of tape to
mark the center. You will work from the
center towards the ends.
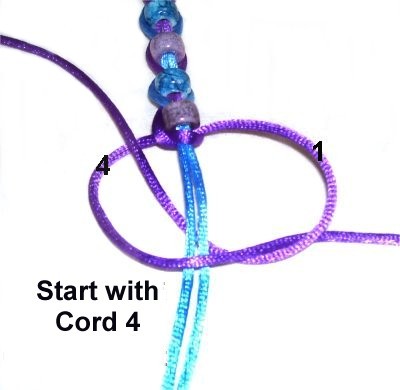
Arrange the cords as: 1
Color A --2 Color B -- 1 Color A.
In the images color
A = purple, and color
B = blue.
Mentally
number the four cords from left to right.
Slide cords 1 and 4 (color
A) through the first bead, and
slide it up close to the tape.
Arrange cords 1 and 4 so they rest between
cords 2 and 3.
The bead should rest between them, too.
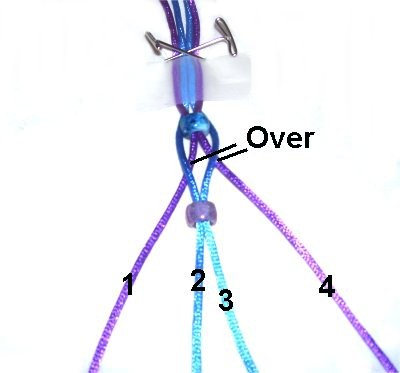
Step
2: Bring cords 2 and 3 (color
B)over
the other two, and slide them through the
next bead.
Slide it up as far as you can while
holding the cords flat on your board.
Make sure
the bead restsbetween
cords 1 and 4.
This image
shows a closer view of the beading
process. Make sure the cords fit
snugly around
the beads, not below them.
If they slide under the beads easily, the cords
are too tight.
Usually all you need to do is push the
beads close together and the cords will
have the proper tension.
Step 3:Repeat
steps 1 and 2 several times, until the
Beaded Necklace is halfthe
size you need.
So for a 24-inch necklace, stop at 12 inches.
Important:
Before you move on to the next step, go back to
the center. Move each bead as close together
as possible, removing the slack as you progress.
Then measure the Beaded Necklace to see if you
need a few more beads.
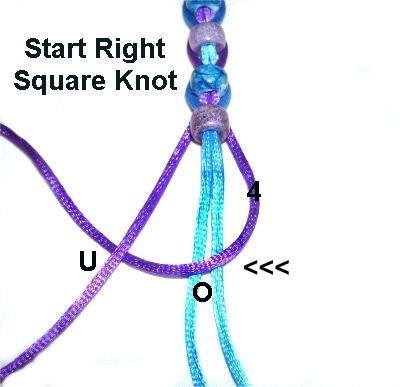
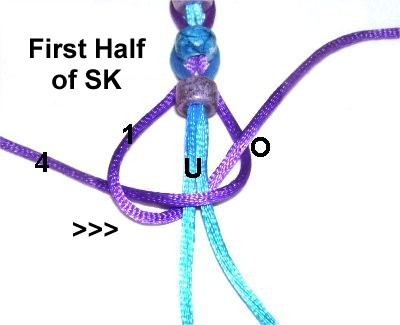
You will now tie a right
Square knot. This image shows the
first step. Mentally number the
cords 1 - 4.
Move cord
4 to the left, passing over
2 and 3 (fillers).
Pass it under
cord 1, which is the left working cord.
Designer's
Tip: Any time you tie
Square Knots, the head will face the direction of
the cord you start with.
In this case, the cord on the right was first so
the knot faces right.
Step
4: To complete the first
half of the Square knot, bring cord
1
under the fillers (2 & 3) and
over
cord 4, as you move it to the right.
Pull on the ends firmly.
Step
5: The second half of the
Square knot is tied in the opposite
direction, since the two working cords
have switched
places.
Pass cord
4over
the fillers and under
cord 1, heading right.
To complete the knot, bring cord
1under
the fillers and over
cord 4, as you move it left.
Step
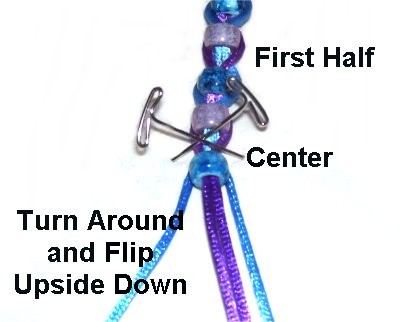
6: Turn the Beaded Necklace
around on your board and go back to the
center.
Flip
the necklace upside down, so the
beading pattern doesn't change.
Repeat
steps 1 - 3.
Important:
Before you move on, go back to the Square knot
tied at the other end of the Beaded
Necklace.
Push the beads close together again, removing any
slack. Then measure to see if you need more
beads.
When you are through, turn the Beaded Necklace
with the front face
up on both ends.
Step
7: Repeat
steps 4 - 6, tying another
Square Knot. You can make it in the opposite
direction if you wish (start with left cord).
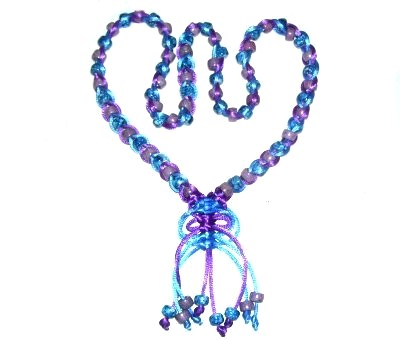
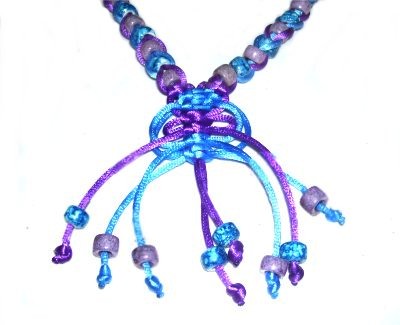
Design on Front of Necklace
The picot design on the front
of the Beaded Necklace is optional, if you prefer
something else.
You could just create a clasp and wear it so that
area is at the back of the neck instead of the
front.
Adding a pendant is another option.
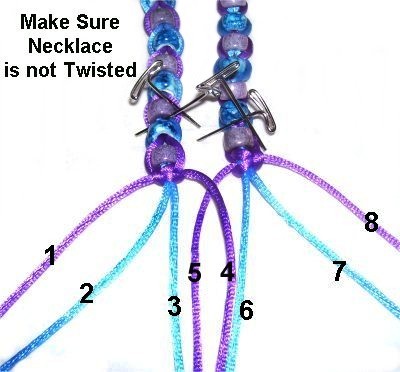
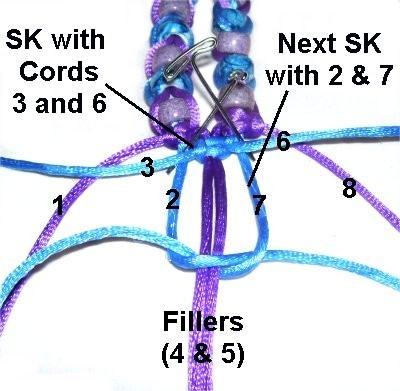
Step 1:
Position the necklace so all the cords are in
front of you.
Make sure the necklace is not twisted and lies
flat on your board. Secure it with tape or
pins.
Mentally
number the cords 1 - 8. The
fillers for all these knots are cords 4
and 5.
Tie a Square Knot with cords 3
and 6 around the fillers.
Important:
Apply glue after you tie the first half of
the knot. Then tie the second half.
Step
2: Move cords3 and 6
to the sides.
Pass cords 2
and 7under
them, and tie the second SK, around the
fillers (4 - 5).
Step
3: Tie the third SK with
cords 1
and 8, after moving them under
the 2 working cords previously used (on
each side).
In the next three steps you will make the
picot designs for the front of your Beaded
Necklace.
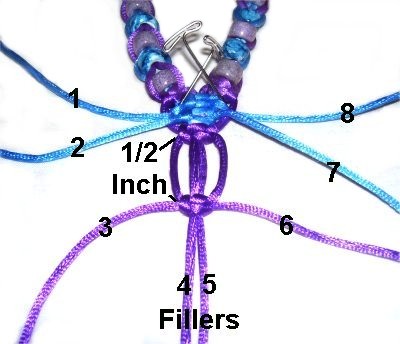
Step
4: Mentally label the
cords again 1 - 8. The fillers
are still cords 4
and 5 for all three knots.
Tie the next SK with cords 3
and 6. Tighten it so it
rests 1/2-inch
below the SK tied in the last
step.
Apply
glue between the first and second half
of the knot.
Step
5: Push up the knot you
just tied, so it rests against the one
tied in step 3. This forms the first
picot loops.
Bring cords 2
and 7under
those used in step 4. Tie a SK,
making sure it rests 1/2-inch
below the previous one.
Apply
glue between the two halves of the SK.
Step
6: Push up the second SK,
so it rests next to first knot (from step
4).
Leave a 1/2-inch space, and tie the third
SK using cords 1
and 8. Make sure you bring
the ends under the other working cords
previously used.
Apply
glue between the two halves of the SK.
Allow the glue to dry for at
least 1 hour before moving on to the
final step of the Beaded Necklace.
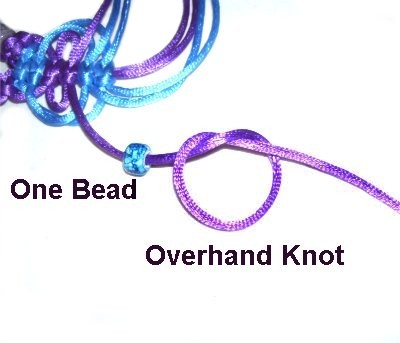
Apply one
bead to a cord, 1 - 2 inches below the
picots.
Start a Barrel knot by tying an Overhand
knot.
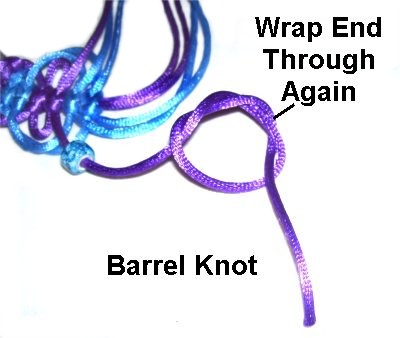
Wrap the end
around the loop again to complete the
Barrel knot.
As
you tighten, apply glue.
Repeat the
finishing process for the remaining cords.
The knots don't need to rest at the same
level unless you want them to be
even. After the glue is dry, cut off
the extra material.
By
using any text or images on Free Macrame
Patterns, you are agreeing to ourTerms
of Use