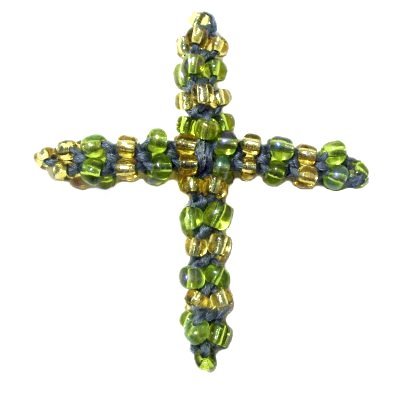
Description:
The Beaded Cross features the Crown Knot,
which allows beads to be added to the
cords.
I recommend that beginners make the Cross
Pendant first, since it
has the same design.
It's a real challenge to tie the Crown
knots with fine material, tiny beads, and
few pins. For that reason, this
Micro-Macrame project is rated moderate.
You will start by making the horizontal portion
of the Beaded Cross. The first step is to
tie a Shamrock
Knot, which is two Overhand Knots linked
in a specific way.
Other decorative knots can be used, but make sure
the cords will head in four different directions
after they are tightened.
Preparation:
Cut 4 cords, each at least 30 inches long.
Prepare the tips with GLUE to stiffen the material
for beading.
I recommend you use Hemp, Bamboo, or other
slightly stiff cord material. Cotton may be
too flexible, depending on the type.
Don't use slippery materials like Nylon and Satin.
In the example shown, Bamboo cord was used to make
the Beaded Cross.
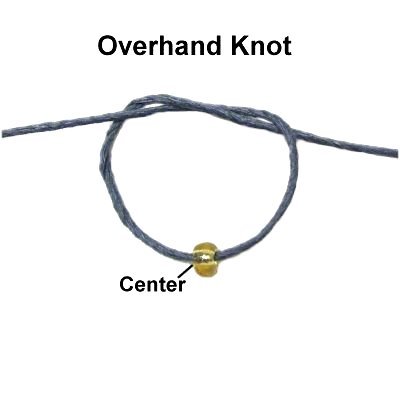
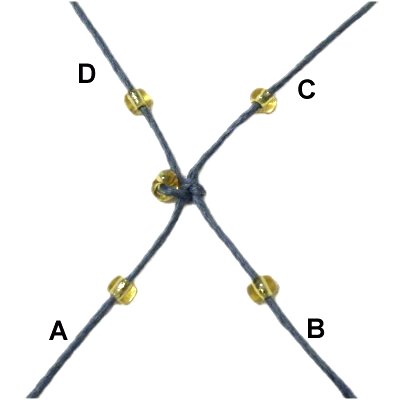
Step
1: Place a bead in the center of
one cord. Tie an Overhand knot,
but don't tighten it.
Arrange it on your board as shown,
with the bead forward.
Designer's
Tip: The term "forward" means the
cord, segment, or bead is heading toward the front of the
board.
The term "backward" or "behind" means it's heading
towards the back
of the board.
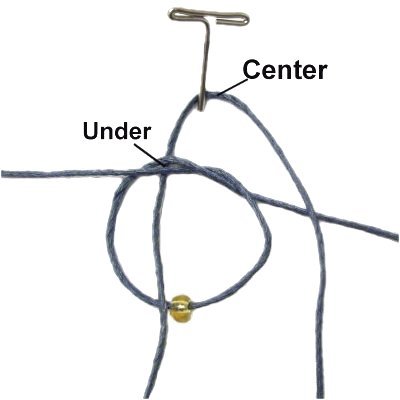
Place
a pin near the crossed area of the
Overhand Knot. Arrange a second cord
around it, so the center is next to the
pin.
Pass the left
half of the cord through the
Overhand knot, so it's under
the crossed area and over
the area where the bead is resting
(crook).
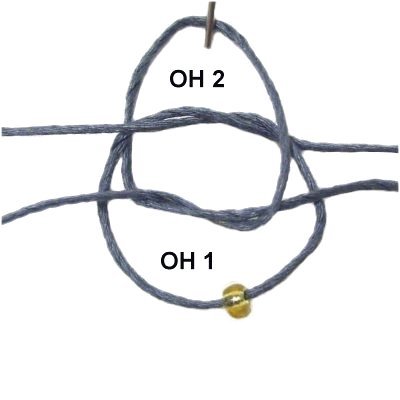
Tie an
Overhand knot with the second cord (OH 2).
The crossed area should be inside the
first knot (OH 1).
Turn the second
Overhand knot so the two halves of the
cord are vertical,
then tighten it.
Tighten the first Overhand knot, making
sure the two halves are horizontal
as you pull them.
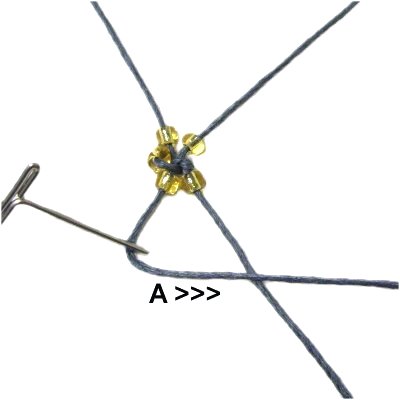
Step
2: Arrange the cords
diagonally as shown. Mentally label
them, starting with the lower left segment
(counter-clockwise).
Slide one bead onto each cord. Push
them close to the first bead.
Designer's
Tip:You can allow the
first bead to rest beside the Overhand
knots. Later you will need to turn the bead
into the proper position under
the knots.
The most challenging part of the Beaded Cross is
figuring out how to secure the cords. At
this stage, do not try to secure them at the
center. They just get in the
way. I recommend you use tape, or
place the pins at an angle and lean them over the
cords.
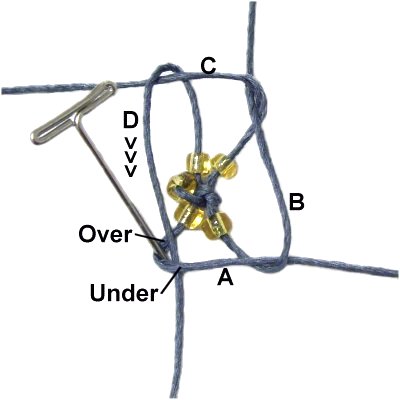
Step
3: Fold segment
A around a pin, then move it
to the right over
segment B. It should be
horizontal.
The pin will help keep a small space
open, and helps to secure the cord if
you lean it left.
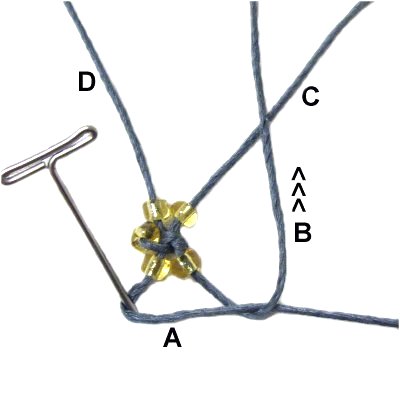
Fold segment
B vertically, passing over
segments A and C.
Secure it to your board.
Fold segment
C horizontally to the left,
passing over segments B and D.
Secure the cord.
Fold segment
D forward vertically, passing
over segment C.
Bring it through the secured corner of
segment A, passing over
- under the two parts.
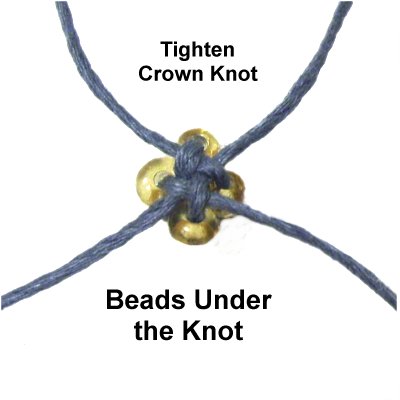
Tighten the Crown Knot by pulling on all
four segments gradually.
The beads should rest below the knot, so
you may need to LIFT the cords off the
project board while tightening.
The first bead should be underneath the
group of four, so re-arrange it now.
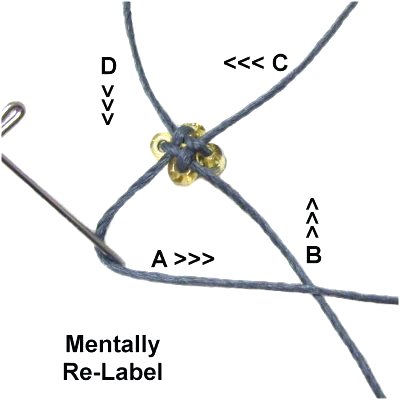
Step
4: Mentally re-label the cords,
starting with the left lower segment (A).
Repeat
step 3, tying another Crown knot,
but
do not add any new beads.
Tighten it firmly.
This extra knot will help keep the
previous knot tight, which makes the
Beaded Cross more stable.
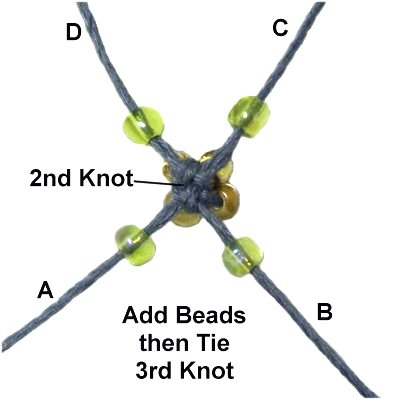
Step
5: Add beads to all four
segments, then mentally re-label them.
Repeat
step 3 to tie the next
knot. Lift the cords when
tightening, so the beads rest below it.
Step 5,
continued: Repeat
steps 4 and 5 eight times, until
there's a total of 10 groups of four beads.
The horizontal portion will be around 2 inches
long.
To make the Beaded Cross smaller, reduce the
number of bead groups to 8. To make it
larger, increase to 12 groups.
Important:After the 10th group of beads is
attached with the Crown knot, do not tie the
extra knot (step 4).
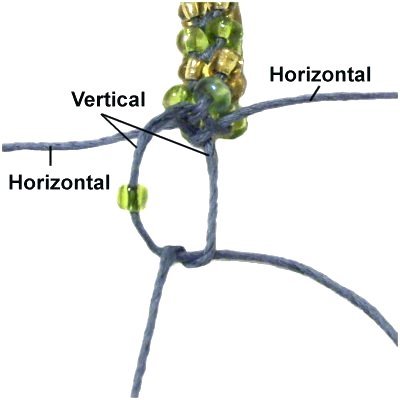
Step
6: Lay the beaded design on
the board with two cords vertical and two
horizontal.
Slide a bead onto the top vertical
cord. That's the one not resting on
the board.
Tie an Overhand knot with both vertical
cords. It should rest sideways as
shown in this image.
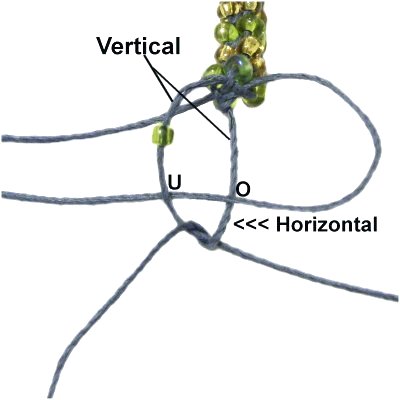
Pass the horizontal
cord on the right through
the Overhand knot.
That's over
the lower and under
the top vertical cord (with the bead).
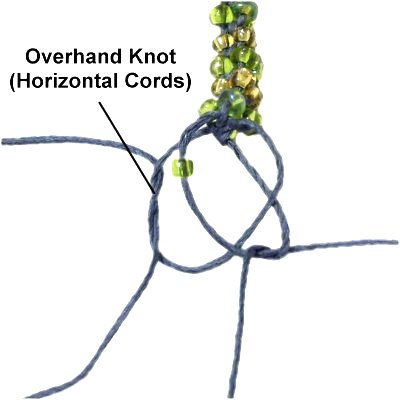
Tie the two
horizontal cords together to make
the second Overhand knot.
Tighten it first, followed by the one made
with the vertical cords. Apply glue
as you are tightening.
When it's dry, cut off the excess
material.
Vertical Portion
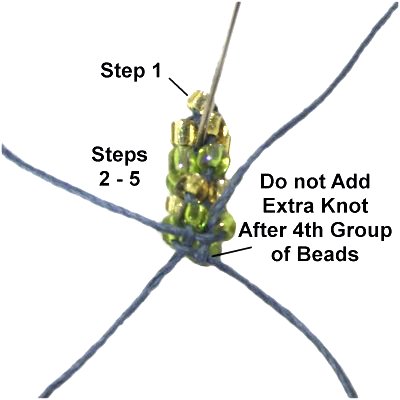
Step
7:Repeat
steps 1 and 2 to start the
vertical portion of the Beaded Cross.
Repeat
steps 3 - 5 until there are four
groups of beads. The design will be
almost 1-inch long.
Do not add the extra knot after the 4th
group of beads (step 4).
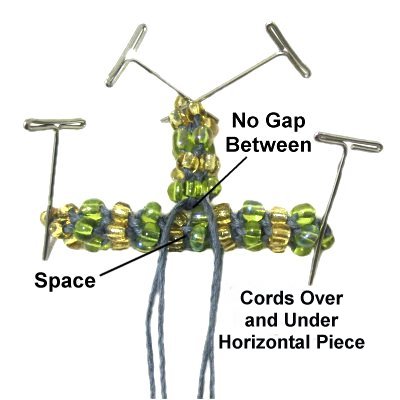
Step 7,
continued: Secure the short
vertical portion flat on your board, with the
cords heading towards you (forward).
Place the
horizontal portion of the Beaded Cross
next to the vertical portion. There should
be no gap between them.
Two cords (from the vertical portion)
should rest over the top of the horizontal
piece, and two should rest under it.
Locate the space between bead groups 5 and
6.
Designer's
Tip: Measure the horizontal piece
to be certain the space is actually in the center
of it, especially if you made that piece with a
different number of bead groups (8 or 12).
Put both cords
in the space between the bead groups, in
the front and back areas of the horizontal
piece.
Use the cords in the back
to tie an Overhand knot around the cords
on top of the piece. Tighten it
firmly.
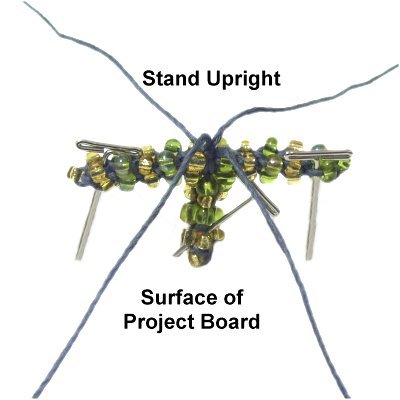
Step
8: Secure the finished
portions of the Beaded Cross so they are
upright.
Placing pins through the horizontal piece
vertically really help to stabilize the
design.
Step
9:Repeat
steps 3 - 5after sliding
one bead onto each cord.
You should make at least 6 - 8 groups of
beads. Don't forget the extra knot
between them (step 4).
Step
10:Repeat
step 6 to complete the vertical
portion of the Beaded Cross.
Apply glue when tightening, and when it's
dry cut off the excess material.
Step
11: To attach the cords to make a
necklace, just tie an Overhand knot at the center
of the necklace cord, then slide it over the top
portion of the cross. Tighten it firmly,
close to the top end of the vertical piece.
It's better to attach only one cord to the cross.
Add any extras you need for the necklace by tying
them onto the first cord.
By
using any text or images on Free Macrame
Patterns, you are agreeing to ourTerms
of Use