|
|
| |
| |

|
|
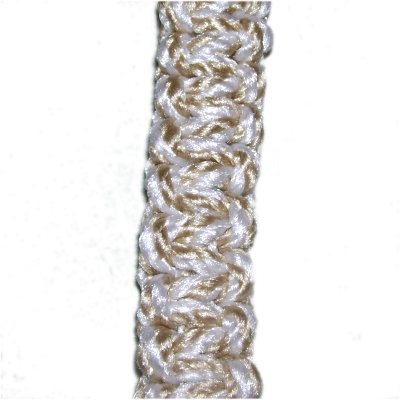
Description: This
Basic Plant Hanger is an easy Macrame
pattern suitable for beginners.
It features three types of basic
decorative knots. Make sure you
practice them before you get started.
You can add beads, decorations, or
additional knots to add character.
The cradle is designed to support any
size pot.
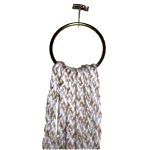
Finished Size: Approximately
44 inches tall, which includes the
fringe.
|
|
| |
|
| |
|
Supplies Needed:
- 6 mm cord material (62 or 74
yards -- see Preparation)
- 5 or 6 beads with 10 mm holes (depends
on size, see Preparation)
|
| |
| |
|
Knots Used:
|
| |
|
|
Preparation
|
|
|
|
|
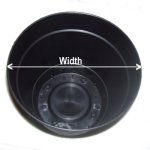
Measure the
width of the plant pot in the widest area
at the top edge.
Use this measurement to determine the
number of cords to cut for the Basic Plant
Hanger (below).
|
|
|
|
| |
For pots 10
inches or wider:
- Cut 12 cords, each 6 yards long
- Cut 2 cords, 36 inches long
For
pots less than 10 inches wide:
- Cut 10
cords, each 6 yards long
- Cut 2
cords, 36 inches long
Prepare the tips of the cords to prevent
unraveling. Using tape is recommended,
since it helps when applying the beads.
When applying the tape, compress the tips so
they are as narrow as possible.
|
| |
| |
|
|
|
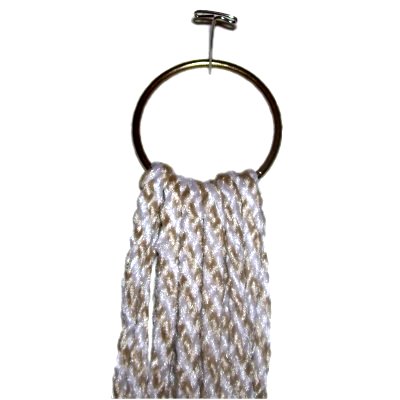
Step 1: Pass half of
the cords through the
2-inch ring while holding the ring upright.
They should dangle over the bottom of
it.
Match the ends of each cord as you pass
it through, so it is balanced.
Do the same with the remaining cords,
placing them on
top of the first group.
|
|
|
|
|
|
|
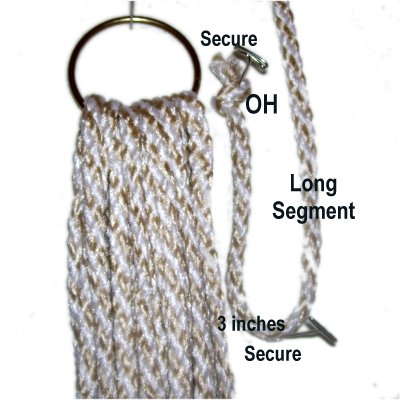
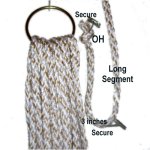
Start a Wrapped
Knot by tying an Overhand knot at one end
of a 36-inch cord. Secure it next to
the ring.
Fold the cord 3
inches from the knot, then bring
it back toward the ring. The long
portion should be on the right
(outside). Secure it at the
fold. |
|
|
| |
|

|
|
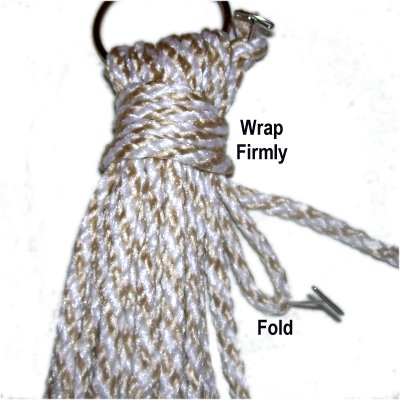
Wrap the long
portion around the cords on the ring
several times.
Make sure you wrap
firmly, and continue until the
knot is 1.5 inches long. |
|
|
|
|
|
|
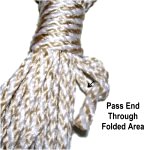
Pass what's
left of the long portion through the
folded area, which looks like a loop. |
|
|
| |
|
|
|
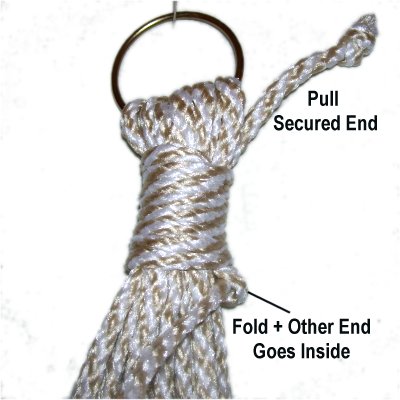
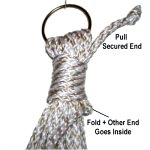
Pull the secured end,
which has the Overhand knot.
The fold and the other end will be pulled
inside the bottom of the Wrapped
knot.
Make sure you pull it half way through the
knot.
|
|
|
|
Cut off the excess material from each end of the
cord used to make the Wrapped Knot. Be
careful not to cut the long cords on the ring.
Tuck the stubs inside the knot so they can't be
seen. |
|
|
|
Divide the cords into groups of 4. There
will be either 5 or 6 groups, depending on what
you cut in Preparation. Bundle each group
separately with a rubber band.
You will be working with one group at a time, so
select one now and move the others aside.
Bundle each cord in the group by wrapping it
around your hand several times. Secure with
a rubber band.
|
|
| |
| |
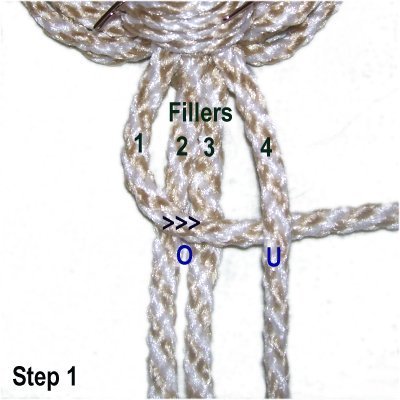
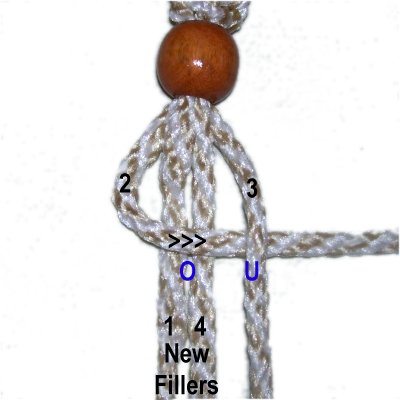
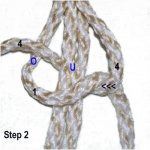
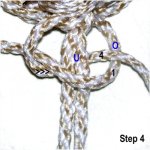
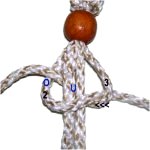
Step
2: Mentally number the four cords. The
fillers are 2 - 3, and the working cords are 1 and
4.
Tie the first Square Knot as shown below:
|
| |

|
|
Move cord
1 to the right, passing over
cords 2 - 3 and under
cord 4. |
|
|
|
|
|
|
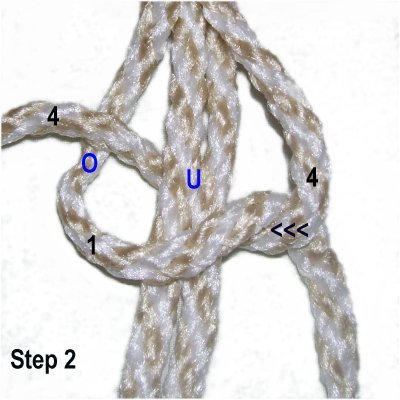
Move cord
4 to the left, passing under
cords 2 - 3 and over
cord 1.
Tighten firmly. |
|
|
|
|
| Cords 1 and 4 have
switched places, so the direction is
reversed for the second half of the Square Knot: |
|
|
|

|
|
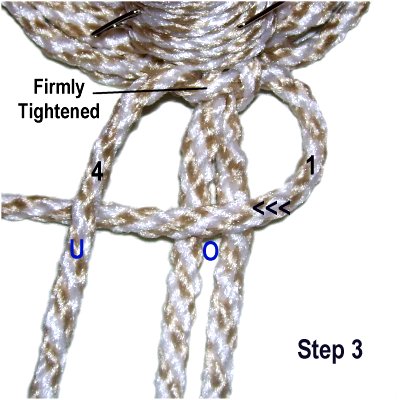
Move cord
1 to the left,
passing over
cords 2 - 3 and under
cord 4. |
|
|
|
|
|
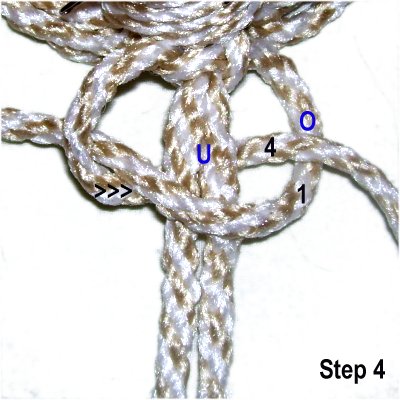
Move cord
4 to the right, passing under
cords 2 - 3 and over
cord 1.
Tighten firmly. |
|
|
| |
| |
|
|
Continue tying
Square Knots to create a sennit.
Push the knots close together as you
progress.
Tighten each knot firmly.
Stop when the sennit is 11
inches long.
|
|
|
|
|
|
|
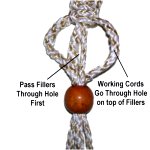
Step
3: Add a bead in the
following manner:
Pass both fillers (cords 2 - 3) through
the hole first.
Pass each working cord (1 and 4) through
the hole resting on
top of the fillers. |
|
|
|
|
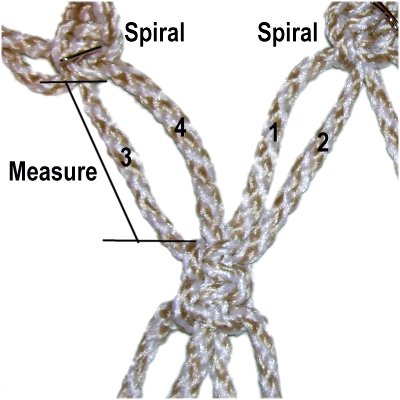
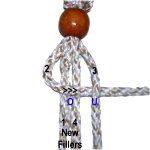
Before you move on to the Spiral design for your
Basic Plant Hanger, arrange the longest cords (2
and 3) on the outside, since they will become the
new working cords.
The shorter cords (1 and 4) should rest between
them, as shown in the images below. They now
become fillers. |
|
|
| |
|
|
To start a
Half knot, move working
cord 2 to the right, over
the fillers (1 and 4) and under
cord 3. |
|
|
|
|
|
Move working
cord 3 to the left, under
the fillers and over
working cord 2. |
|
|
| |
|
|
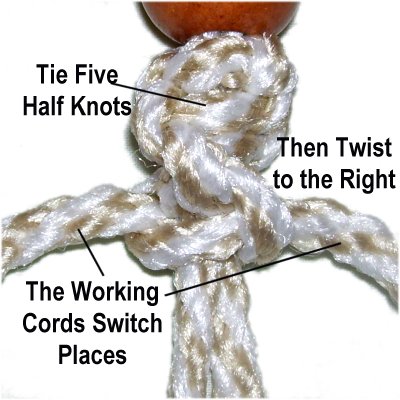
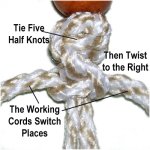
When making
the Spiral Stitch for your Basic Plant
Hanger, you should tie 5 Half knots, then
twist the knots to the right while holding
the fillers steady.
The working cords should switch places each
time you twist the knots.
Repeat this step every 5 knots as you
continue making the sennit. |
|
|
|
|
Step 4: Tie a Spiral Stitch
design by tying a series of Half Knots as
described above.
Stop when the sennit measures 11
inches.
Finish by tying the
second
half of
the Square knot. The Spiral Stitch was
the first half of a SK, so you simply change
direction to make the second half.
|
| |
|
|
| Step 5:
Repeat
steps 2 - 4 for each group of cords. |
|
|
|
| |
Cradle
|
|
|
|
|
Now you will
make the cradle at the bottom of the Basic
Plant Hanger.
Measure the plant pot and find the half
way point by dividing the total height by
2. So if the pot is 6 inches
tall, the half way point will be 3
inches.
Use
this measurement in step 6. |
|
|
|
Locate two Spiral sennits that rest next to each
other, and secure them side-by-side.
Make sure the last knots you tied are not twisted.
Mentally re-number the cords in each sennit 1 - 4. |
|
|
|
|
|
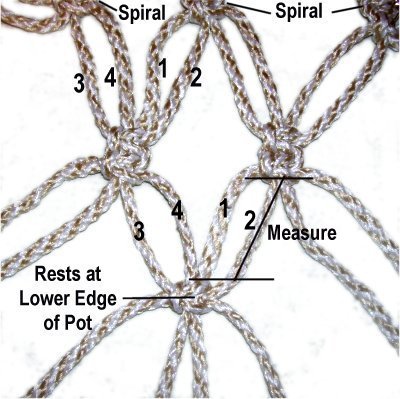
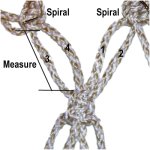
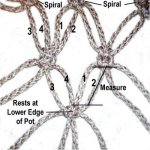
Step
6: Alternate
by selecting cords 3 and 4 from the left
sennit, combined with cords 1 and 2 from
the right
sennit.
Measure
from the bottom of the Spiral sennit down
to the place that would be the half way
point on the pot (see previous
image).
Tie two Square Knots at that point.
|
|
|
|
|
Step
7: Repeat
step 6 using the remaining cords.
This is much easier if you suspend the Basic Plant
Hanger by the ring at the top.
Make sure the sennits are not twisted, and that
you are combining cords from two sennits that rest
next to each other. |
|
|
|
Step 8:
You now need to alternate the cords again, as
described in Step
6.
Start by mentally re-numbering the cords coming
from two sets of SK tied in the previous
step. |
| |
| |
|
|
Measure from
the bottom of the SK tied in step 6, down
the same distance as in step 6. This
way the next knot rests at the lower edge
of the pot.
Repeat
steps 6 and 7, but tie only one
SK.
|
|
| |
|
|

|
|
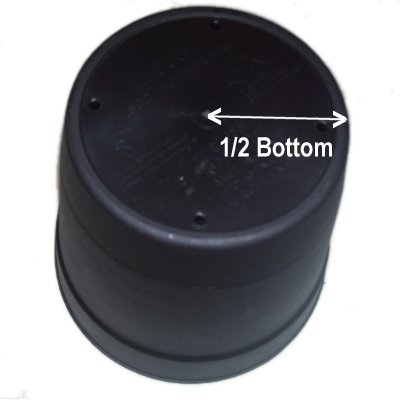
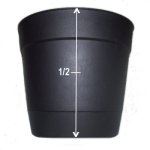
Step
9: Measure the bottom of
the pot from the edge to the center (1/2
the bottom area).
Tie additional SK to make a short sennit,
until you reach the measurement you came
up with for the bottom of the pot.
Tie all the knots firmly to eliminate any
space between them. |
|
|
|
|
| Step 10:
Repeat steps 8 and
9 with the remaining cords. |
|
|
|
| |
Finishing Touches
|
| |
| |
|
|
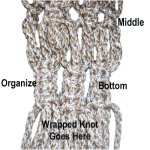
Organize all
the cords at the bottom of the Basic Plant
Hanger.
Match the knots made in the cradle,
especially those that will rest in the
middle and bottom of the pot. |
|
| |
|
| |
Step 11:
Tie a Wrapped Knot around all the cords, as you
did in step
1.
After tightening it, place the pot in the
cradle. The knot should rest in the center
of the pot. Make adjustments as needed.
Important: Pull on each cord to
eliminate any space between the Wrapped Knot and
the SK.
Cut off the excess material from the cord used to
make the Wrapped knot, and tuck the stubs inside
so they can't be seen.
|
| |
|
| |
Step 12:
Trim the tips of all the cords so they are
even. You have the option of tying
finishing knots, or to unravel and brush to create
a fringe for your Basic Plant Hanger.
When using Bonnie Braid or Nylon, you can heat the
tips with a flame to prevent the cords from
fraying.
|
| |
|
| |
|
|
By
using any text or images on Free Macrame
Patterns, you are agreeing to our Terms
of Use
|
|
|
|
|
Have
any comments about the Basic Plant Hanger? Contact
Me.
|
|
|
|

|
|
|