|
|
| |
|
|
Description:
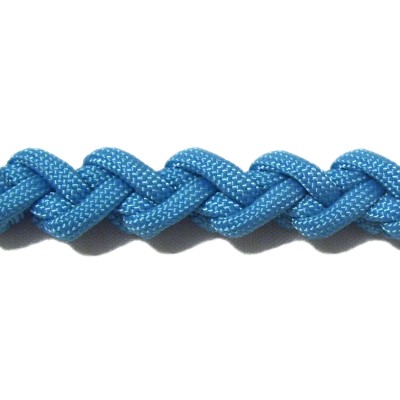
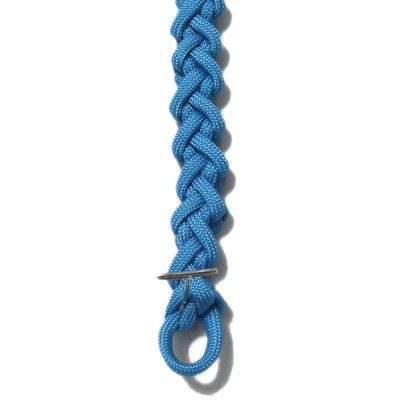
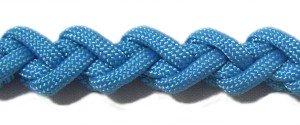
The Zipper Wrap is a variation of the Zipper
Sennit. The diagonal segments
face different directions to form a zigzag pattern
on the edges.
This design is not flat like most sennits.
The loops are raised in the back, forming a ridge
down the center.
You can use this interesting sennit for key chains
and bracelets, for the long posts in plant
hangers, and other similar projects.
The key to this design is to keep the folded
segments flat and neatly arranged. That's
the most challenging part, so work with the
material to avoid twisting.
Read the bottom section of Cord Preparation
if you intend to use Paracord, which is the
material used in the example shown.
|
| |
| |
| |
Preparation:
You need one cord to practice
the Zipper Wrap. It should be at least 60
inches long.
The cord should be at least 12
x the finished length of the item you
plan to make, if you are using this technique in a
project.
|
| |
| |
|
| |
|
|
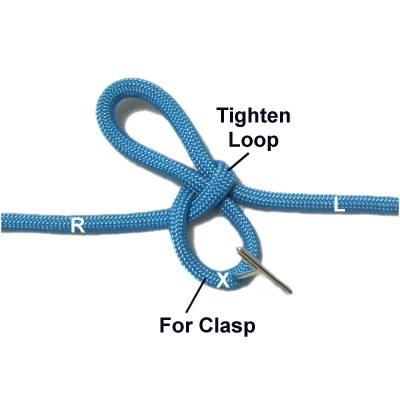
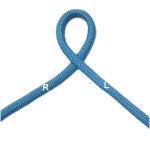
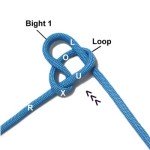
Step
1: Make a loop in the
center of the cord, crossing left
over right.
|
|
| |
|
|
|
Fold the left
half of the cord to form a bight.
Mentally label it bight
1.
Pass it into the loop under
- over (from below), heading
right to left.
Identify the segment marked with the X,
which leads to the bight. |
|
|
| |

|
|
Tighten the
LOOP by pulling the right
half of the cord.
(Optional) Pull the segment identified in
the previous step (X) if you need a loop
for a clasp. Secure it to your board
if you are using one.
|
|
| |
|
|

|
|
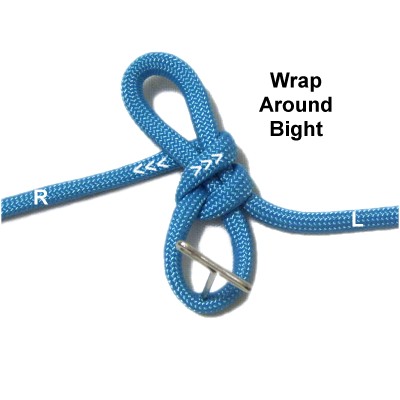
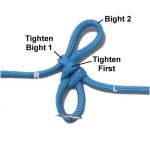
Step
2: Fold the right
half of the cord diagonally to
the right, then wrap it around the bight
heading left.
Make sure the cord is not twisted and is
FLAT. |
|
|
|
| |

|
|
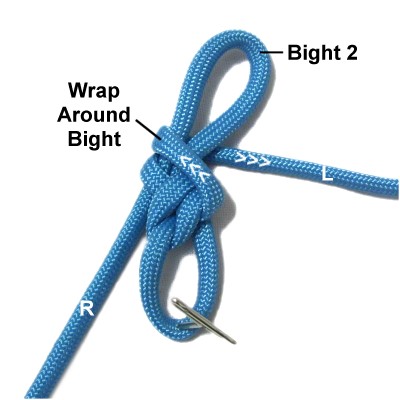
Fold the right
half of the cord to form bight 2,
then pass it into bight 1 over
- under (from the top).
It should be arranged diagonally toward
the right.
|
|
| |
|
| |
|
|
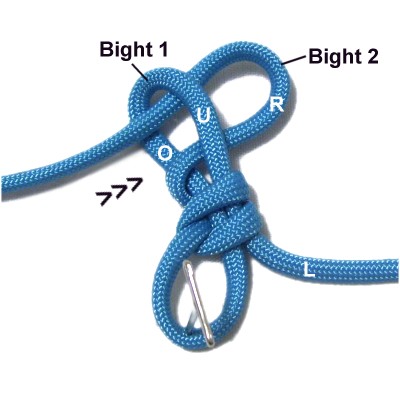
Step
3: Tighten the wrapped area
firmly,
by pulling the portion that leads to bight 2
(right
half).
Then tighten bight
1 by pulling on the left
half of the cord.
|
|
| |
|
| |

|
|
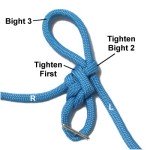
Step
4: Fold the left
half of the cord diagonally to
the left, then wrap it around bight
2 heading right.
Remember to work with the material to
avoid kinks or twisting.
|
|
| |
|
|

|
|
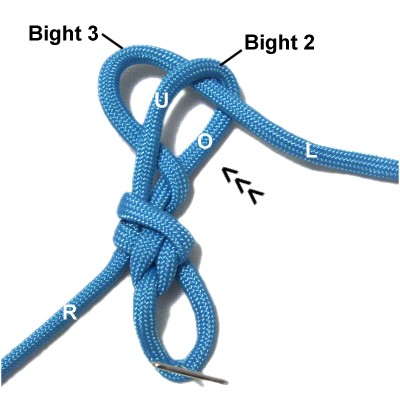
Fold the left
half of the cord to form bight
3, then pass it into bight 2 over
- under.
It should be arranged diagonally toward
the left. |
|
| |
|
|
|
|
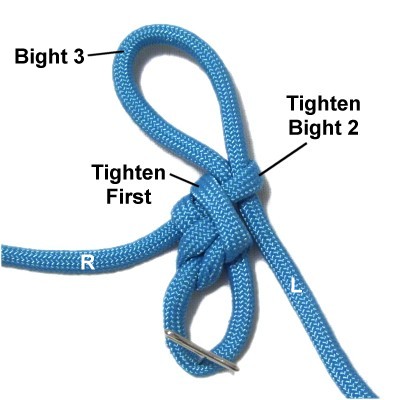
Step
5: Tighten the wrapped area firmly,
by pulling the portion leading to bight
3 (left half).
Then tighten bight
2 by pulling on the right
half of the cord. |
|
|
|
|
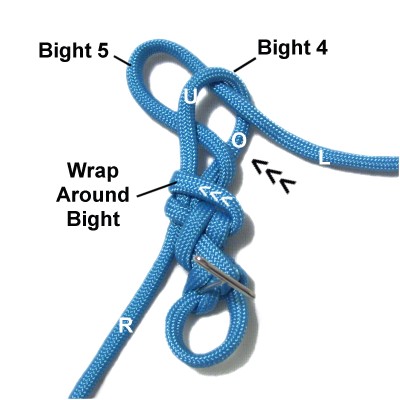
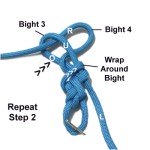
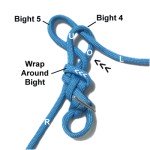
Step
6: Repeat
step 2 to wrap and create bight 4.
Repeat
step 3 to tighten. |
|
| |
| |
|
|
Step
7: Repeat
step 4 to wrap and
create bight
5.
Repeat
step 5 to tighten. |
|
| |
| |

|
|
Step
8: Repeat
steps 2 - 7 at least one more
time if you are practicing
the Zipper Wrap.
Continue until the finished size is
reached if you are using this sennit for a
project. |
|
|
|
| |

|
|
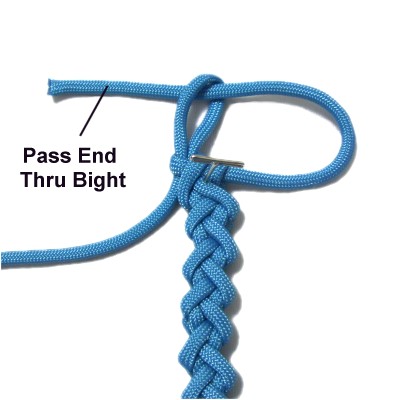
Step
9: Determine which half of the
cord was used to make the last bight.
Pass the opposite
end through the bight, then
tighten it firmly.
The two ends of the cord can now be used
to tie a button knot if you need one for a
clasp. |
|
| |
| |
| |
|
|
| By using any
text or images on Free Macrame Patterns, you are
agreeing to our Terms of Use |
|
|
|
| Have
any comments about the Zipper Wrap? Contact
Me. |
|
|
|

|
|
|
|