|
|
| |
 |
|
| |
|
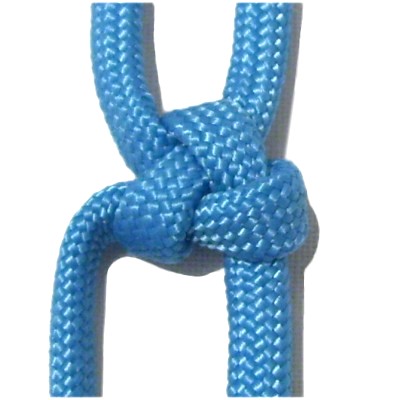
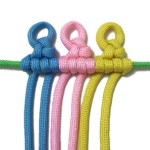
Description: The Triangle Knot
is a vintage Macrame knot that is rarely used
anymore. I found it in a book written in 1899,
but not in any books after that time.
You can use this interesting decorative knot
in an Alternating Pattern, to create a net-like
panel. It can also be used to make a
sennit, as well as a unique type of mount.
These variations are shown below the basic
instructions.
|
|
|
|

|
|
The Triangle
Knot Bracelet is a good
project to help you expand your skills
after you have mastered tying this knot.
Click on the image or link to view the
page. |
|
|
|
|
|
|
Basic Instructions
|
| |
| |
|
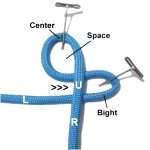
Step 1: To practice, fold one
18-inch cord in half and secure it to your board
vertically. When the knot
is tightened, there will be a loop at the top.
You can make the Triangle Knot with two cords,
if you don't need the loop.
Designer's
Tip: Create the knot the first
time with the cords on a project board, so you
can use pins. Then practice tying it in
hand without the pins.
|
| |
|
| |
|
|
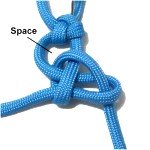
Pull the left
half of the cord under
the right half, forming a bight.
Arrange the left half horizontally, and
secure it to your board.
Make sure there is a SMALL space
between the bight and the center of the
cord.
|
|
| |
|
| |
|
|
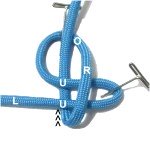
Step 2: Bring
the right
half of the cord under
both parts of the bight, heading
backward towards the center of the cord.
Pull it out so it temporarily rests
over the secured area a the center of
the cord.
|
|
| |
|
|
Designer's
Tip: Step 2 was changed because
it's easier to make the knot as described above,
especially if you tie it in hand.
Work with the material so that it folds around the
bight without twisting. |
|
|
| |
|
|
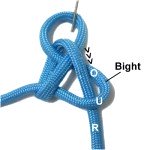
Step
3: Bring the right
half of the cord through the
bight diagonally,
passing over
- under the two parts near the
curve.
Make sure nothing is twisted, so the knot
is neat. |
|
| |
|
| |
|
|
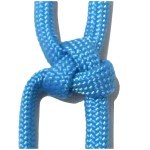
Step
4: Pull on the right half of the
cord to tighten the vertical loop.
Pull on the left half to tighten the
bight.
As you tighten, reduce the size of the
folded area if you need a loop. |
|
| |
| |
|
| |
 |
| |
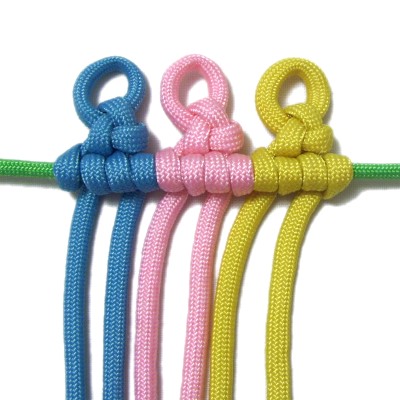
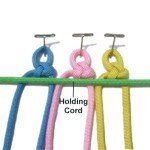
Mounting Technique
|
| |
|
|
|
| You can create a very unique mounting technique
by simply attaching the knot to a holding cord. |
|
|
| |
|
Step 1: Tie at least three
Triangle Knots, following steps
1 - 4 from the basic instructions.
When you tighten them, remove most of the slack
above the knot, so you have only a small
loop (less than 1/2-inch in size).
This is called a "picot", which gives character
to the upper edge of items like wall hangings
and curtain designs.
Secure them vertically to your board resting
side-by-side.
|
| |
|
| |
|
|
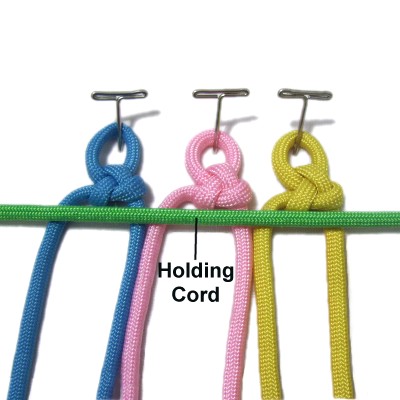
Place a holding
cord
on top of the working cords,
arranged horizontally. The knots
should rest against
the holding cord.
Secure it to your board, stretching it
so it has tension.
|
|
| |
|
| |
|
|
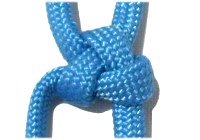
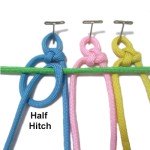
Step 2: Attach each
working cord to the holding cord with a
Double
Half Hitch.
Work left to right, tying the knots counter-clockwise.
This image shows a single
Half Hitch. Make sure you tie two
with each half of the cords.
|
|
| |
|
| |
| |
|
|
|
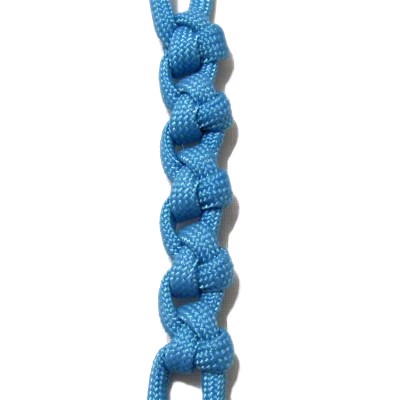
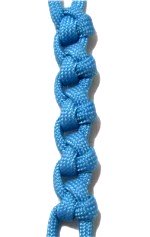
Sennit Design
You can tie
several Triangle Knots to form a
sennit.
When
practicing, you should use two cords,
each at least 18 inches long.
In a Macrame
project, you can use a folded 36-inch
cord if you need a loop at the top.
|
|
|
| |
| |
|
|
Repeat
steps 1 - 4 of the basic
instructions, to tie the first knot.
When the second knot is tied, the space
you pull the cord through in step 2 is
the area between the two knots.
|
|
| |
|
| |
|
|
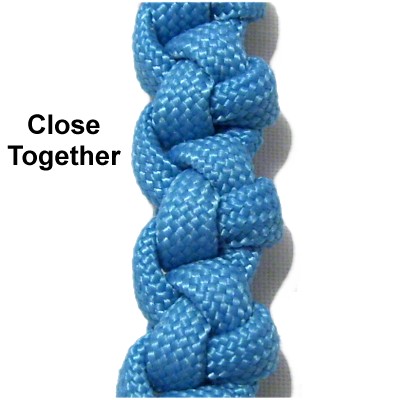
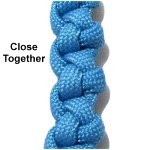
When
tightening the knots, make sure they are
close together.
After all the knots are tied, stretch
the sennit so the knots separate
slightly. Adding a little space will
make the knots more visible.
|
|
| |
|
|
| |
|
| |
Alternating Pattern
|
| |

|
|
|
|
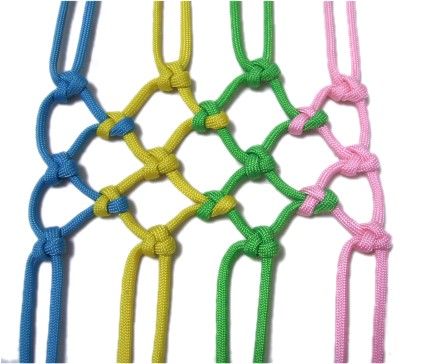
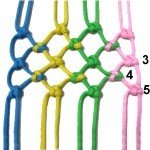
One of the best ways to use the Triangle Knot
is to form an alternating pattern, similar to
how you use Alternating
Square Knots.
This is an easy way to make a net-like
structure that's stable and strong. You
could make a Hammock with this technique, as
long as you use the right material, like the
Paracord shown in the example.
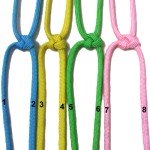
To practice, you need 4 cords folded in half
(or 8 separate cords). Make sure they are
at least 36 inches long, so you can tie several
rows.
|
| |
|
| |
|
|
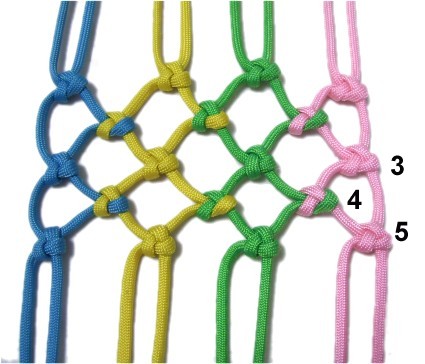
Step 1: Mentally
number the cords 1 - 8, starting on the
left.
Tie four Triangle Knots using cords 1
- 2, 3 - 4, 5 - 6, and 7 - 8.
Make sure they all line up in a horizontal
row. |
|
| |
|
| |
|
|
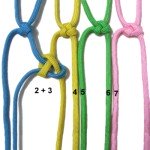
Step 2: Start the second
row by using cords
2 and 3 to make the first
triangle knot.
Tie the remaining knots with cords 4 -
5, and 6 - 7.
|
|
| |
|
| |
|
|
Step 3: Repeat
steps 1 and 2 at
least one more time, to make more rows.
|
|
| |
|
|
|
|
| By using any
text or images on Free Macrame Patterns, you are
agreeing to our Terms of Use |
|
|
| |
|
Have
any comments about the Triangle Knot? Contact
Me.
|
|
|
|
|
| |
|