Description:
The Switch Belt features the Square Knot,
the most frequently used decorative knot in
Macrame.
This is a great beginner's project, where you will
learn to tie a unique variation called the Switch Knot.
There is a simple Bead Clasp in this Macrame belt,
but if you prefer something else, you will have 8
ends to work with.
One unique feature of this belt design is that the
knots face different directions when you switch
colors. So you need to practice tying both
right and left Square knots.
The color change occurs when you swap
the fillers and working cords.
Important:
The knots are tied with the working
cords. The fillers
run through the knot.
Determine the size of the Switch Belt by
measuring just
above your hips with a tape
measure.
Use the following chart to determine how long to
cut the cords:
Size
of Belt
Length of
Cords
Up
to 26 inches
2 cords of
each color, 80 inches long
27
to 30 inches
2 cords of
each color, 96 inches long
31
to 36 inches
2 cords of
each color, 3 yards long
Over 36
inches
Hip
measurement x 3
Prepare
the ends with tape, glue, or Overhand knots.
First Half of Belt
When you make the Switch Belt, there will be
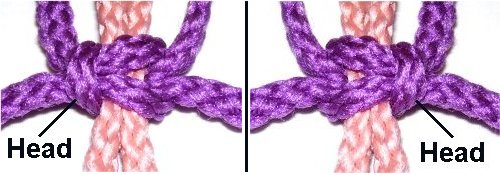
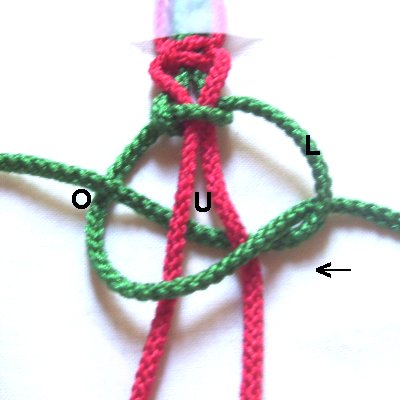
changes in the direction of the Square Knots (SK).
You use the HEAD
of the knot to determine the position, as in the
photo above.
The rule to follow is that the head will face the
same direction as the first
cord moved when constructing the
knot.
In steps 1 - 4, you will tie a Left
SK with color
A.
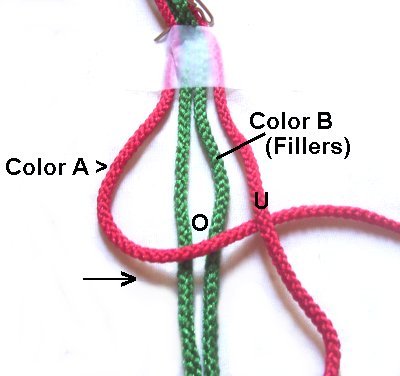
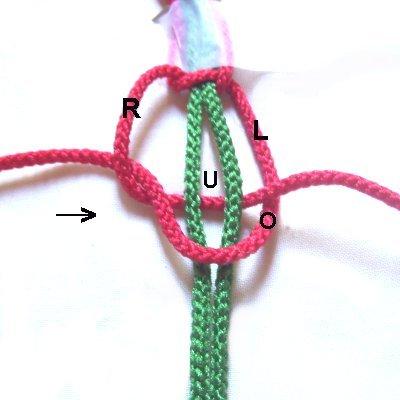
Step 1: Secure
the center
of the four cords to your board. They should be
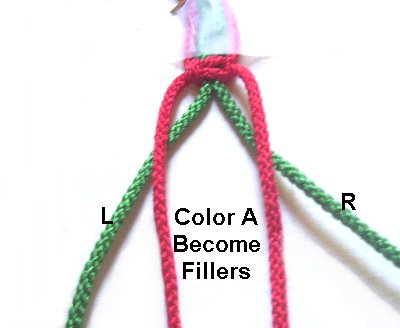
arranged vertically, as follows:
1 Color A
-- 2
Color B -- 1 Color A
Place a piece of
tape across the cords at the center, to
mark the place where the first knot should
rest when it's tightened.
Mentally label
the color
A cords, which are used to tie the
first knot at the center of the Switch Belt
(working cords).
The
Color B cords are the fillers.
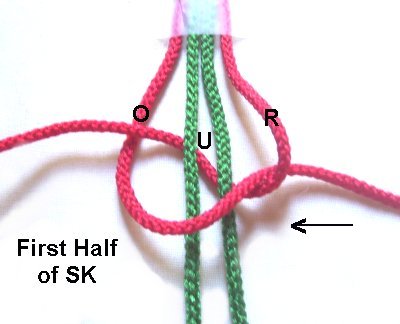
<<
Move the left
working cord to the right, passing over
the fillers
and under
the right
cord.
Movethe
right
cord under
the fillers,
and overthe
left
cord, as you pull it to the left. >>
Pull
on both working cords while holding the fillersfirmly
on the board.
This completes the first
half of the Square knot, which should
rest against the tape at the center.
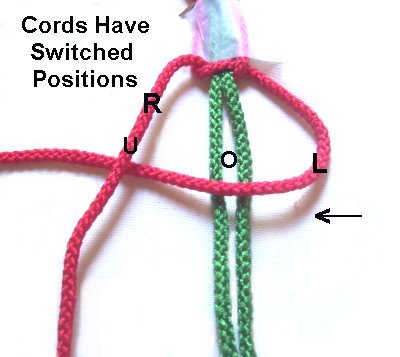
The
working cords have changed positions. So the left cord is now on the right,
and the right one is on the left.
<<
Move the left
working cord over
the fillers and under
the other working cord, heading left.
Bring the right
working cord under
the fillers and over
the left cord, as you move it right.
>>
Important:
Pull the filler
cords downward, as you
tighten each half of the Square
Knots.
This will help keep the areas
between the knots straight.
Now you will swap
cords and change the direction of the SK.
For the first
half of the Switch Belt (steps 1 -
4), when you useColor A,
you should always tie LEFT
Square Knots.
When you useColor
B,you tie RIGHT
Square Knots.
Step
2: Position the color
A cords so they rest between
the color
B cords.
Color
Awill now become the FILLERS
for the next knot.
Mentally label color
B (working cords) left and
right.
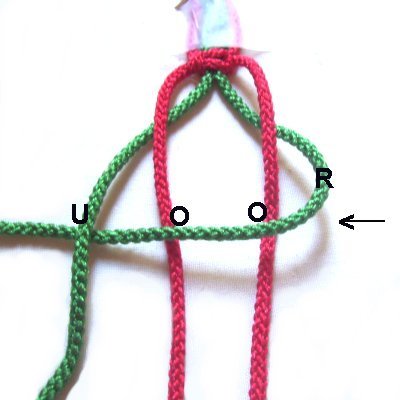
Step 3:
Below are the instructions for tying right SKwithcolor B:
<<
Move the right
working cord over
both fillers,
and under
the left
working cord.
Bring the left
workingcord
under
the fillers and over
the right cord, as you pull it
right. >>
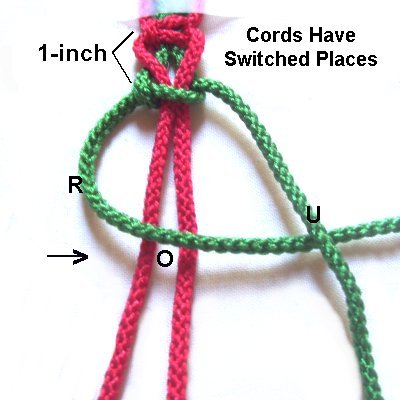
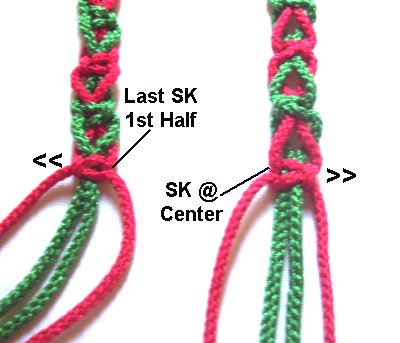
When you tighten the first half of this Square
knot, make sure there is at least 1-inch
of space between it and the SK above it
(see left image below).
The
working cords have now switched places.So the left cord is now on the right, and
the right one is on the left.
<
Bring the right
working cord to the left, over
the fillers and under
the other workingcord.
Bring the left
working cord under
the fillers and over
the other working cord, as you pull it
left. >
Step
4:Repeat
steps 1 - 3 several more times, until the
Switch Belt is 1/2the
sizeyou wish to make. So for a 28-inch
belt, stop at 14 inches.
Remember to switch
cords each time, so the colors
change. Also remember to change the
direction of the Square Knots, and tighten them so
they are 1-inch apart.
Second Half
Step
5: Turn the Switch Belt
around, and return to the knot at the
center. Notice that the SK is
now facing the opposite
direction.
For the second half of the belt, rightSK
are tied with the color
A working cords.
LeftSK
are tied with the color
B working cords.
Step 6:
Switch back and forth between the two colors,
tying left and right SK, until the second half is
the same sizeas
the first half.
Measure from the center,
and be as accurate as possible.
Add extra knots to both
halves of the Switch Belt if you feel you
need them.
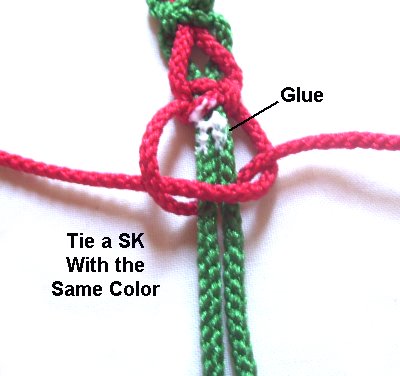
Step
7: Tie one extra Square
Knot at each
end, using the same
working cords as the last knot tied.
In this image, color
A was used last, so this extra SK
is color A, too.
As you tighten the first half, add glue to
the fillers, and then tighten the knot
firmly so it's on the glue.
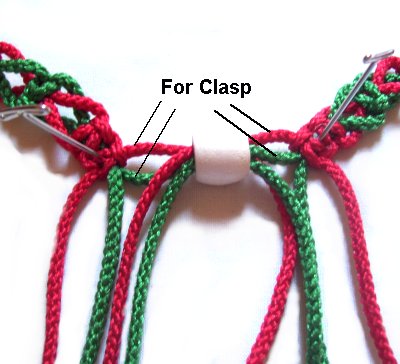
Finishing Touches
Step
8: After the glue is dry, trim the
cords so they are even.
Arrange the belt in a circle, making sure it's not twisted
and the front surface is face up.
The last knots tied should face each other, with
the ends spread apart somehwat, as shown in the
image below.
The two cords at
the TOP, on each side, are used to make
the bead clasp.
The other two are not
used, and will dangle freely.
You can change this arrangement, and try
to get all 8 cords through a bead instead
of 4.
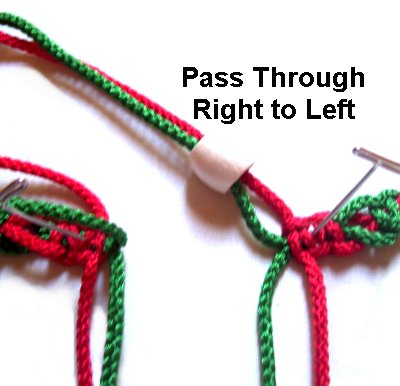
Bead
Clasp: Pass the two cords
from the right
end of the Switch Belt through the bead
fromright to left.
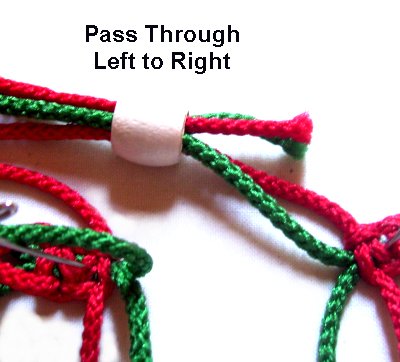
Pass the two
cords from the left
end through the bead heading left
to right.
Step 9: Trim
the cords again, to whatever length you want the
fringe. Tie tight Overhand or Barrel knots at the
tips of each cord. Other finishing knots can
be used, if you want to make changes.
Apply glue as
you tighten the knots(so it's inside), and allow it to dry
before cutting off the excess material.
By using any
text or images on Free Macrame Patterns, you are
agreeing to ourTerms of Use