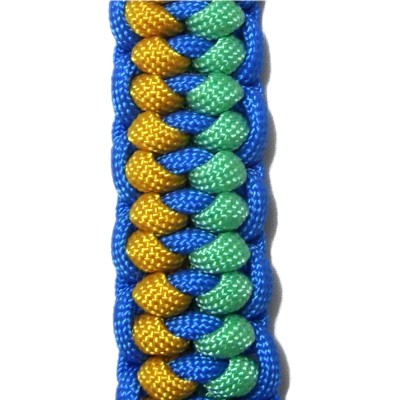
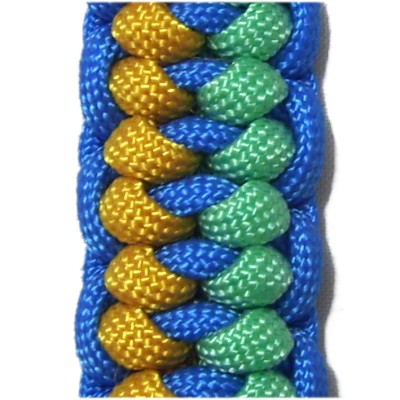
Description:
The Split Spine Bar is a unique
way of using Square knots combined with
extra loops. It features contrast
stitching that is slightly slanted and
close to the right and left edges of the
sennit.
When making a Macrame project with this
interesting technique, use at least two
colors for contrast.
In the example shown, Paracord material in
three colors was used. Be sure to
read Cord
Preparation to learn how to
prepare Paracord properly.
This
design is listed on the Fusion
Knots website.
Name:Split
Spine Solomon Bar
Click on the image or link to visit the
website.
The video gallery contains tutorials for a
wide range of unique combination knots.
To practice the Split Spine Bar, you need 3
cords at least 60 inches long (one working cord, 2
fillers).
When using it in a project, the WORKING cord needs
to be at least 12
x the finished length you are trying to
make.
The FILLERS can be approximately half the size of
the working cord. Make them longer if you
plan to tie a button knot to create a clasp.
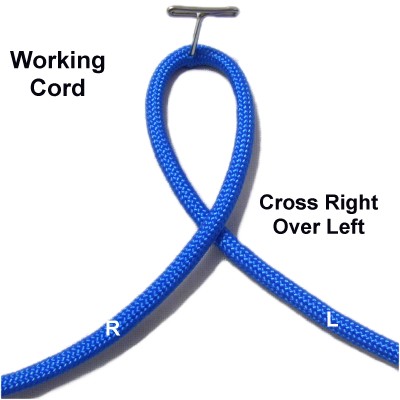
Step
1: Make a loop with the working
cord, crossing right over left.
Secure it to your board.
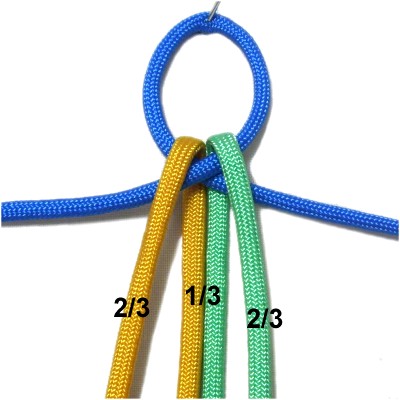
Fold the filler
cords and arrange them around the
crossing point of the loop.
Make sure that 2/3
of the material passes over the
front of the crossed area. The
remaining 1/3 passes beneath
the crossed area.
Move the long segments beside the short
portions.
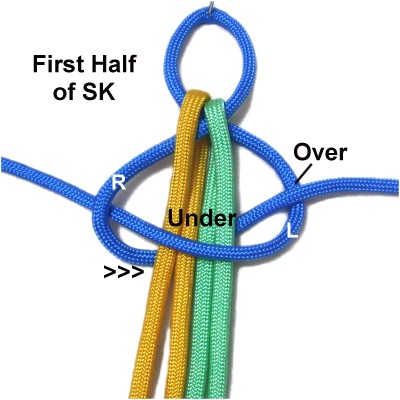
Step
2: Start the first half of
a Square knot by curving the left
half of theworking cord
horizontally to the left.
Pass it over
the fillers and under
the right half of the working cord.
Move the right
half of theworking cord under
the fillers, heading right.
As you pull it out on the right, pass it over
the left half of the working cord.
Tighten the knot and adjust the size of
the loop.
Now it's time to create the main area of the
Split Spine Bar. Here are a few important
details:
The front
half of the fillers are used to form
the loops, which is why they are longer. The
back half rest between them.
After tightening each knot, arrange the
front half of the fillers so they rest on
either side of the back half.
When you curve and weave the working cords,
keep the design wide so you can see all areas.
Each half
of the Square knots begins with the loops and
ends with tightening.
From this point on, the two halves of the
working cord are considered two separate
cords. Mentally label the four fillers
as shown in the image below. The long
portions should be labeled 1 and 4.
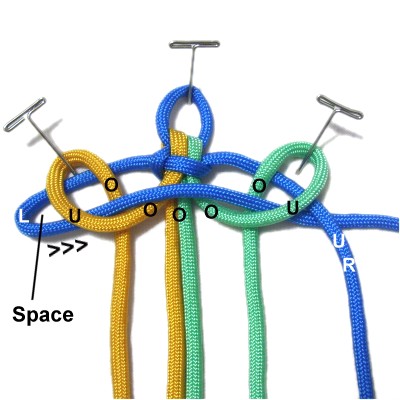
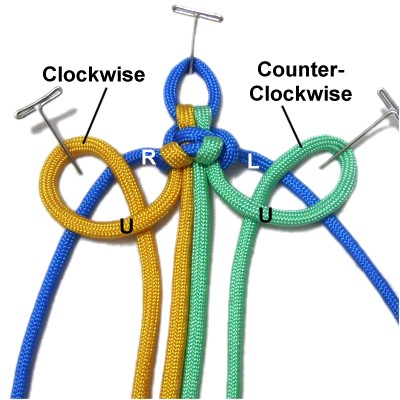
Step
3: Make a clockwise
loop with filler
cord 1, placing it on top of the
left
working cord.
Make a counter-clockwise
loop with filler
cord 4,
placing it on top of the right
working cord.
Important:
Pass under
to form the crossing points of both loops.
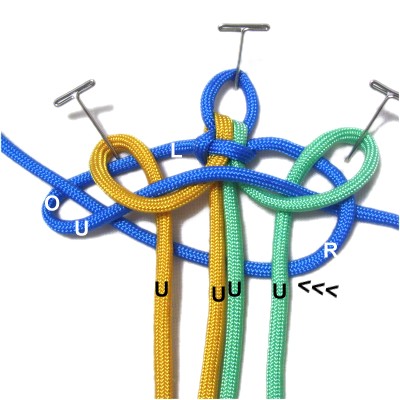
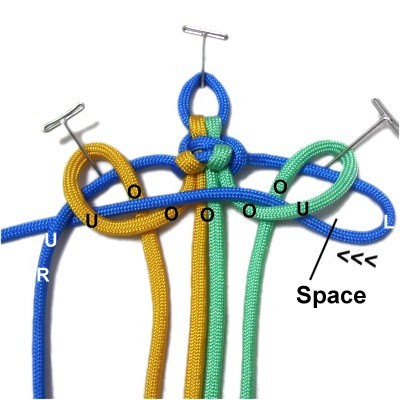
Step
4: Curve the left
working cord to the right,
leaving some space between the curve and
the left loop. Pass it through
the left loop under
- over.
Bring it over
all the segments in the center area, and
through the right loop over
- under.
Pass it under
the right working cord (outside the loop).
Designer's
Tip: The best way to secure the
loops for the Split Spine Bar is to lean a pin
backward over the crook (roundest area).
When it comes time to tighten the loops, you can
just lift them up over the pins.
Move the right
working cord to the left,
passing under
all four filler cords.
Pass it through the curved area of the
left working cord under
- over (from below).
The first half of the SK is
finished.
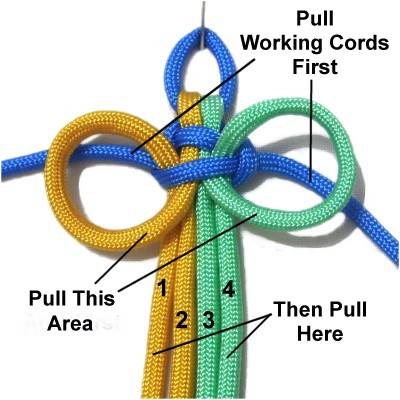
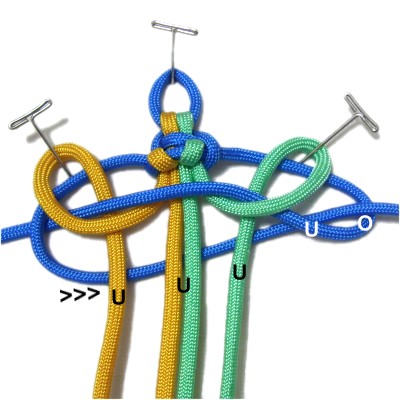
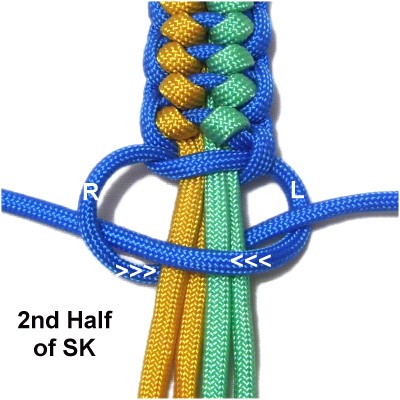
Step
5: There are three steps to
tightening each half of the knots in the
Split Spine Bar:
A.
Pull the working cords to tighten the
Square Knot.
B.
Pull the loops in the area close to the
Square Knot.
C.
Pull filler cords 1 and 4 to tighten the
loops FIRMLY.
Important
Tip: The reason why you pull the
loops in the area close to the SK is to
make sure there is no slack between them,
so they rest close together.
As you progress, make sure the loops you
are tightening are touching
the previous loops, like you see in this
image.
Step
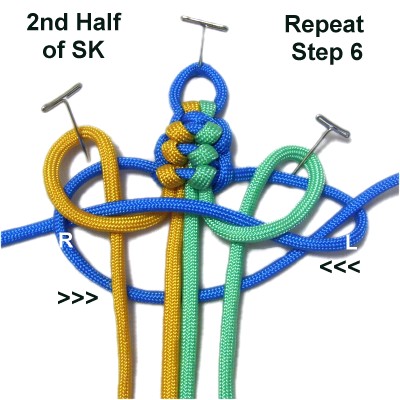
6: Repeat
step 3 to make the next
pair of loops. The two working cords
have switched places, so make this change:
The
ClockwiseLoop rests on
the right
working cord.
TheCounter-Clockwiseloop rests on the
left working cord.
Curve the left
working cord to the left,
leaving space between the curve and the
right loop. Pass it through
the right loop under
- over.
Bring it over
all the segments in the center area, and
through the left loop over
- under.
Pass it under
the right working cord (outside the loop).
Move the right
working cord to the right,
passing under
all four filler cords.
Pass it through the curved area of the
left working cord under
- over (from below).
Repeat
step 5 to tighten the Square
Knot.
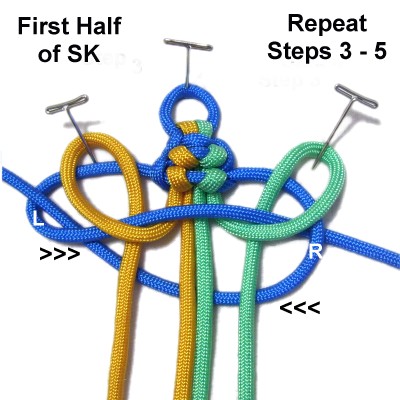
Step
7:Repeat
steps 3 - 5 to make the first
half of the next Square Knot.
Step
8:Repeat
step 6 to make the second half
and complete the SK.
Repeat
steps 7 and 8 several more times,
until the
Split Spine Bar is the length you need for
your project.
When practicing, it can be any length.
Step
9: Tie the first half of a
regular Square Knot:
Move the leftworking cordover
the 4 fillers and underthe
right working cord, heading right.
Move the right
working cord under
the fillers and overthe
curved area of the left working cord.
The two
working cords have switched places.
Tie the second half of the SK by moving
the left
working cord over
the fillers and underthe
right working cord.
Move the right
working cord under
the fillers and overthe
curved portion of the left working cord.
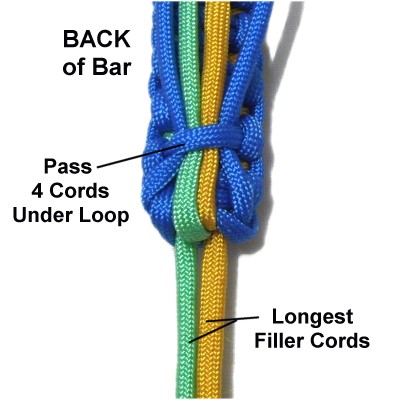
Step
10: Finish off the ends of
the working cords and the two shortest
fillers by passing them under a loop in
the BACK of the Split Spine Bar.
The longest filler cords can be used as
part of a clasp (see next image), or they
can be finished off, too.
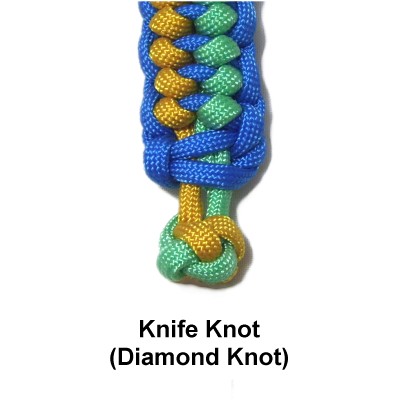
To make a
clasp, you can tie a button knot with the
two filler cords.
The Knife Knot(Diamond Knot) is a great choice,
since it can be made with two cords.
By using any
text or images on Free Macrame Patterns, you are
agreeing to ourTerms of Use