Description:
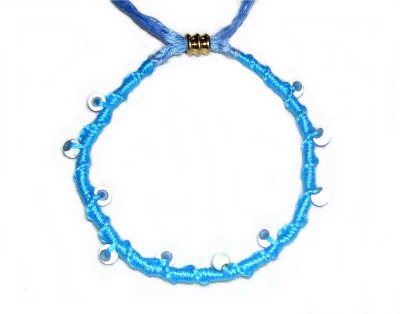
The Spiral Bracelet is a Micro-Macrame
design featuring the Half
Hitch Spiral, which is very easy to
tie.
There is a sliding bead clasp, which makes this
Macrame bracelet adjustable. The thickness
of the bracelet can be changed, simply by using
more or less
holding cords.
It's important to use cord materials that are soft
and comfortable, like the Cotton Embroidery cord
shown in the example.
When using beads for decoration, try to find the
smallest beads you can, with holes suitable for
the material you use. The bead used for the
clasp needs to have a hole large enough for ALL
the holding cords to fit, from both ends.
Remember the cords will be compressed, so the hole
size can be smaller than you expect.
In the example shown, a total of 12 cords were
passed through the bead, which had a 4mm
hole.
Determine your wrist
or ankle size, and cut the cords to the lengths
in this chart.
To change the
thickness of the Spiral Bracelet, simply add
more or reduce the number of holding
cords. The cords will overlap,
so take that into account.
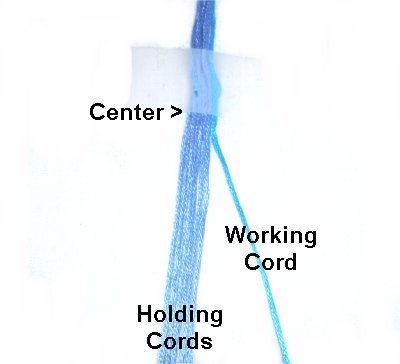
Step
1: Arrange the cords
vertically, matching the centers.
Place a piece of tape across the cords horizontally,
so the bottom
is at the center.
Make sure the working cord is on the right.
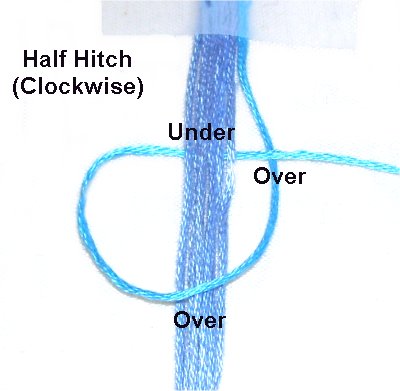
Step
2: Tie the first Half
Hitch by passing the working cord over
- under the holding cords, and over
the working cord on the right.
Tighten the knot so it rests next to the
tape.
Step
3: To encourage the knots
to spiral, rotate the working
cord after you have tied 5 more
knots:
Bring
the cord to the left,
then rotate it under
the holding cords, moving back to the
right.
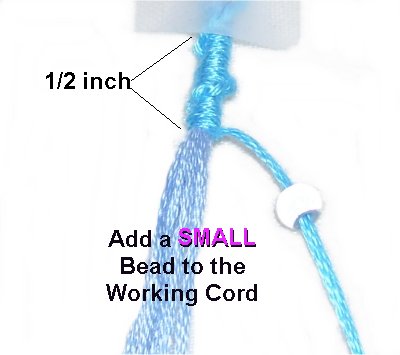
Step
4: Repeat
steps 2 - 3, tying more
knots for the Spiral Bracelet, until the
design measures 1/2
inch.
OPTIONAL:
Slide a small bead onto the working
cord, and then continue, adding
more beads every 1/2 inch.
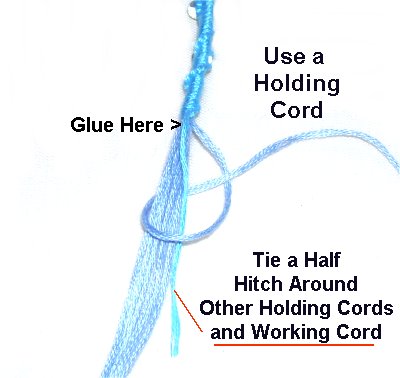
Step 5: When
the Spiral Bracelet is half
the size you plan to make, select one of
the holding
cords to make the final knots:
Tie a Half
Hitch with the holding cord, around ALL
the other cords, including
the working cord. Apply
glue before tightening it, and then pull
the end firmly.
(Optional):
Tie an Overhand knot with the working cord
and this same holding cord.
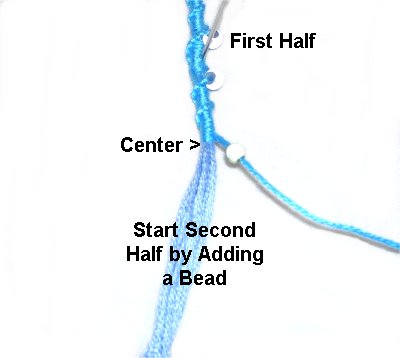
Step
6: Turn the bracelet
design around, and go back to the center.
Start the second half by adding a bead, if
you decided to use them.
Repeat
steps 2 - 5. Stop when the
Spiral Bracelet is the size you need.
Step
7: Trim the holding cords
so the ends are even. You can
cut off what's left of the working cord
and the holding cord used in step
5, but the others should be part
of the clasp.
To make the clasp, pass the holding cords
through the bead in opposite
directions.
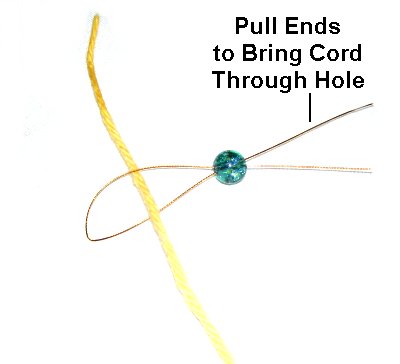
The
easiest way to slide multiple cords
through a bead is to use a cord
threader.
Fold a piece of fine wire in half.
Pass the ends through the hole in the
bead. Place the group of cords
through the area near the fold.
Pull on the ends of the wire,
which will bring it through the bead,
along with the cords.
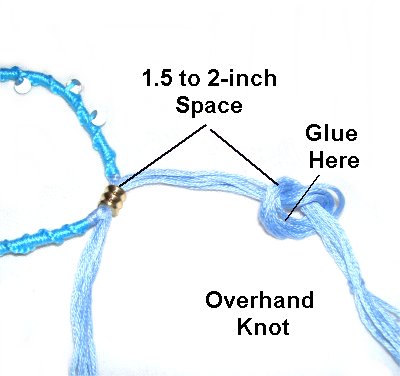
Step 8: Pull
the ends of the Spiral Bracelet, so the clasp is
in the
closed position.
Leave a 1.5 to 2-inch space, and tie a loose
Overhand knot with all the cords in one group working
together.
Check
to make sure your hand fits through when you
open the bracelet. Adjust the placement
of the knot as needed.
When
the Overhand knot is in the right place,tighten
it firmly. Apply glue before
tightening. When the glue
is dry, cut off the extra material.
Repeat
Step 8 with the other group of
cords.
By
using any text or images on Free Macrame
Patterns, you are agreeing to ourTerms
of Use