Description:
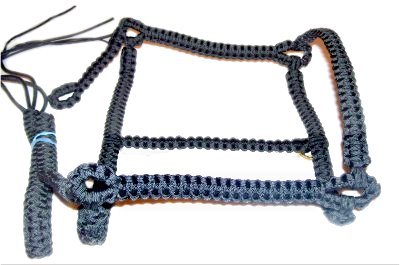
The Soft Halter features Square Knot
straps connected to knotted loops on the pieces
that rest on the horse's cheeks. The metal
rings typically found on halters for horses have
been replaced by these loops, making it a lot
softer. All of the pieces in this custom halter
are movable, so it's more flexible, too. You
have the option of adding a metal ring to attach a
lead to the harness.
Since each horse needs a specific size, you must
make careful measurements of your horse's head
prior to starting. You can also get your
measurements from a halter you are now
using.
The material used in the example is Parachute cord
(nylon), which can be finished off by melting the
tips with a flame. This material is by far
the best for this project, although other
materials will work as well. When using
material that cannot be melted, you will need to
tie finishing knots or rely on glue.
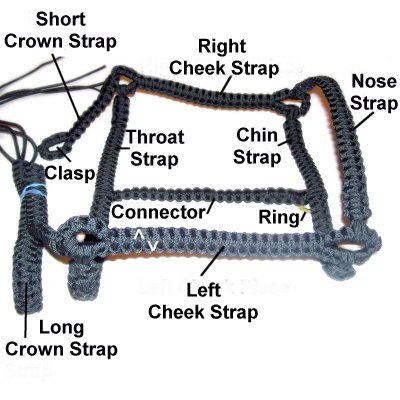
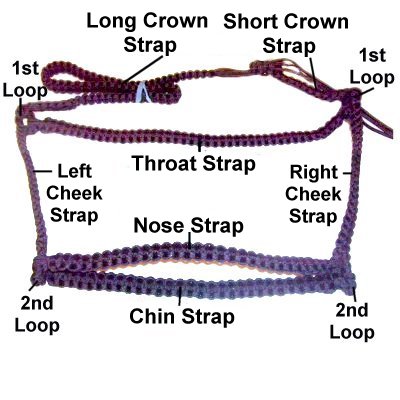
This Macrame pattern is rated Easy, but make sure
you understand the various parts of a
halter. A diagram has been provided.
Supplies
Needed:
550 Parachute Cord (amount depends on size
-- see preparation)
The most important step for creating the Soft
Halter is to make accurate measurements.
You must determine the length of all eight straps
separately, by either measuring your horse's head,
or a halter currently in use. Write the
measurements down on paper, since you will need to
refer to them as you create the pieces.
To determine the total amount of material for this
project, do the calculations as described below,
then add them all together.
Below you will
measure for the length of each strap shown
on this image, then follow the cutting
instructions. Keep each
set of cords separate, by placing them in
plastic bags.
Prepare the tips of all the cords with
masking tape, to prevent unraveling.
When using Parachute Cord to make the Soft
Halter, melt the tips with a flame.
Cheek Straps x
2: Measure along the sides of the
horse's head, in the area where you want the sides
of the Soft Halter to rest. The two loops will
be part of this measurement.
Cut
4 cords, the measured length x 12
Short Crown
Strap: This piece is a 6-inch
strap, which has a loop that's used as a
clasp. The ends from the Long Crown Strap
are passed through the clasp to secure the halter.
Cut
1 cord, 72 inches long
Cut
1 cord, 30 inches long
Long Crown Strap:
Measure from one cheek over the head to the other
cheek, then subtract 6 inches.
Cut
2 cords, 6 x the result + 36 inches
Cut
2 cords, 1 x the result + 36 inches
Throat Strap:
Measure from one cheek under the throat to the
other cheek.
Cut
2 cords, the measured length x 6
Cut
2 cords, the measured length + 12 inches
Nose Strap: Measure across the top
of the horse's nose, from one cheek to the other.
Cut
2 cords, the measured length x 6
Cut
2 cords, the measured length + 12 inches
Chin Strap:
Measure from one cheek to the other, under the
mouth. This will be similar in size to the
Nose Strap.
Cut
2 cords, the measured length x 6
Cut
2 cords, the measured length + 12 inches
Connector
Strap: Measure from where you
think the Throat Strap will rest, down to where
the Chin Strap will rest.
Cut
2 cords, the measured length x 6
Cut
2 cords, the measured length+
12 inches
Cheek Straps
The Cheek
Straps for the Soft Halter begin and end
with loops made with Larks Head Knots.
They are approximately 1.5 inches in size, which
allows the other straps to move around a
bit. You can alter the size if necessary.
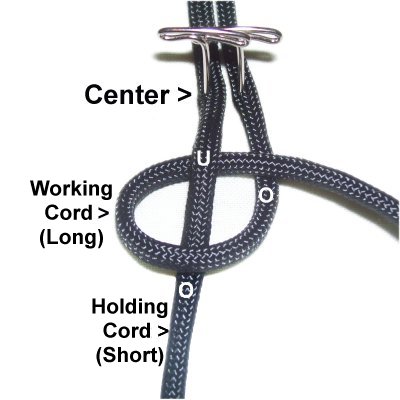
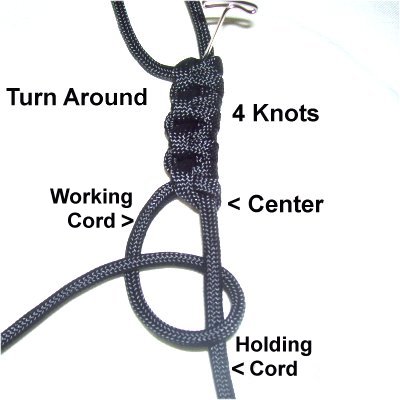
Step
1: Secure two cords cut for the Cheek
Straps to your board, matching
the centers. The long working cord
should be on the right.
Make a loop with the working cord, over
- under the holding cord,
rotating clockwise.
As you pull it right, pass over
the working cord. This loop should
rest against the pin at the center when
tightened.
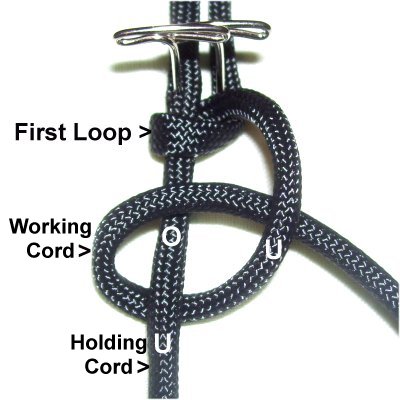
Step
1, continued: Make a second
clockwise loop with the working cord,
passing under
- over the holding cord.
As you pull it right, pass under
the working cord. Pull firmly to
tighten the Larks Head knot.
Step 2:
Repeat step 1, tying enough knots so the
sennit is 1.5
inches long.
This size can be changed if you wish, but it
should be at least 1-inch in length.
Step
3: Rotate the entire sennit
around on your board. The working cord
will be on the left.
Starting at the center, tie the same
number of knots as in steps 1 - 2.
The only change is that the loops are made
counter-clockwise.
Step
4: Form the ring by
bringing all four ends together.
Tie a tight
Square Knot with the working cords, with
the holding cords as the fillers.
Step
5:Subtract
3 inches from the total length
you measured for the Cheek Strap.
The result is the length you should make
the following sennit.
Tie additional Square Knots, measuring as
you progress, until the sennit is the
length you just calculated. Do
not include the loop when you measure.
Design
Tip: Always push the knots close
together as you progress, especially if you are
using Nylon Parachute cord to make the Soft
Halter.
Gaps will cause the knots to separate and loosen
over time.
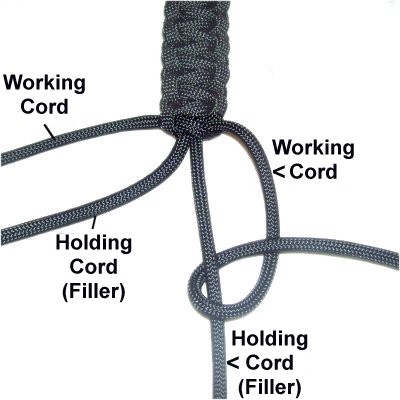
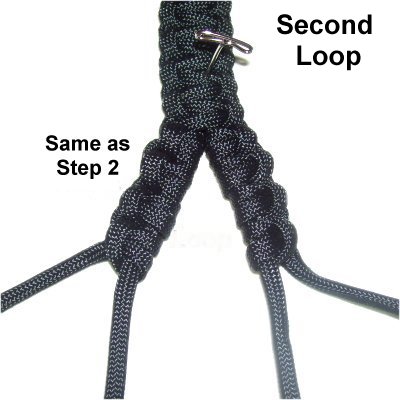
Step
6: To make the second loop,
divide the cords into two pairs, each with
one working and one holding cord
(filler).
Repeat
steps 1 - 2, tyingLarks Head knots with the two cords
on the right. Tie the same number of
knots as you did for the first loop.
The knots should be made clockwise.
Tie the same
number of knots with the two cords on the
left.
Make the knots in a counter-clockwise
direction.
Step
8: Move the working cords under
the holding cords, so they switch
places.
Use the HOLDING cords to tie a Square
knot, with the previous working cords as
the fillers. This will close the
loop.
Tighten it as much as possible, adding
glue inside
the knot.
Step
9: Turn over the Cheek
Strap so you are working in the
back.
Pull the four ends through spaces in the
area, working them under the back of the
knots.
Apply plenty of glue to hold them in
place. (See finishing information
below)
Finishing
Information: The finishing
method depends on the type of material you are
using to make the Soft Halter.
For Parachute cord (nylon), the best method is to
start by applying glue. When it's dry, cut
the excess down to 1/4-inch, and apply a flame to
the tips. Melt the material so it adheres to
the back of the knots in the area.
Bonnie Braid and similar materials can sometimes
be melted in the same manner. TEST the material
first by applying a flame to a small piece of scrap cord.
Do not use this method if the material burns
rather than melts.
Natural materials like Jute or Cotton
cannot be melted, so you need to rely on
the glue alone, or tie finishing knots.
Step 10:
Repeat steps 1 - 9
to make the second Cheek Strap for the Soft
Halter.
Crown Straps
Step 11:
The next part you will make for the Soft Halter is
the ShortCrown
Strap, which is 6 inches long.
Arrange the two cords on your board vertically,
with the long working cord on the right.
Repeat
Steps 1 - 4 to make a 1.5-inch loop that
will be used as a clasp. Place it on your
board vertically, as shown in the image
below.
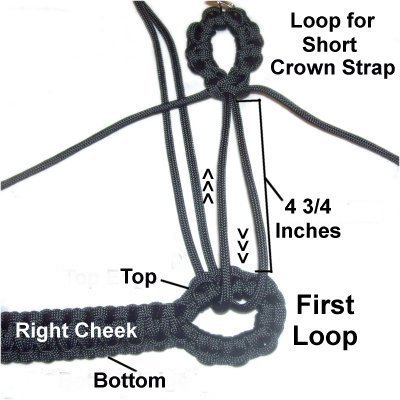
Arrange the Right
Cheek Strap horizontally, so the first
loop (steps 1 - 4) is in front of you,
with the second loop to your left.
Stand it upright on one edge, which is considered
the bottom.
Place pins behind it for support.
Important:
Make sure the front
is facing you, NOT the side where you finished off
the cords, which is the back.
Pass the holding
cords (short)from the Crown
Strap through the loop on the
Cheek Strap (front to back).
Bring them back up towards the Crown
Strap, so they surround the top
portion of the loop.
Adjust the position of the Crown
Strap so the Square knot is 4
3/4 inches from the Cheek Strap.
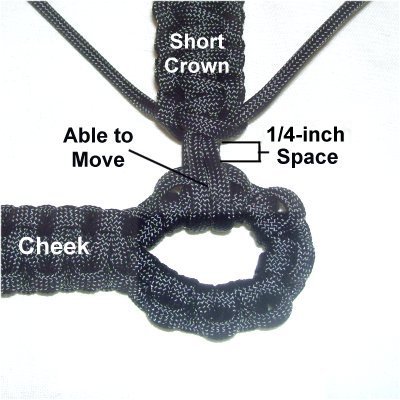
Step
12: Use the working
cords to tie a 4-inch
sennit of Square Knots (Crown
Strap). Make sure they go
around all four segments of the short
cord, which are the fillers.
Push the knots close together as you
progress.
Step
13: Tie another 1/2-inch
of SK, so you leave a 1/4-inch
space between the last one and
the Cheek Strap. This will allow the Crown
Strap to move.
Test it by moving it side to side.
You can remove or add knots as needed,
depending on how much movement you would
like to have in this area.
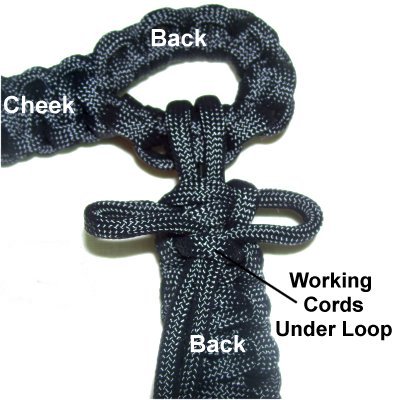
Turn over both
pieces, so you are working in the
back.
Pass the working cords from the Crown
Strap under a loop from one or more of the
SK in the area. Apply glue to
hold it in place.
Finish off the ends of the working cords
and fillers as you did in step
9.
Now it's time to create and attach the Long
Crown Strap. It doesn't have a
loop, so the process is a little different.
All the remaining pieces for the Soft Halter are
made in a similar fashion.
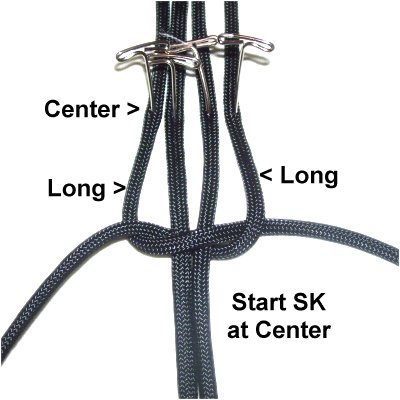
Step 14:
Arrange the four cords vertically on your board,
with the short cords between the long
ones. Place pins on the cords at the center, which
is where the sennit starts.
Tie a SK with
the long working cords around the short
ones (fillers). When you tighten the
first knot, make sure it rests against the
pins.
Take a look at the measurement you wrote
down for the Long Crown Strap. Divide that
measurement in half and subtract 2
inches.
Step
15: Tie additional Square Knots
until the sennit is the size you just
calculated. Remember to push the
knots close together as you progress.
Rotate the entire sennit around on your
board to work on the second half.
Step
16: Tie the second
half of a Square Knot with the
otherhalf
of the cords, placing it at the center.
Continue on, tying the same number of SK
as you did in the first half.
Step 17:
Measure the entire sennit to make sure it's 2
inches shorter than the length you
need. Add or subtract knots as needed.
Look at both ends of the Crown Strap to see which
has the shortest
cords coming from it. That end should
be arranged vertically in front of you.
Place the Left
Cheek Strap near the Crown Strap,
arranged horizontally, so the first
loop is in front of you. The second
loop should be to your right (see arrows on image
below).
Stand it upright on the bottom
edge. Make sure the front
is facing you, not the side where the cords were
finished off.
Step
18: Pass the ends of the filler
cords from the Crown Strap
through the loop (front to back), then
bring them back up so they surround the top portion of
the loop.
Move the pieces until there is 2
1/4 inches between the last SK
in the Crown Strap and the loop.
Step 19:
Tie 2
inches of SK with the working cords,
around all four segments of the filler
cords.
Make sure there is 1/4-inch
space between the last SK and the loop in
the Cheek Strap. (See image for step 13)
Make sure the Crown Strap can move easily, then
finish off the ends as you did in step
13.
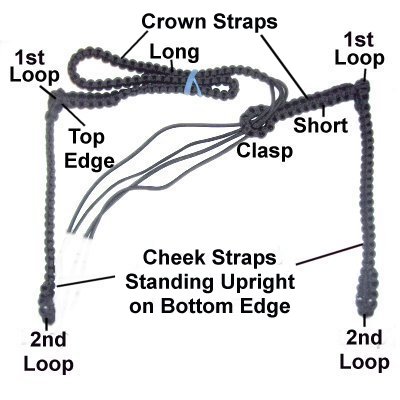
Step
20: Arrange the Cheek
Straps so they are standing upright on the
bottom edge. Adjust both Crown
Straps so they are horizontal and heading
towards each other.
Pass the ends from the Long Crown Strap
through the loop in the Short Crown Strap.
Step 20,
continued: Measure the entire Crown
Strap (both parts) to verify that this portion of
the Soft Halter is the right size for your horse.
You can add or remove knots in the long portion if
needed.
Trim the cords coming from the unattached end of
the long strap. Finish the tips in some manner to
prevent unraveling (glue, melting, or knots).
Nose, Chin, and Throat Straps
Here's a
review of the arrangement for the next
pieces of the Soft Halter:
The Nose and Chin Straps are attached to
the second
set of loops, with the Nose Strap
resting above the Chin Strap.
The Throat Strap is attached under the two
Crown Straps, to the first
set of loops.
Step 21:
Repeat Steps 14 -
16 using the cords and
measurements for the Nose
Strap.
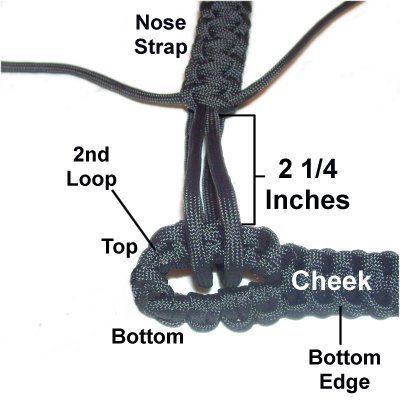
Step 22: Arrange the Nose Strap
vertically. Arrange the Right
Cheek Strap horizontally, so the second loop
is near the Nose Strap.
The first loop should be to your right (see image
below).
The Cheek Strap should be standing upright
on the bottom
edge. Compare it to the opposite end so you know
which is the correct edge to stand it on.
Important:
Make sure the front
of the Cheek Strap is facing you.
Pass
the fillers from the Nose Strap around the
top
portion of the loop (front to
back), then back up. Adjust the
pieces so there is 2
1/4 inches between them.
Tie 2
inches of SK using the working
cords, around all four segments of the
fillers.
Do
not finish off the cords yet.
Step 23:Repeat
step 22, attaching the other end of the
Nose Strap to the Left
Cheek Strap.
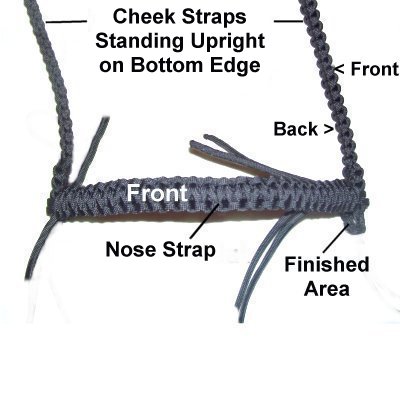
Read the information below before you get started,
so this strap for the Soft Halter is positioned
properly.
Important:
The Cheek Straps should be standing
upright on the bottom edge.
The front surfaces are on the outside, and
the areas where you finished the cords
(back) are on the inside.
The front of the Nose Strap should be face
up.
Step 24:
Once this portion of the Soft Halter is arranged
correctly, measure to make sure the Nose Strap is
the correct size for your horse.
Then finish off the ends of the cords as you did
in step
9.
The next piece for your Soft Halter is the Chin
Strap, which rests underneath the Nose
Strap, and is attached to the same loops.
Your horse's nose fits between the two straps.
Step 25:Repeat
steps 14 - 16 using the cords and
measurements for the Chin Strap.
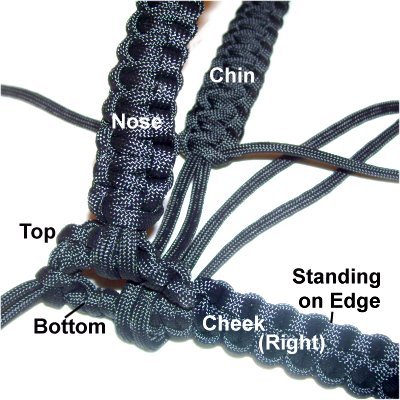
Step 26: Position the Soft Halter
so the Chin Strap is vertical and the Right
Cheek Strap is horizontal and upright, as
in the image below.
Note that in the image below the pieces were
diagonal to get a better photo.
Pass the fillers
from the Chin Strap around the bottom
portion of the loop (front to
back), then back towards the Chin
Strap.
Adjust the pieces so there is 2
1/4 inches between them.
Tie 2
inches of SK using the working
cords, around all four segments of the
fillers.
Step 27:
Attach the opposite end of the Chin Strap to the Left
Cheek Strap, in the same manner.
Measure the Chin Strap to make sure it's the right
size. Then finish off the ends as you did instep
9.
The next piece for your Soft Halter is the
Throat Strap, which is attached to the first set
of loops, and rests under the Crown Straps.
Step 28: Repeat
steps 14 - 16, using the cords and
measurements for the Throat Strap.
Step 29:Repeat
steps 26 - 27, attaching the Throat Strap
to the first
set of loops. The fillers should pass around the
bottom portion of the loops, so the Throat Strap
rests underneath the Crown Straps.
Connector Strap and Ring
The final piece for your Soft Halter is a
Connector Strap that's attached to the
Chin and Throat Straps. It rests vertically,
like the Cheek Straps.
A ring is added in the instructions below, but it
is optional. The purpose for the ring is so
you can attach a lead.
Step 30: Repeat steps 14 - 16,
using the cords and measurements for the Connector
Strap.
At one end of the strap, pass the filler cords
through the ring under
- over. Pass the ends between
the two fillers and pull to tighten.
This shows the
back
of the Connector Strap, where the ring is
resting.
It should dangle downward when you hold
the strap above your work surface.
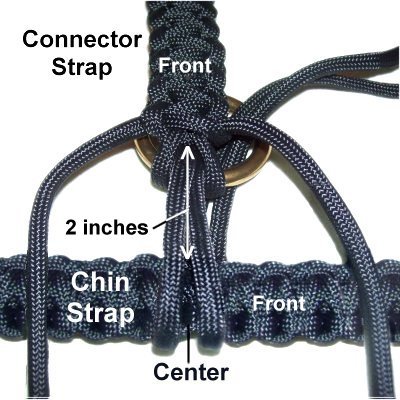
Step
31: Place the Connector
Strap next to the center
of the Chin
Strap, with the front
surface of both pieces face up.
Pass the fillers from the Connector Strap
around the Chin Strap, and back through
the ring.
Adjust the pieces so they are 2 inchesapart.
Step
32: Tie several SK with the
working cords of the Connector Strap,
around all 4 segments of the filler
cords. Push the knots close
together.
The last knot should
touch the Chin Strap. This piece
should not move around like the other
straps in the Soft Halter. Pull on
the fillers if necessary to bring the
pieces close together.
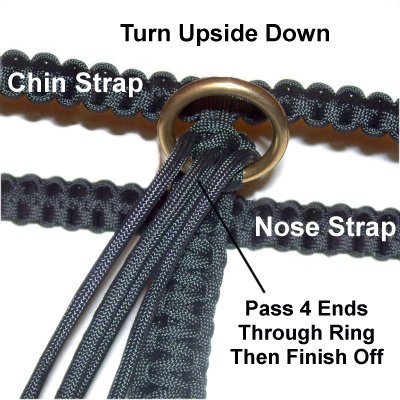
Step
33: Turn the Soft Halter upside
down.
Pass all 4 cords (Connector Strap) through
the ring, then slide them under the loops
of at least two knots.
Don't
finish them off yet.
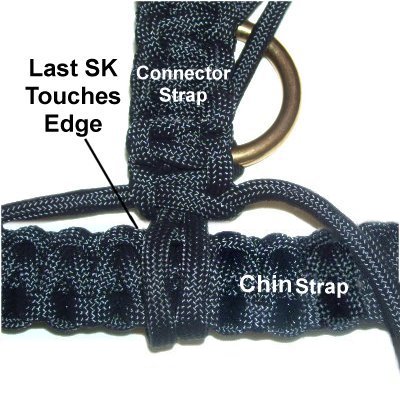
Step
34: Repeat
Steps 31 - 32to attach
the other end of the Connector Strap to
the Throat Strap.
Make sure it's in the center, and the last
SK tied is against the edge of the Throat
Strap.
Step 35:
Put the Soft Halter on your horse, after making a
final measurement of the Connector Strap.
Make sure everything fits properly.
You can still make adjustments to the length of
the Connector Strap if necessary.
Finish off the cords at both ends of the Connector
Strap, in the same manner you did all the others.
By
using any text or images on Free Macrame
Patterns, you are agreeing to ourTerms
of Use