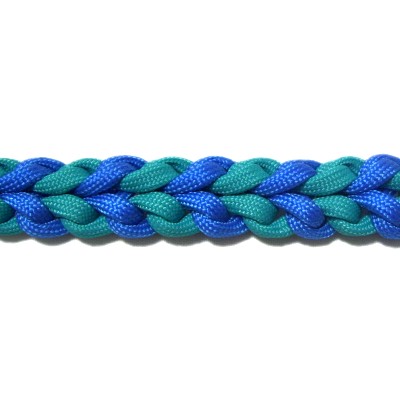
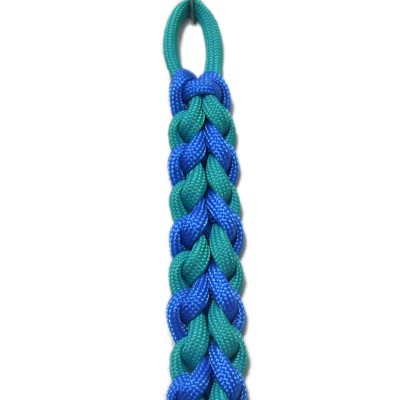
River Bar
Description: The River Bar is
a unique knotting technique. The loops and
folds produce a rippling pattern similar to the
waves of a river. Using different shades
of blue or green is recommended.
It's suitable for Macrame projects like
bracelets, belts, and pet collars. This
design is smooth on the back, so could be used
to make a choker style necklace. You can also
use it for the long posts in hanging planters or
tables.
Paracord bracelets are very popular, and this
decorative knot is a perfect choice if you are
making one. The design includes a loop
that can be used as a clasp.
The River
Bracelet Click on
the image or link to view the page.
I found this knot the Fusion
Knots website.
Click on the image or link to visit.
View the video
gallery , which contains
tutorials
for a variety of very unique and
appealing designs.
Preparation:
To practice
the River Bar, you need one cord of each color,
at least 36 inches long.
When using it in a project, multiply
the finished length by 7 , and cut the
cords to that size.
Be sure to melt the ends with
a flame if using Paracord material, for both
preparation and finishing. See Cord
Preparation
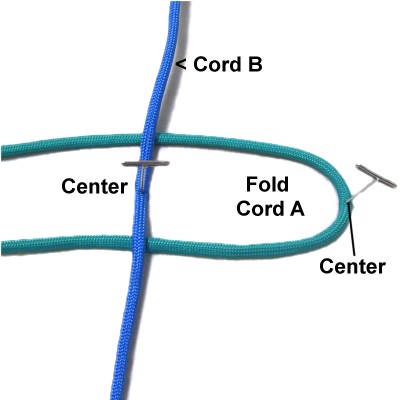
Step
1: Fold cord
A in half an place it horizontally
on your board with the fold on the
right.
Place cord
B on top, arranged vertically .
The centers should line up.
Bring each half of cord
B
under
cord A, then pass both halves over
the folded area on the right.
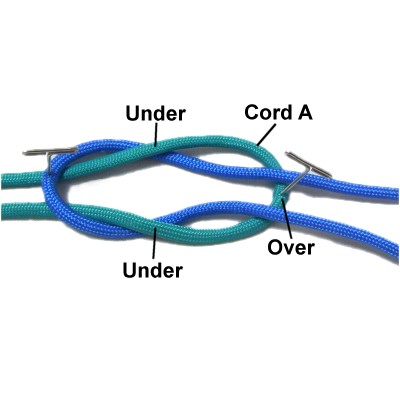
Turn the knot so it's vertical .
Hold cord A, then pull both halves of cord B
Adjust the loop to the most appropriate
size for how you intend to use it.
Secure the loop to your board.
Arrange cord B so the two halves are diagonal
(arrows).
Designer's
Tip: These two terms may be
confusing to beginners:Backward =
Closer to the back of your boardForward =
Closer to the front of your board
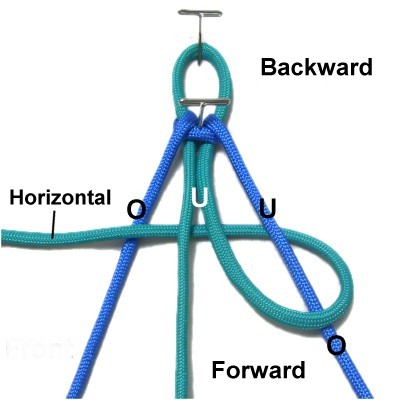
Step 2: Use the
right
half of cord
A to make a counter-clockwise
loop over
the right half of cord B.
Move it backward
and pass it under
cord B, heading left. Bring it under
both halves of cord A, and over
the left half of cord B.
Keep it horizontal
when you are done.
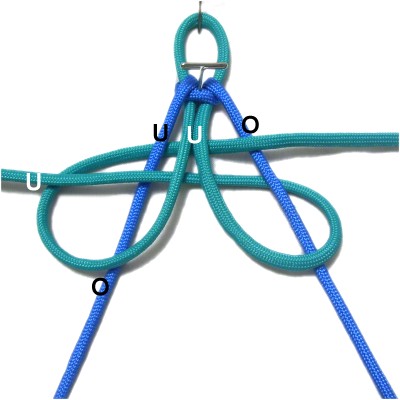
Make a
clockwise loop with
the left
half of cord
A , passing it over
the left half of cord B, then under
the right half of
cord A (backward).
Bring it under
the left half of cord B, under
both halves of cord A, and over
the right half of cord B.
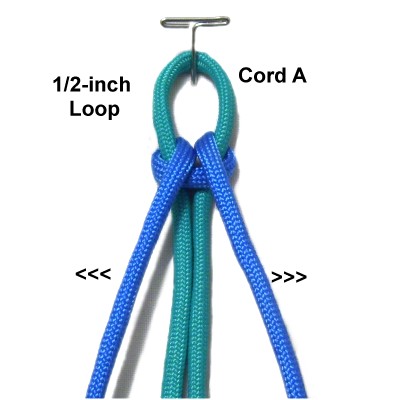
Tighten the knot by holding both
halves of cord
B with one hand while using the
other hand to pull each half of cord
A.
Adjust the size of the loop if you plan
to make a button knot for a clasp.
The two cords have now switched
positions.
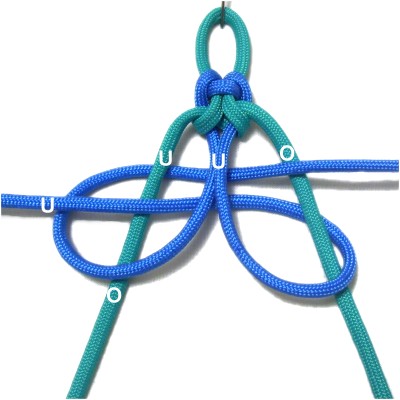
Step 3: Use the right half
of cord
B to make a counter-clockwise
loop over
the right half of cord A.
Move it backward
and pass it under
cord A, heading left. Bring it under
both halves of cord B, and over
the left half of cord A.
Make a
clockwise loop with
the left
half of cord
B , passing it over
the left half of cord A, then under
the right half of
cord B (backward).
Bring it under
the left half of cord A, under
both halves of cord B, and over
the right half of cord A.
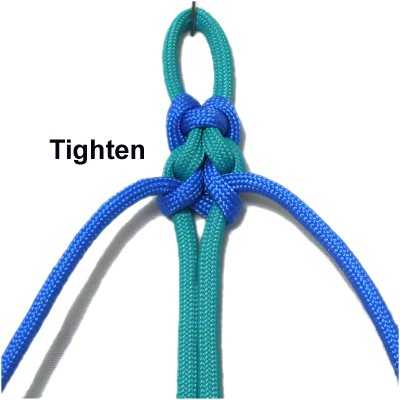
Tighten the
knot by holding both halves of cord
A , then pulling on each half of
cord B.
Step 4: Repeat
steps 2 and 3 several times if
you are practicing the River Bar.
When making a project, stop when it's
close to the finished length.
Include the loop when measuring.
Step
5: When making a project
with the River Bar, the last cord used to
make the loops (inside position) is used
to make a button knot.
By
using any text or images on Free Macrame
Patterns, you are agreeing to our Terms
of Use
Have
any comments about the River Bar? Contact Me .