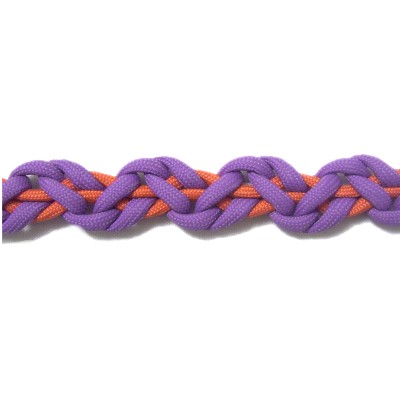
Description:
The Mycelium Bar is stretched after the
knots are tied, allowing you to see the diagonal
and horizontal branching. It's quite
interesting.
You will be tying a series of Half
Knots with extra folds. Because
these knots are tied in both directions, Square
knots are formed.
This decorative knot is perfect for Paracord
bracelets, Macrame belts, and other projects where
you need a long, slender knot design.
The instructions below include a loop at one
end. At the opposite end a button, bead or
button knot can be placed to form a clasp.
Paracord was used in the instructions shown.
Be sure to read the bottom section of Cord
Preparation to find out how to
treat the tips to prepare and finish the cords, if
you plan to use this material.
The video gallery has this design under
the name Branching
Mycelium Bar.
Preparation
and Loop
To practice the Mycelium Bar, you need two cords
in contrasting colors, each at least 60 inches
long.
When using this decorative knot in a Macrame
project, the length of the working cord (A) should
be 8
x the finished length of the item you
plan to make.
Cord B should be 2 x the finished length + 8
inches. This gives you enough material to
tie a button knot for a clasp.
The loop design below is optional if you prefer to
simply fold the cords, or if other knots have been
tied.
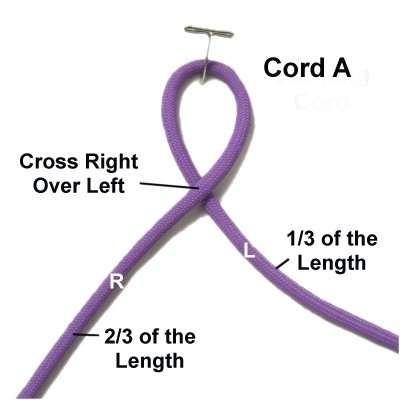
Step 1: Make a
loop with cord
A, crossing right
over left.
The right
portion of the cord should
contain 2/3 of the material. The
left portion should be 1/3 of the total
length.
Fold cord
B in half and arrange it around
the crossing point of the loop, so the right half
passes over the front of it.
The left half should rest underneath
it.
Step
2: Move the left
portion of working
cord A to the left, passing over
cord B and under
the right half of cord A.
Move the right portion
of cord A to the right, passing under
cord B and over
the left half of cord A.
This is a Half knot, which is similar to
what you will be tying for the remainder
of the Mycelium Bar.
Tighten the knot firmly, and adjust the
size of the loop so it's appropriate for
your project.
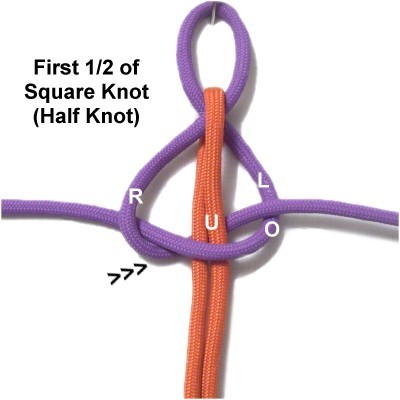
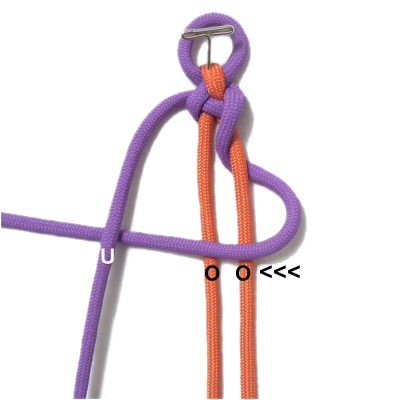
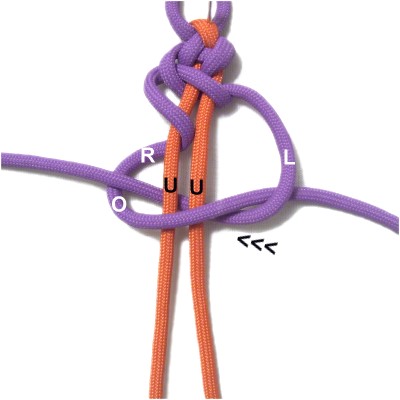
Mycelium Bar Design
Step
3: Mentally label the two
halves of cord
B right and left. Secure
them with
tension.
Wrap the long
portion of cord
A (right) over
- under the right half of cord
B. The arrows show the direction the
cord should move.
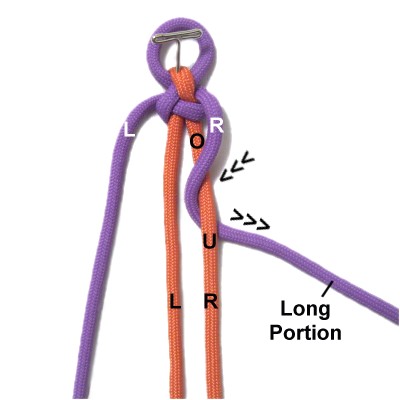
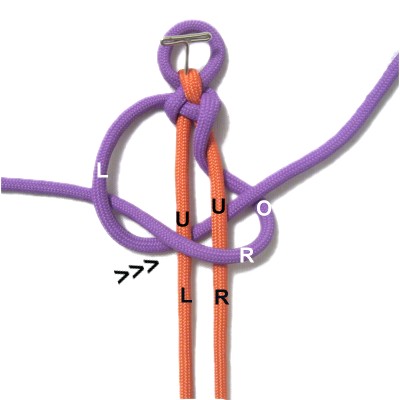
Fold the right portion
of cord
A to the left, passing over
both halves of cord B and under
the left portion of cord A.
Move the left portion
of cord
A to the right, passing it underboth
halves of cord B, and over
the right portion of cord A.
Tighten the
Half Knot completely, but make sure it can
still be moved.
You will be stretching the knots apart
later on.
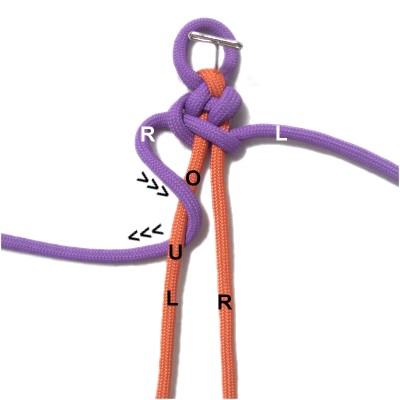
Step
4: Use the right
portion of cord
A again, which is now on the
left.
Wrap it over
- underthe left
half of cord B.
Move
the right
portion of cord
Ato
the right, passing over
both halves of cord B and under
the left portion of cord A.
Move the left portion
of cord
A to the left, passing under
both halves of cord B and over
the right portion of cord A.
Tighten the
Half Knot completely, making sure it can
still move.
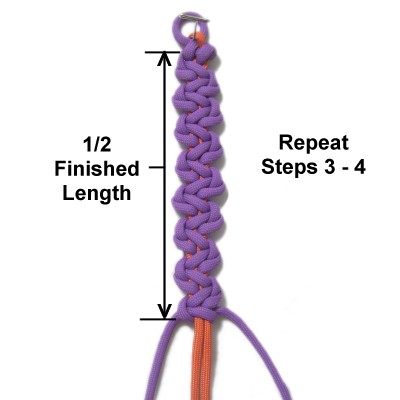
Step
5:Repeat
steps 3 - 4 several times, until
the sennit is 1/2 the
finished lengthyou
wish to make.
Important:
Do not include the loop when you measure.
Push the knots close together as you
progress.
Finishing the
Bar
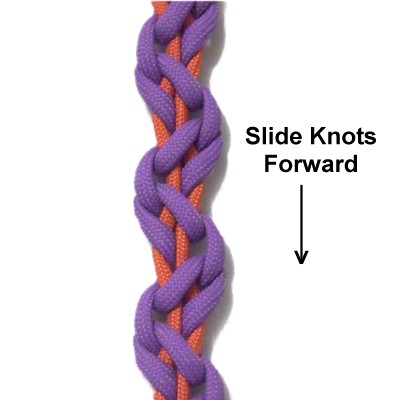
Step
6: Make sure the
Mycelium Bar is secured well near the
loop.
Separate the knots by sliding them
forward, which is towards the front of
your board.
Stop when the sennit is the finished size
you want. Include
the loop when you measure.
Designer's
Tip: You can only
stretch the knots so far. So you may need to
add or remove knots after you separate them, in
order to get the finished length you want.
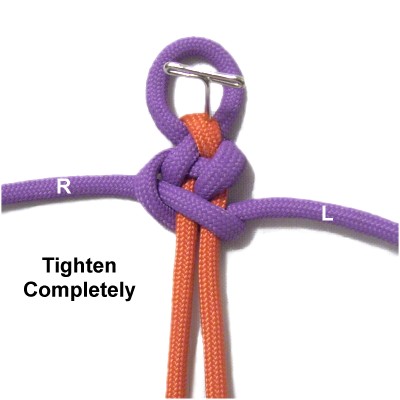
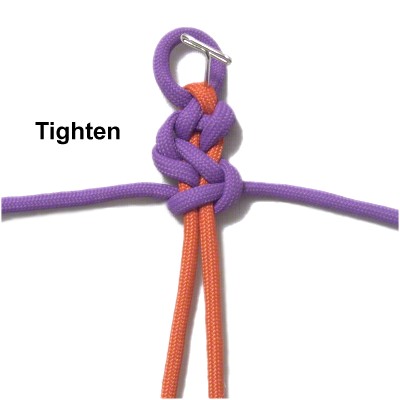
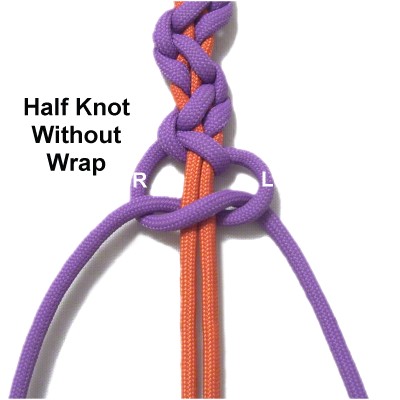
Step
7: Secure the bar by tying
a regular Half knot (without the wrap).
Tighten it firmly.
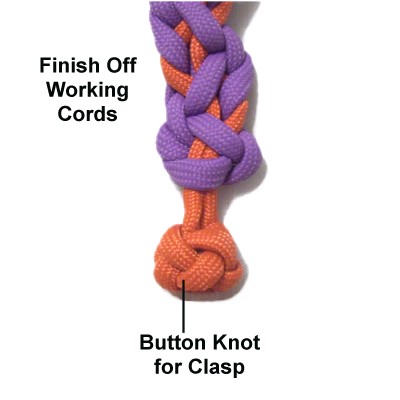
Step
8: Finish off the working
cords (A) by securing them to the
BACK of the sennit.
You can tie a button knot with both halves
of cord
B if you need one for a clasp.