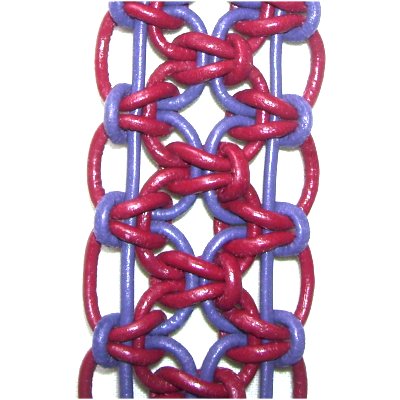
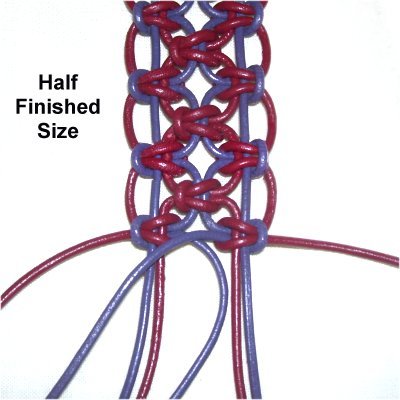
Description:
The Leather Star Bracelet is named for
the star-like areas in the center between the rows
of knots.
This Macrame bracelet features Alternating Square
Knots, and is a good craft project for
beginners.
You will be tying Square Knots in both
directions, so practice them before
creating the bracelet.
The band is 1.25 inches wide when using 2mm
size cord. To make it more narrow, use 1mm -
1.5mm round leather.
Because leather is stiff, the knots hold their
position better than if you were using regular
cord. So two cords remain straight, and the
loops along the edges are more even.
In the images,
COLOR A is wine and COLOR
B is dark purple.
Cut 2 cords of COLOR
B, each at least 60 inches long.
For a Leather Star Bracelet over 8 inches, cut
these cords longer.
Cut 4 cords of COLOR
A, each at least 60 inches long.
Increase the length for bracelets over 8 inches.
Step
1: Arrange the cords as
follows, securing them at the center:
Color
A -- ShortColor
B -- Color
A -- LongColor
B
LongColor
B -- Color
A -- ShortColor
B -- Color
A
Mentally number the cords 1 - 8.
Important:
You should use a project board to make your
Leather Star Bracelet, but
do not use pins. That's what the
masking tape is for. Pushing pins
through leather will damage it.
Another option for securing the cords is to use
the Cross-Pin Technique
or you can LEAN
the pins over the cords.
Place tape horizontally at the center,
across all the cords. Secure each cord above
the center with additional tape.
The lower
portion will be used first.
Left Square Knot Instructions
You will be tying both left and right Square
Knots, so the heads of the knots face opposite
directions at the edges of the Leather Star
Bracelet.
Below are the instructions you follow when tying
the SK with the head facing left.
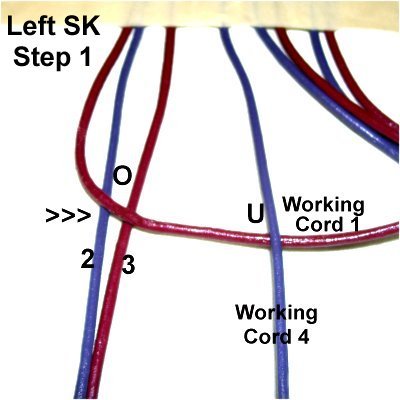
Step 2:
Cords 1 and 4 are the working cords, tied around
cords 2 - 3 (fillers).
<<
Move cord
1 to the right, over
cords 2 - 3 and under
cord 4.
Move cord
4 to the left, under
cords 2 - 3 and over
cord 1,
as you pull it out on the left. >>
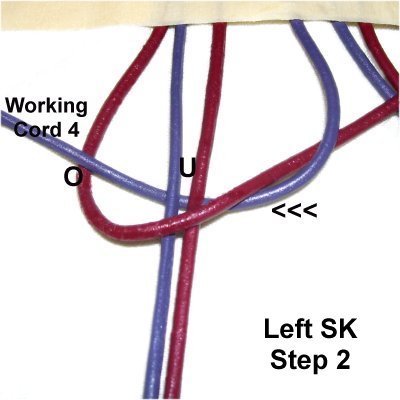
Pull both ends and tighten firmly.
The working cords have now switched
places, so the direction of the movements
has changed.
<<
Move cord
1 to the left, over
cords 2- 3 and under
cord 4.
Move cord
4 to the right, under
cords 2 - 3 and over
cord 1. >>
Tighten firmly.
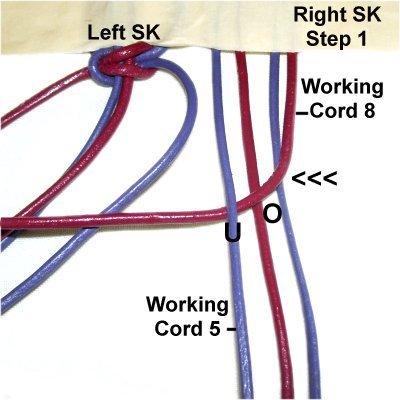
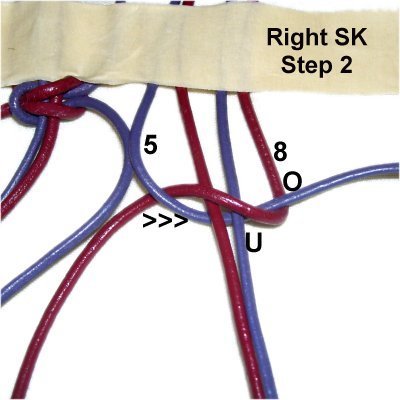
Right Square
Knot Instructions
Step 3:
Working Cords 5 and 8 are used to tie right
Square Knots. The fillers are cords 6 and 7.
<<
Move cord
8 to the left, over
cords 6 - 7, and under
cord 5.
Move cord
5under
cords 6 - 7, and over
cord 8 as you pull it out on the
right. >>
Tighten firmly.
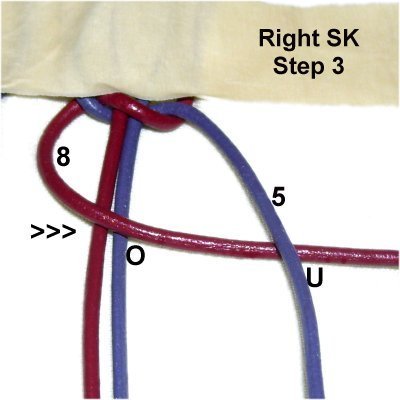
The
cords have switched places.
<<
Move cord
8 to the right, over
cords 6 - 7, and under
cord 5.
Move cord
5under
6 - 7, and over
cord 8 as you pull it out on the
left. Tighten firmly. >>
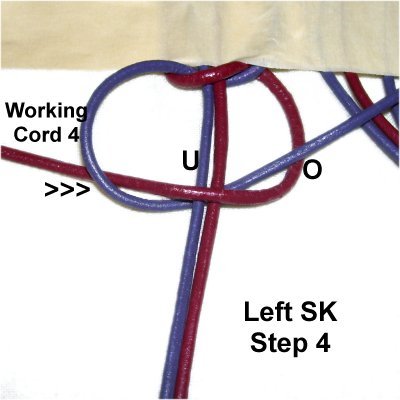
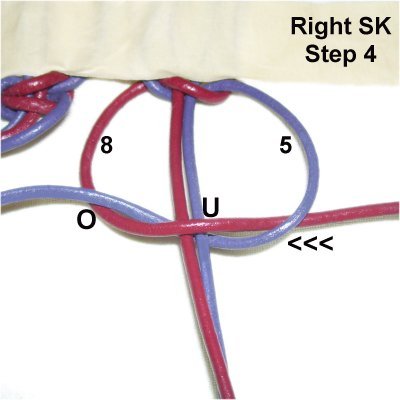
Step
4: Here you can see the
first two knots, with the heads facing
opposite directions. The space
between the two knots is considered the
"star".
The next LEFT
Square knot is tied with cords
3 and 6, around cords 4 -
5.
Make sure you tighten the knot so it's
balanced and there is a small amount of
space between this knot and the two above
it.
Neatness and
symmetry are important aspects of the
Leather Star Bracelet design.
As you progress through the next steps,
make sure the knots are horizontal, and
tightened so the loops along the edges are
the same size.
The stars in the center should be the same
size, too.
Step
5:Repeat
steps 2 - 4 several times, to
complete the first
half of the Leather Star Bracelet.
Stop when the bracelet measures 1/2
the size you need. So for
an 8-inch bracelet, stop at 4 inches.
Make sure you end with two Square Knots (step
3).
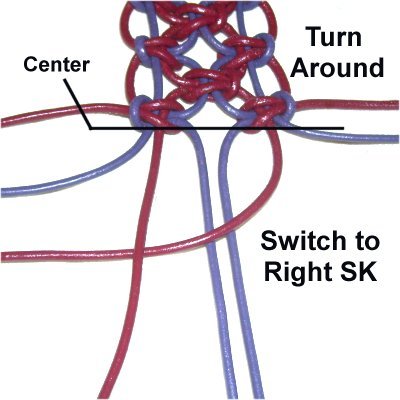
Step 6:
Remove the tape, and turn the entire bracelet
around. Start at the center
again.
The first knot
you tie needs to be a RIGHT
SK in order to match those on the
first half, which are now turned
around.
Each time you repeat step
4, the knot will face right.
Stop when the Leather Star Bracelet is the
size you need.
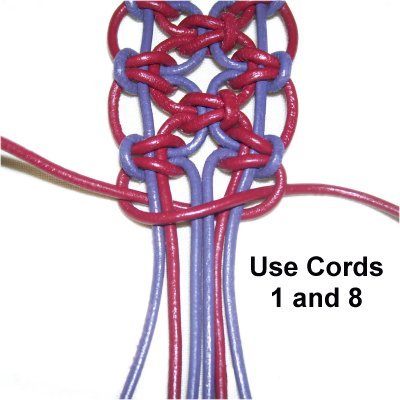
Step
7: At each end, use cords
1 and 8to tie a Square Knot around all the
other cords.
Keep the cords flat and straight without
overlapping. The knot will be wider
than the rest.
Finishing Steps and Clasp
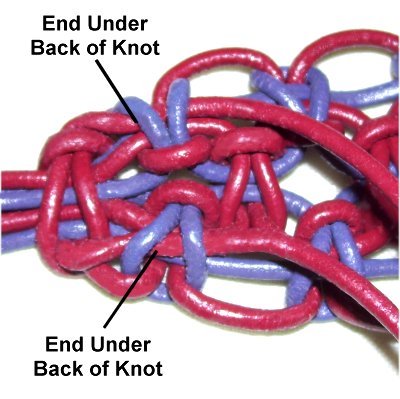
Step
8: Flip over the Leather
Star Bracelet.
Pass the ends of cords
1 and 8under
the back of the two knots closest to the
final one tied in the last
step.
Apply glue to hold the ends in
place.
Step 9: Short
cords 2 and 7 were not used to tie any
knots, so can easily be pulled out.
For that reason, they should be finished like the
cords in the previous step.
Bring them to
the back and pass them over
the first
loop of the large knot (closest to the
bottom).
Pass them under
the second loop.
Apply glue to hold the ends in place.
Important:
The inside of leather material is usually a
lighter color than the outside, and will show when
the cords are cut.
After cutting, use a marker to change the color of
the tips to either black, or the same color of theleather.
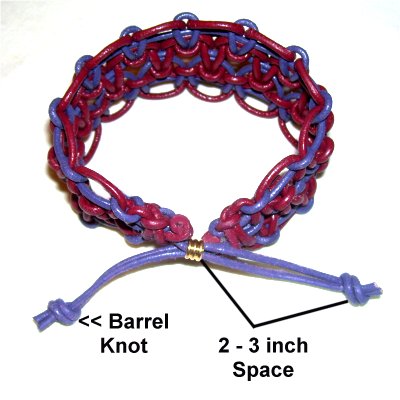
Select two
cords on each end of the bracelet, to be
used for the clasp.
Cut off the remainder, or finish them off
like the others if you wish.
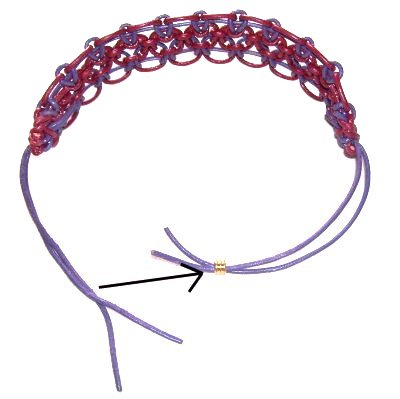
Pass the 4 cords you selected through the
bead in opposite
directions.
Pull the ends
to close the bracelet.
Leave a 2 - 3 inch space, and tie one
Barrel knot with each set of two
cords.
This prevents the ends from sliding
through the bead.
By
using any text or images on Free Macrame
Patterns, you are agreeing to ourTerms
of Use