Description:
The Herringbone Braid is a very unique rectangular
design with four sides. It is not a flat
design like a standard plait. Like the
Round Braids, there are crossed elements created
by hooking the cord backward.
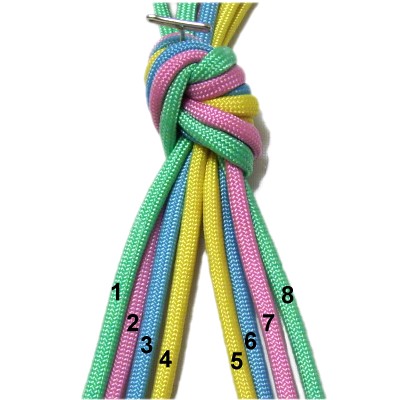
To see the pattern shown in the image above, set
up the cords as described in step 1. They
need to be in a specific order.
This type of braiding is suitable for many Macrame
projects, including the long posts in plant
hangers. To use it in jewelry designs, make
it with fine, flexible material.
Since Paracord was used in the example, the braid
was too firm to be used as a bracelet, but it
would make a nice dog leash.
Preparation:
To practice the Herringbone Braid, you need a
total of 8 cords in four different colors, each at
least 36 inches long. In other words,
you need two cords per color.
When using Paracord, you need to prepare it a
certain way. Please read Cord
Preparation if you have not used
the material before. There is a section that
explains the details (near the bottom of the
page).
When using this braiding technique in a Macrame
project, multiply the finished length you need by
3, and cut the cords to that length. That
gives you enough material for the Herringbone
Braid, and two extra knots above and below it.
Step
1: Tie an Overhand
Knot with all the cords in
a bundle, close to one end. Secure
it to your board.
Organize the cords as shown, so the colors
match from the center moving
outward. Mentally label them.
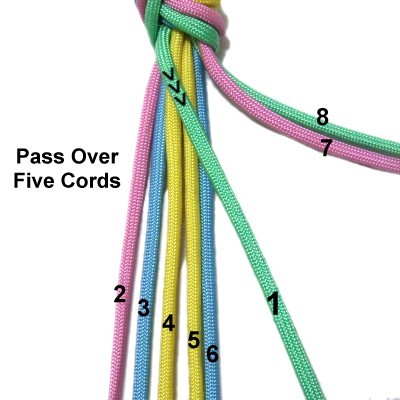
Step
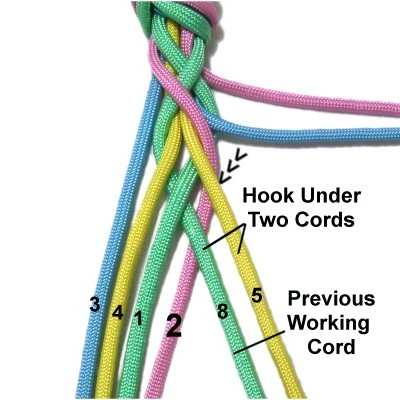
2: Move cords7 and 8
aside.
Since cord
1 is furthest to the left, move
it over
the remaining fivecords diagonally, heading right.
Hook cord
1 back to the left, passing under
the two cords closest to it (cords 5 and
6).
Secure it next to cord
4. Move cords 8 and 7 back
to their original position next to the
other cords.
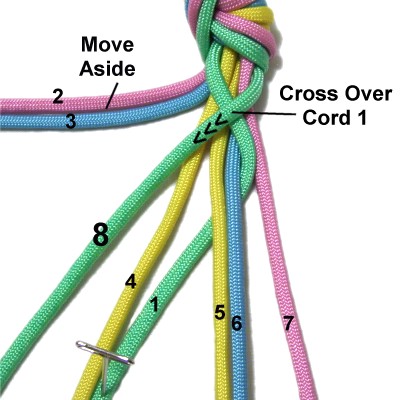
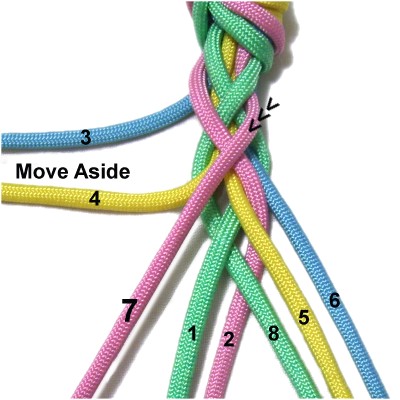
Move cords
2 and 3 aside.
Move cord
8over
the remaining five cords diagonally,
headingleft.
It will cross over cord
1, which is an important feature
of the Herringbone Braid.
Hook cord
8 to the right, passing under
the two cords closest to it (cords 4 and
1).
Secure it next to cord
5. Move cords 2 and 3 back
to their original position next to the
other cords.
Here is the
basic concept for the Herringbone Braid:
Use the working cord furthest to the left,
followed by the one furthest to the
right. They will be the same
color if you organized them
correctly. Numerical order: 1 -- 8 -- 2 -- 7
-- 3 -- 6 -- 4 -- 5
By moving two cords off to the side, you can
then pass the working cord over the remainder
without the need to remember their
numbers. The two cords you move away
should be the ones furthest from the current
working cord.
Always move the working cord overfive cords
in one direction, then move it back under
two the opposite direction
(hook). One of the cords it goes under
should ALWAYS be the previous
working cord.
One step is completed after you have moved
two cords (same color). The end result is a
loop with two crossed areas (see previous
image).
Securing the working cord is optional, but
it helps to identify it, so you can verify the
next cord is passing under it.
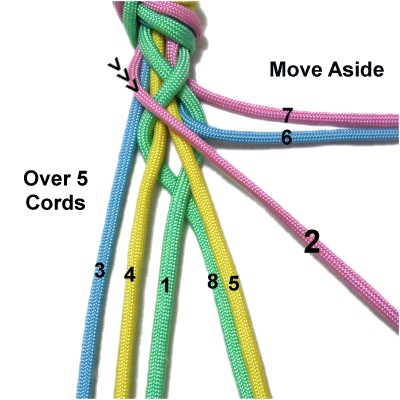
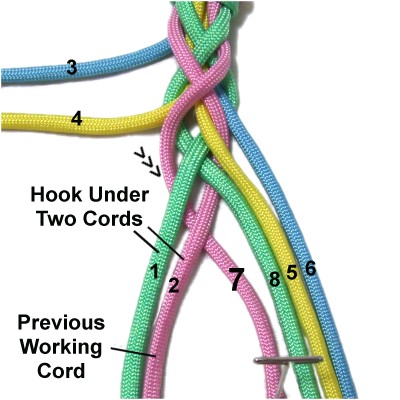
Step
3: Move cords
6 and 7 aside.
The cord furthest to the left is now cord
2, so move it over
the remaining five cords, heading right.
Hook cord
2 to the left, passing under
cords 5 and 8. Cord 8 was the previous
working cord.
Secure it next to cord
1. Move cords 7 and 6
back to their original position.
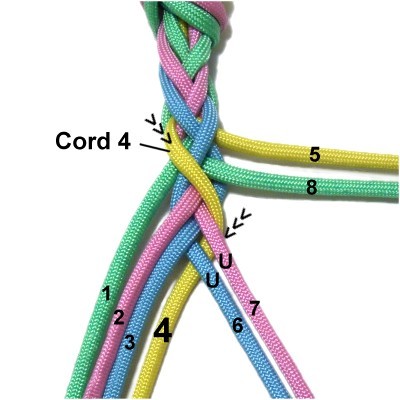
Move cords
3 and 4 aside.
Cord
7 is furthest to the right,
so move it over
the remaining five cords, heading
left.
Hook cord
7 to the right, passing under
cords 1 and 2.
Cord 2 was the previous working cord.
Secure it next to cord
8. Move cords 3 and 4 back
to their original position.
Step
4: Move cords
6 and 5 aside.
Move cord
3 to the right, passing over
the remaining five cords. Hook it back to
the left, passing under
cords 7 and 8.
Secure it next to cord
2. Move cords 6 and 5 back
to their original position.
Move cords
4 and 1 aside.
Move cord
6 to the left, passing over
the remaining five cords. Hook it
back to the right, passing under
cords 3 and 2.
Secure it next to cord
7. Move cords 4 and 1 back
to their original position.
Step
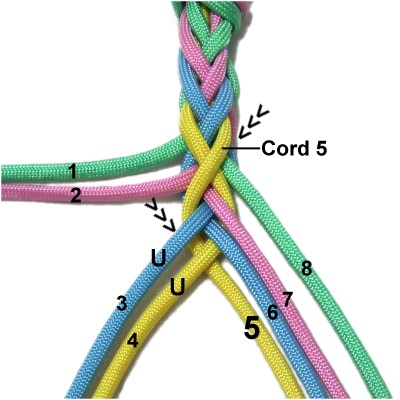
5: Move cords
5 and 8 aside.
Move cord
4 to the right, passing over
the remaining five cords. Hook it
back to the left, passing under
cords 7 and 6.
Secure it next to cord
3. Move cords 5 and 8 back
to their original position.
Move cords
1 and 2 aside.
Move cord
5 to the left, passing over
the remaining five cords. Hook it
back to the right, passing under
cords 3 and 4.
Secure it next to cord
5. All the cords should now
be in their original positions (step 1).
Tighten the
Herringbone Braid by pulling on each cord
in order, starting with cord 1 (left to
right).
The crossed areas should be close
together. Make sure the cords are
still in order when you are finished.
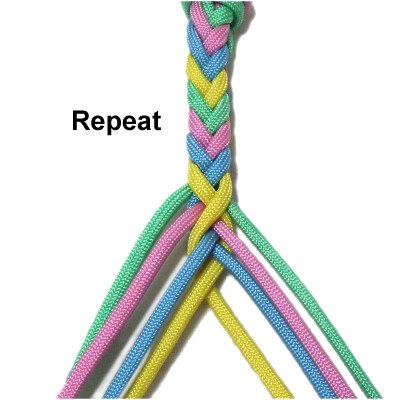
Step
6:Repeat
steps 2 - 5 at least one more
time if you are practicing.
When using the Herringbone Braid in a
project, you would continue until you
reach the finished length you were
planning to make.
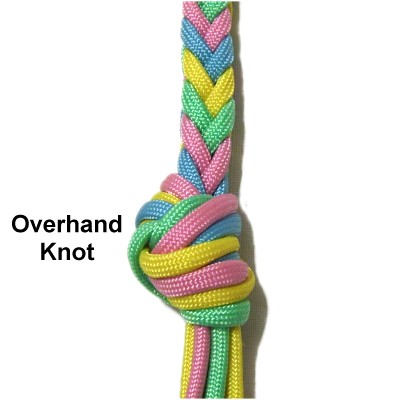
Step
7: Tie some type of
finishing knot to secure the braid.
When practicing, an Overhand knot is a
good choice, since it matches the opposite
end.
By
using any text or images on Free Macrame
Patterns, you are agreeing to ourTerms
of Use