Description:
The Footprint Bar is a Square Knot
pattern tied around an extra cord. The extra
cord forms a series of loops resembling
footprints.
A loop is usually left at one end of the sennit,
to be used as part of a clasp, or to attach a key
ring. At the other end, a button knot can be
tied.
The images show nylon Parachute cord, which I
recommend you use when practicing
knots. See Cord Preparation
for more details on how to prepare the material
properly.
This
decorative knot was found on the Fusion
Knots website as the "Caterpillar
Footed Solomon Bar"
The design described below has been
slightly
altered from the original.
Click on the image or link to
visit. The video
gallery contains many interesting
knot patterns and techniques.
Preparation:
To practice
the Footprint bar, cut one working cord, at least
60 inches long. Cord 2 should be at
least 36 inches long.
In the images, the working cord is orange
and cord 2 is yellow.
To make a Macrame project with the Footprint Bar,
the working cord
needs to be cut to at least15
x thefinished
length of what you want to
make. So for a 4-inch sennit, you need
at least 60 inches.
Cord 2
should be 3
x thefinished
length, and
should be a contrasting color.
Cut this cord longer if you plan to tie a button
knot to form a clasp.
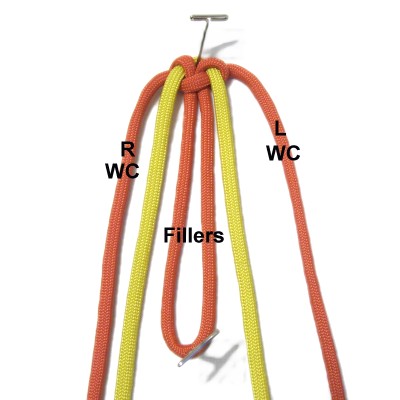
Step
1: Fold the working cordin half and secure it at the
center, arranged vertically. The
folded area should be close to the front
of your board with the remainder heading
away from you.
Mentally label the two halves, which are
called "working cords" (WC) in these
instructions.
Bring both
working cords towards the front of the
board, folding them again. Secure the
folds.
The distance between the two folded areas
should be equal to the total finished
length you are aiming for, which includes
a loop at one end.
Since you are just practicing, make it 4
inches.
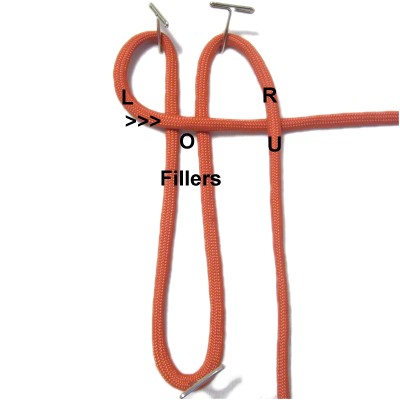
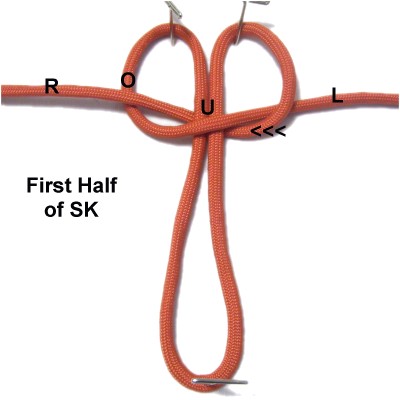
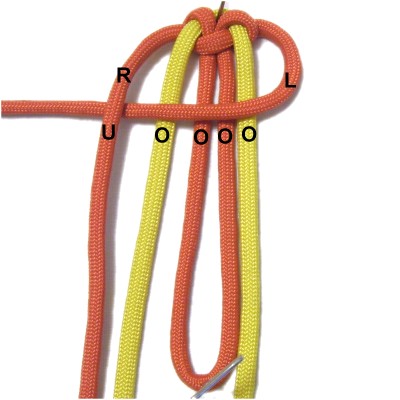
Step
2: Now you will tie the
first half of a Square knot.
The folded
portion is considered the
fillers.
Move the left
working cord
to the right, passing it over
the fillers and underthe
right working cord.
Move the right
working cord to
the left, passing it under
the fillers.
As you pull it out on the left, pass it over
the left cord.
Tighten the knot slightly, but leave it a
little loose.
Step
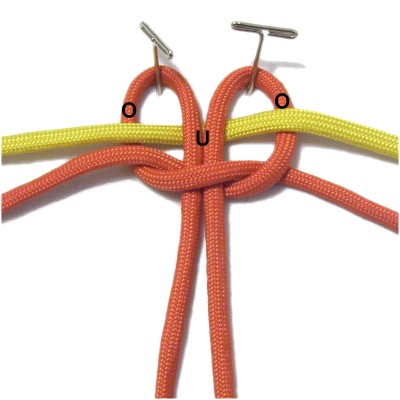
3: Pass cord
2 through the folded area, which
look like two loops. Pass it over
- under - over, arranged
horizontally.
Match the ends to center the new cord,
then pull both working cords to tighten.
See important information below
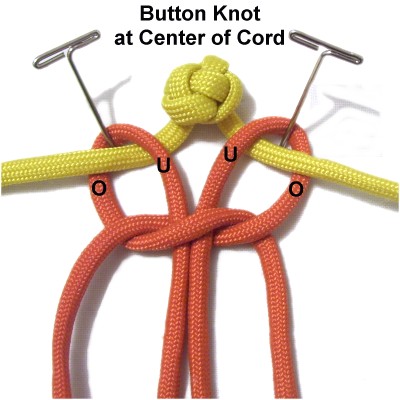
Should you
decide to use the Footprint Bar to make a
Paracord Bracelet, tie a button knot at
the center
of cord 2.
Then slide it through both loops under
- over. Secure the knot,
then tighten the loops.
Designer's
Tip: The button knot shown in the
image above is the Knife Knot,
also called the Diamond knot. It's the
easiest button knot to tighten, so I recommend you
try it as a clasp for the Footprint Bar.
You could also attach a regular button or a bead
at the center of cord 2, which can also be used to
make a clasp.
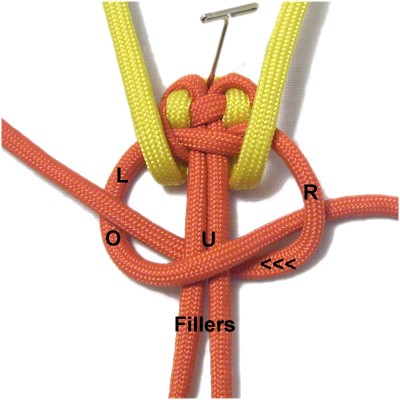
Step
3, continued: Arrange the
cords vertically as shown, placing the two
halves of cord 2 between the working cords
and the fillers (folded portion).
Step
4: To start the second
half of the Square knot, move the left
working cord to the left
horizontally, passing overthe
fillers and cord 2.
Bring it under
the right working cord.
Move the right
working cord to the right,
passing over
the left half of cord 2, and under
the fillers.
As you pull it out on the right, make sure
it goesover
the right half of cord 2 and over
the left working cord.
Tighten the second half of the SK
completely.
Designer's
Tip: The most important thing to
remember about this important step is that the
working cord only passes under one portion, the fillers.
It passes over all the other segments.
It helps if you arrange the cord on a diagonal
slant as shown in the image above.
Step
5: Move both halves of cord
2 backward, towards the back of
your board.
Start the first half of the next SK by
moving the left
working cord to the right, over
the fillers and under
the right working cord.
Move
the right
working cord
under the fillers.
Bring it over
the left working cord, as you pull it out
on the left.
Pull the working cords firmly to tighten
the first half of the SK.
Step
6:Repeat
step 4 to tie the second half of
the Square knot.
In this image, the path of the left
working cord is shown in small blue
letters.
The path of the right
working cord is shown in larger black
letters.
Step
7:Repeat steps 5
and 6 several more
times, until the last SK is 3/4-inches
from the center fold. This gives
you a small loop for a clasp or key ring.
Make
sure you stop on step 5.
Pass the ends of cord 2 through the center
fold.
Designer's
Tip: Before moving on, check to see
if the button knot fits through the
loop. Sometimes all you need to do is
push the SK closer together to give the loop more
space for the button knot, if it's a little too
small.
Step
8: Turn the Footprint Bar upside
down.
Pass the ends of both
cordsunder
the second
loop, counting backward from the last knot
tied.
Apply glue, and then cut off the excess
material. Use a flame to melt the
tips if using Paracord.
By
using any text or images on Free Macrame
Patterns, you are agreeing to ourTerms
of Use