Description:
The Cotton Belt features material
typically used in Crochet designs. I encourage you
to try any form of cotton material for this belt.
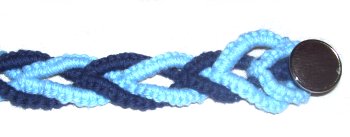
The primary decorative knot is called the Double
Buttonhole Stitch, which is a vintage
technique. It's simply a series of Vertical Larks
Head knots. Two sennits are combined to make
narrow loops which are linked.
This Macrame belt looks best if you use two
colors. You can make a button clasp, which
is described below, or you can simply tie the ends
together so the belt has a fringe.
This Macrame project is suitable for beginners who
have some experience with the knots used in the
design. I rated it moderate, since you are
using fine cords, which are harder to
control.
Use the chart below to determine the amount of
material needed for your Cotton Belt.
You need to cut the cords ofboth colorsto the sizes in
the chart.
Should you decide to
make a fringe
instead of a clasp, cut the cords for
the core
to 4 yards long.
Belt
Size
Working
Cords
Core
Total
Amount of Material
30
- 35
inches
2
x 17 yards
6
x 3 yards
52
Yards of each
color
36
- 40 Inches
2 x 20 yards
6 x 3 yards
58 yards of
each
color
41 - 45
Inches
2 x 23 yards
6 x 3 yards
64 yards of
each
color
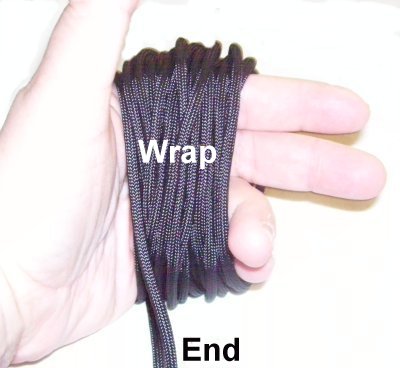
Working With Long Cords
The key to
handling the long working cords used in
this Cotton Belt is to wrap them up in small
bundles.
Start about 12 inches below the level
where the cord is attached to the
board. Wrap the cord around your
hand several times, until you have about
10 inches left.
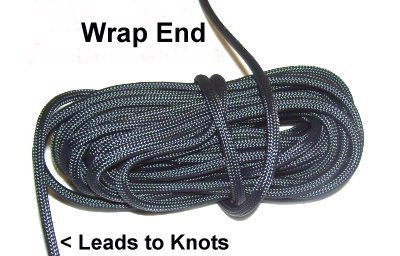
Slide the
bundle off your hand carefully, and wrap
the end around the bundle several times.
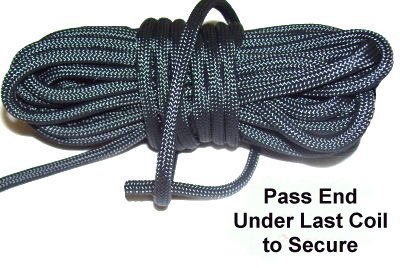
Pass the end
of the cord under one of the coils,
preferably the last one. As you
work, you should be able to pull from the
middle of the bundle.
First Half of Cotton Belt
Start the first half of the Cotton belt by
cutting the cords to the lengths in the chart
above. Tie Overhand knots at the tips of
each cord.
Step 1:
Find the center of each cord, and place it on your
board vertically as shown below. The best
method is to wrap each cord around a pin several
times. You can tuck the cords under
the board to hold them steady, or use
tape.
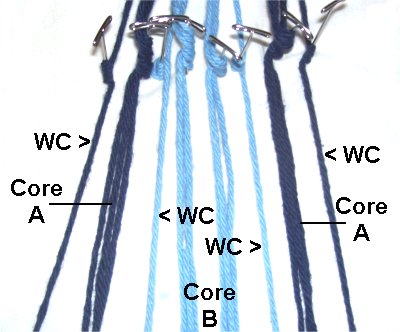
Color A
is dark blue, and Color B
is light blue in this design.
The long working cords are used to tie all the
knots onto the shorter cords, which are called the
core.
Each sennit is tied with one working cord and
three cords for the core (total of 4).
Arrange the cords for the Cotton Belt as follows:
Working
Cord (A) - 3 Core (A)
Working
Cord (B) - 6 Core (B) - Working
Cord B
3
Core (A) - Working Cord (A)
Step 2:
Each sennit for the Double Buttonhole Stitch is
created with a series of Vertical Larks Head
knots. They are tied in two
parts.
The images below show only the
left facing knot, tied with the left
working cord.
Step A:
For the first half of the vertical Larks
Head, pass the working cord over
and then under
the core.
Rotate counter-clockwise.
Bring it over
the working
cord as you pull it back to the
left.
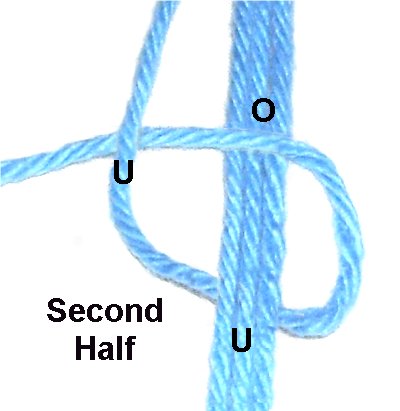
Step
B: To tie the second half,
direct the working cord underand
overthe
core.
Pass it under
the working
cord, as you bring it to the
left.
NOTE:
When using the working cords on the right,
the over - under process is the same, but
you rotate clockwise.
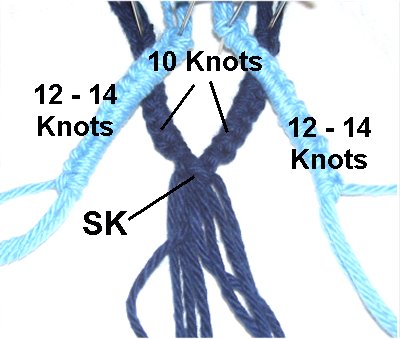
Step
3: Tie 2 Double Buttonhole
sennits for each
color.
Color
A should consist of 10
knots.
Color B needs to have 13 knots.
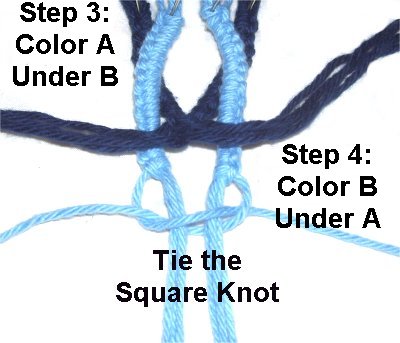
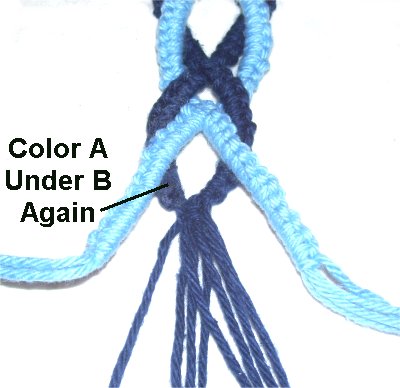
Bring the right and left Color
A sennits together, passing under
Color B.
Tie a tight Square Knot with the two working
cords, around all
6 short cords (core).
Step
4: Bring the Color
B sennits together, passing them
under
the Color A cords.
Tie the Square knot with the two working
cords, around all
6 short cords.
Design Tip:
The Color
B sennits need more knots, so they are
longer.
So when you tie the Square knot to close it, the
know will rest below
the SK from the other color.
(Move
down 2 photos to see clearer details)
Step
5:Repeat
steps 3 and 4. For the
first half of the Cotton Belt, it's easier
to tie all four sennits, and then position
them. (This image shows step 3)
Once they are resting under
the opposite color, tie the Square Knots
to complete the designs.
This is a
closer view of the placement for the
Square knots. Notice that each one
is near the center
of the oval Buttonhole designs.
You may need to
tie more
knots periodically, so the SK
line up properly.
Step
5, continued: Repeat
steps 3 and 4 over and over, until the
first half of the Cotton Belt is 1/2
the size you need.
So if you are making a 40-inch belt, stop at 20
inches.
Each Buttonhole design should consist of 10 - 13
knots, so the design looks like the image above.
The last Buttonhole design you tie should be Color
B (so these instructions make
sense). You can make adjustments to the size
in the second half if necessary.
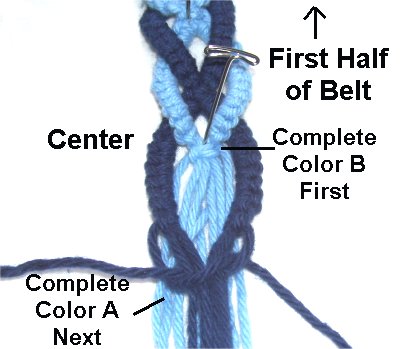
Second Half of Cotton Belt
Step 6:
Go back to the center
and remove the pins. Turn the entire board
around if you can, otherwise just turn the belt.
Make
sure you do not flip the
belt upside down.
Turning the whole board around prevents this from
happening.
You should still be working on the front
of the Cotton Belt, with the ends heading towards
you, and the first half of the belt heading away
from you.
Complete the
Buttonhole design of Color Bfirst, by tying the Square knot.
Make sure it's resting over
the Color
A sennits.
Bring the Color
A sennits over
the Color B cords, and tie the Square
knot.
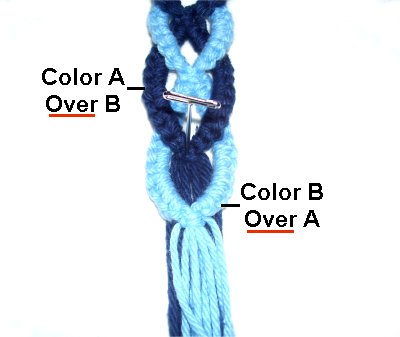
Design
Tip: In order for the Cotton Belt
design to work out properly, you will bring the
sennits together on
top of (over)
the opposite color.
For the first half, you positioned them under
the other color.
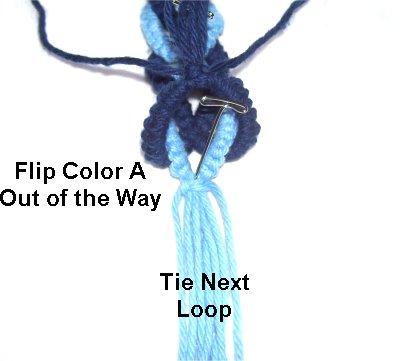
Step
7: You will need to flip
the Color
A design out of the way, so you
have access to the Color B cords.
Just below the SK, tie the two sennits for
the next Buttonhole design (Color
B).
Design Tip:
For the second half of the Cotton Belt, I found it
easier to tie the two sennits for one color, bring
them to the front, and tie the SK.
I then flipped the design out of the way, and did
the same thing for the other color.
Step
8: Continue tying
Buttonhole designs, alternating the two
colors. Stop when the Cotton Belt is
the size you want, ending with Color
A if you can.
Remember to bring the sennits over
in front of the opposite color before
tying the SK.
Finishing Touches
Step 9: The
following Finishing method is only one option for
completing the Cotton Belt.
Another way to finish is to apply glue to the SK
tied in the last Buttonhole design at each
end.
You can then use the ends together in
a group, tying them together to secure
the belt. This is the best way to form a fringe.
Adding beads to decorate the fringe looks nice,
too.
I prefer a finished appearance, so did something a
little unusual:
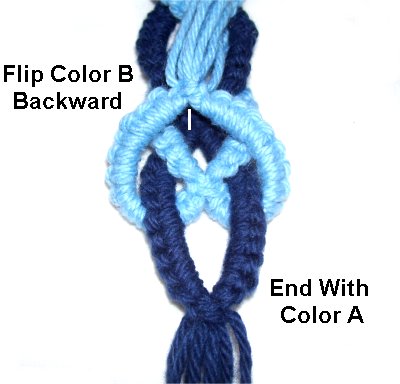
Step
A: At the end of the Cotton Belt
(second half), fold the lastColor Bdesign backward,
away from you.
The Buttonhole design for Color
A is used as part of the
clasp.
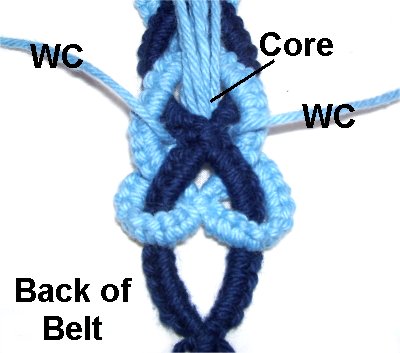
Step
B: Mentally label the Color
A designs 1 and 2, starting with
the last one tied at the end.
Move the 6 Color
B cords for the core
over the SK of design
2, and through the space in the
center.
Move the two working
cords into the spaces
on either side of the Square knot for
Color A.
Flip the
Cotton Belt to work in the back
of it, where you can see the placement of
the ends around the Square knot.
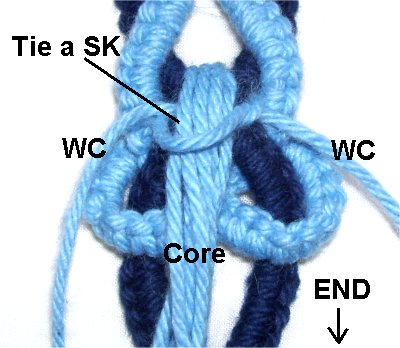
Step
C: Fold the ends towards
you (forward). Use the two working
cords on the sides to tie a tight
Square Knot around the 6 cords for the core.
Tie the first half of the knot, apply
glue, and then tie the second
half.
Step D: Switchthe
working cords with two from the
core.
Tie another Square knot, also
applying glue.
Add a little more glue under the knot. When
the glue is dry, it's safe to cut off the
ends close to the knot.
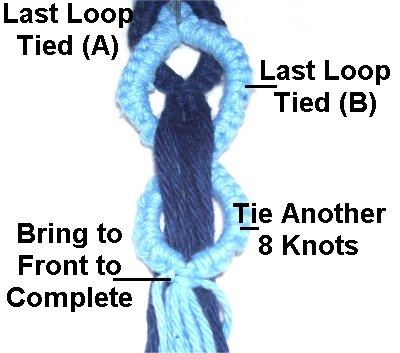
Step
E: Go to the opposite end
of the Cotton Belt (first half) and make
sure the last Buttonhole Loop is color
B (light blue).
Tie another Buttonhole design with color
B, tying a total of 8 knots.
Make sure you bring the sennits to the front
before tying the SK.
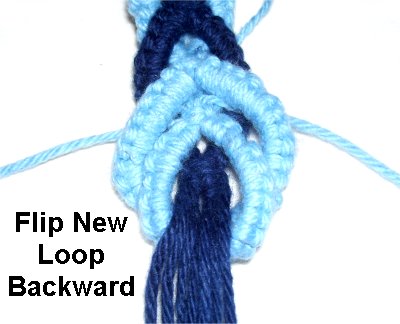
Step
F: Flip the new loop backwards,
so it nestles inside the closest
Buttonhole design (same color).
The ends are passed through spaces in the
front, just as you did on the other end --
see image
below.
This image
shows the back
of the Cotton Belt.
The 6 cords for the core
are resting in the center space of the Color
A design. The working cords
should be resting on each side.
Repeat
Step C - Tying the SK
to secure the cords.
The Clasp
When you have finished
the Cotton belt as described above, you will need
to make a clasp.
This step is optional
if you changed the finishing method,
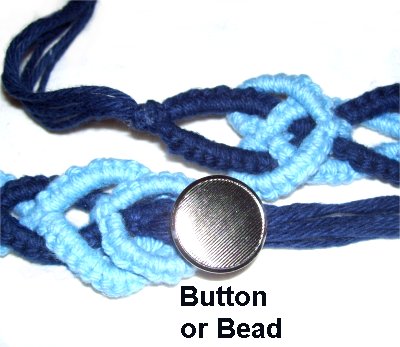
A shank button
is required, and it must have an opening
large enough for 8
cords to pass through.
The button will pass through the last
Buttonhole design at the opposite end.
Design Tip:
I trim the ends so they are even and then apply tape
around the entire group, compressing them.
It's easier to pull them all through the opening
in the button.
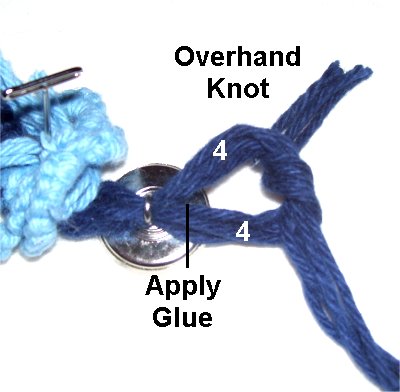
After you
slide the 8
cords through the button,
separate the cords into two groups of 4.
Tie an Overhand knot, applying glue so
that it will be on theinside
when the knot is tightened. When
the glue is dry, cut off the excess
material.
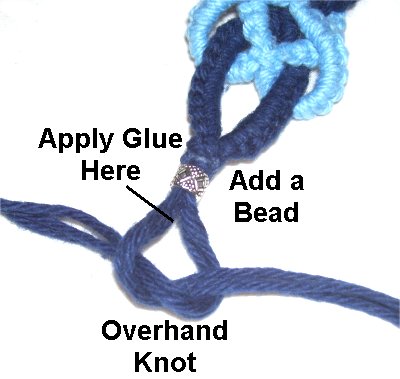
At the other
end of the Cotton Belt, you can add a bead
if you wish. Apply glue next to the
bead, and tie an Overhand knot just like
you did in the previous step.
When the glue is dry, cut off the extra
material.
By
using any text or images on Free Macrame
Patterns, you are agreeing to ourTerms
of Use