Description:
The Contrast Bracelet features Vertical
Larks Head knots that face different
directions. It's important to use two
contrasting light and dark colors for this
Micro-Macrame bracelet design.
Waxed Cotton was used in the example shown, but
Leather can be used as well. Flexible
materials are not suitable for this design.
The clasp used in this design is a clip, but other
clasps can be used. You can switch to a
sliding clasp, by starting the knots in the center and
working in each direction.
This Macrame pattern is rated Easy, suitable for
beginners.
Preparation:
When using waxed cotton or similar material to
make the Contrast Bracelet, prepare the ends to
prevent unraveling. Leather needs no
preparation.
Measure you wrist size.
Subtract the length of the clip, which is
usually around 1-inch.
The result is the finished length of the
bracelet.
Multiply the finished length x 13, and cut 2
cords of Color A to that length.
Multiply the finished length x 8, and cut 1
cord of Color
B to that length.
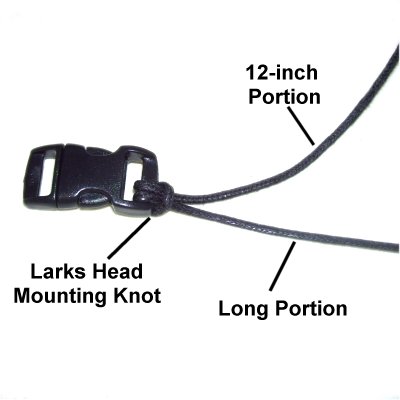
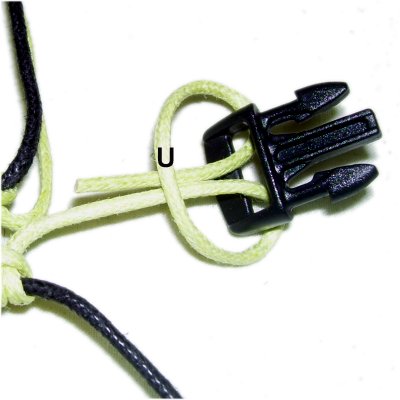
Step
1: Fold one Color
A cord 12
inches from one end. Pass
the ends through the space on the clip and
under the folded area (Larks Head
knot).
The LONG portion should be on the outside,
as shown in this image.
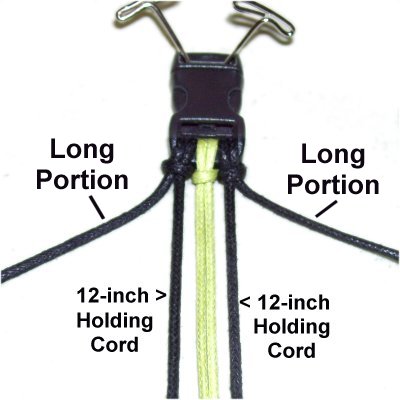
Mount the
other Color
A cord in the same manner, making
sure the long portion is on the outside.
The 12-inch portions are the holding
cords.
Fold the Color
B cord in
half and mount it between the
other two cords.
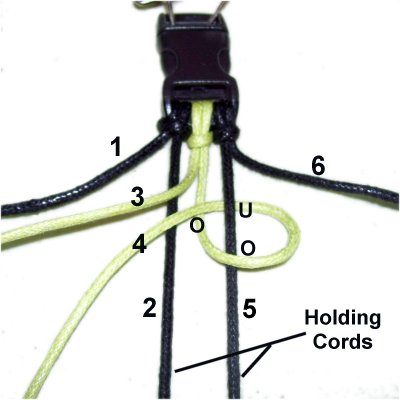
Step 2:
Mentally number the cords 1 - 6. Secure
cords 2 and 5 so they have tension (12-inch
segments of the dark cord).
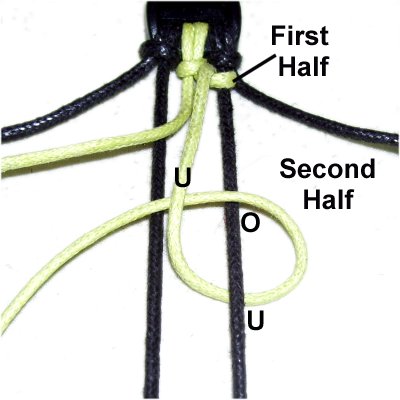
To make the
first half of the Vertical Larks Head
knot, use cord
4 to tie a counter-clockwise
loop:
Pass over
- underholding
cord 5.
As you pull it left, pass the end overcord
4.
To make the
second half of the knot, use cord 4 to
make a loop, under
- over cord 5.
As you pull the end left, pass under
cord 4.
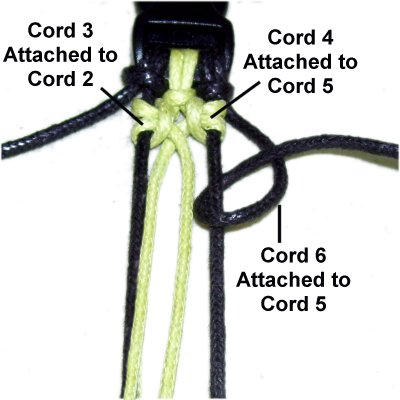
Step
3: The next knot is tied
with cord
3, which is attached to holding
cord 2. The two loops are
tied in a clockwise
direction.
Tie the following knot with cord
6, attaching it to holding
cord 5. Rotate clockwise
when making the two loops.
(see information below)
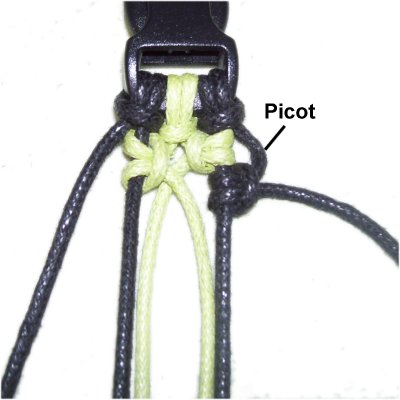
While
tightening the knot made with cord 6,
loosen it in the area above the knot.
This forms a picot, which will match the
others that form as you progress.
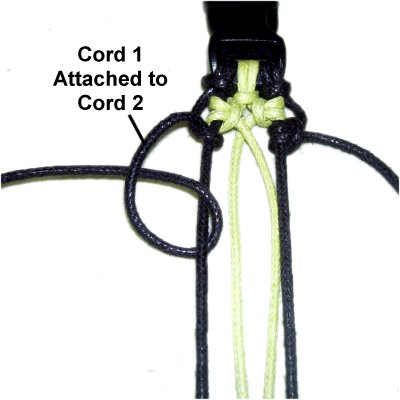
Step
4: Attach cord
1 to holding
cord 2 with a Vertical Larks Head
knot, rotating counter-clockwise.
Step
5: As you continue to create the
rest of the Contrast Bracelet, there is an
important
change you need to make:
Cord
4 is attached to holding
cord 2, so it crosses from right
to left. Always start with
this cord, so the crossing is the same
throughout.
Step
6: The next knot is tied
with cord
3. Cross left
to right, and attach it to holding cord
2.
Attach cord
1 to holding cord 2.
Attach cord
6 to holding cord 5.
Step 7:Repeat
steps 5 and 6 several times, until the
Contrast Bracelet is the finished size you need.
Remember to take into account the length of the
clip when you measure.
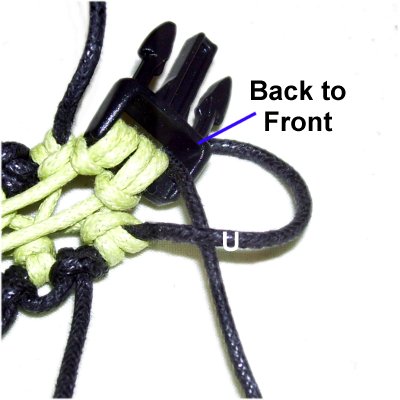
The
other half of the clip needs to be
attached to the loose ends. The
following steps show the best way to do
this, but are optional if you prefer a
different method.
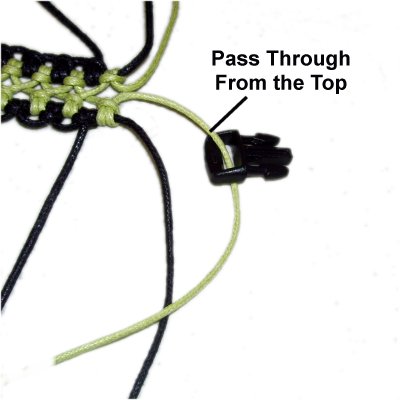
Place the bracelet on your left.
Pass one Color
B cord through the clip from
the top (front to back).
Cross the end
over the portion coming from the bracelet,
forming a clockwise
loop.
Then pass it through the clip again, but
this time from back
to front.
Pass the end under
the segment next to the loop, to complete
the Larks Head knot.
Remove all the slack as you tighten, so
the clip is close to the knots in the
bracelet.
Step
8:Repeat
step 7 with the other Color
B cord.
There's not enough room to tie a Larks
Head knot with the Color
A cords. So attach them
with Reverse
Half Hitches:
Pass the end through the clip from
back to front, and then under
the segment coming from the knots.
Turn over the
bracelet, and bend cords 2 - 5 towards
the clasp. Apply a generous
amount of glue to secure them in
place.
Do
not put the glue on the clasp.
Tie a Barrel Knot with cords 1 and 6,
tightening it so it rests on top of the
other cords. Apply glue.
After the glue
dries, cut off the excess material.
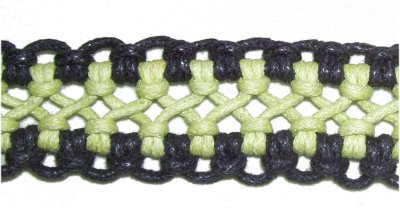
This image shows the detail for the
Contrast Bracelet.
By
using any text or images on Free Macrame
Patterns, you are agreeing to ourTerms
of Use