Description:
The Contrast Belt features the use of two
colors, along with knots that change
direction. What's unique about this belt
design is that two sets of working cords are used
to alternate the colors.
Try to choose one light and one dark color if you
can. In the example shown, color
A is turquoise and color
B is navy blue.
I used brown for the fillers, just to help with
instruction. I recommend you use the dark
color for the fillers.
This is a great beginner's project, since only two
decorative knots are used for the entire belt
design. The Square knot is featured, and
this Macrame project will teach you how to tie
them in both
directions.
In the example shown, I used 4mm Polypropylene
cord, and the width of the belt was 1-inch.
To make it wider, use 6mm cord materials.
Supplies
Needed:
4mm cord material, 2 colors (total amount
depends on size -- see below)
Use
the chart below to determine the lengths to
cut the cords. Prepare the ends by
applying tape to the tips.
To determine the total amount you need to
purchase, add all the lengths together (Color A, B
and Fillers). 36
inches = 1 yard
Length
of Belt
Color A
Color B
Fillers
Under 30
inches
4 yards x 2
4 yards x 2
40 inches x
2
30 - 35
inches
5 yards x 2
5 yards x 2
45 inches x
2
35 - 40
inches
6 yards x 2
6 yards x 2
50 inches x
2
Over 40
inches
Length x
5, divided by 36 (for yards)
same as
color A
Length + 10
inches
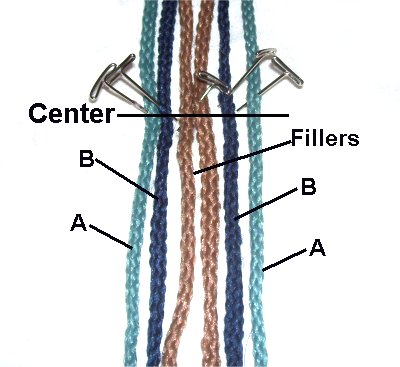
Step
1: Secure all the cords to
your project board at the center.
They should be arranged vertically, in
this order:
1 Color
A - 1 Color B - 2 Fillers - 1 Color B -
1 Color A
The two sets of working cords for the
Contrast Belt are labeled A and B.
Left Square Knot Instructions
Step
2: The first Square knot you tie
at the center should have the head facing left,
so here are the instructions for making the knot
in that direction.
The first knot is tied around 4
fillers. The knots following the
first one will be tied around 2
fillers.
When making Square knots in two directions, just
remember that the cord you start
with determines the direction.
In this case, both working cords are color
A and you start with the one on the left.
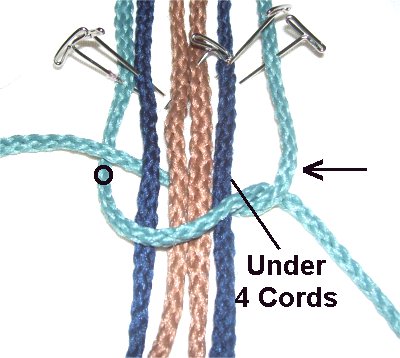
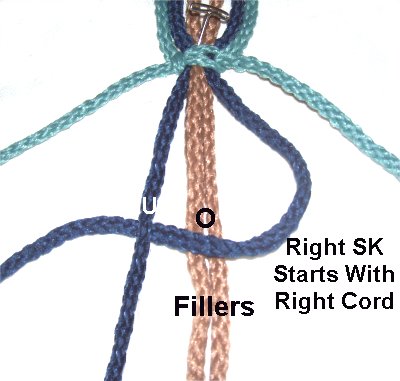
Step
A: Move the left
working cord to the right, passingover
the next 4 cords.
This includes both color
B and filler
cords.
Pass it under
the right
working cord.
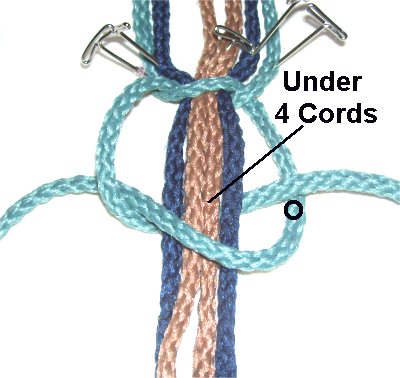
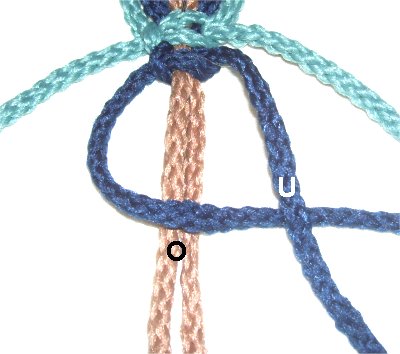
Step
B: Move the right
working cordto the left,passingunder
the two color
B and filler
cords.
Pull it out on the left, passing over
the left
working cord.
Pull the ends to tighten the knot firmly,
so it rests next to the pins.
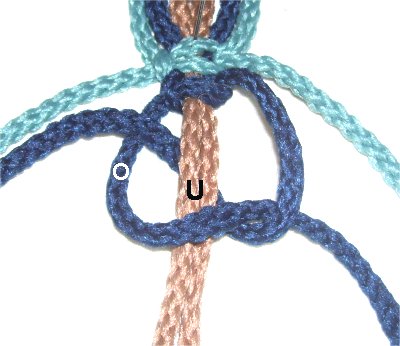
Step
C: Now you repeat these steps,
in the opposite direction:
Move the working cord now on the right
over the next 4 cords, heading left. Pass
it under
the working cord on the left.
Step
D: Move the working cord
on the left
under the color
B and filler
cords.
Bring it out on the right, passing over
the right
working cord.
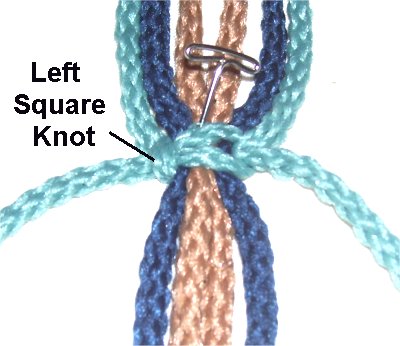
Tighten the second half of the knot firmly.
This is the
completed knot. Only here, in the center
of the Contrast Belt, will the Square knot
be tied around 4 other cords.
The
following knots are all to be tied with
2
fillers, unless otherwise
directed.
Right Square Knot Instructions
Step
3: For the next Square Knot in the
Contrast Belt, you change to the Color
B cords. The knots need to face right,
so you start with the right working cord.
Important:Remember that this knot will only have 2 fillers.
Also,the
two cords you just used (color A) are not
part of this knot.
Step
A: Move the right
working cord (color B) over
the two fillers
and under
the left
working cord.
Step
B: Move the leftworking cordunder
the fillers.
Bring it out on the right, passing over
the right
working cord.
Tighten it firmly, so it rests close to
the previous SK.
Step
C: Move the working cord
now on the leftover
the fillers
and under
the working cord on the right.
Step
D: Move the right
working cord under
the fillers.
As you pull it out on the left, pass
it over the left
working cord.
Tighten the knot firmly.
For the first
half of the Contrast Belt, when using the
Color
A cords, you tie left
SK.
When using Color
B, they face right.
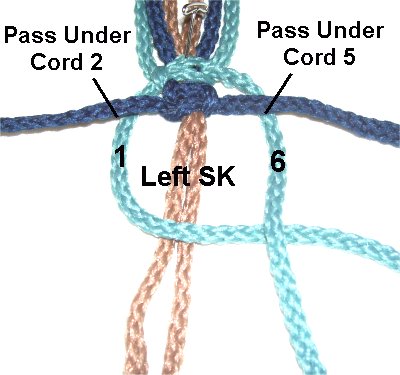
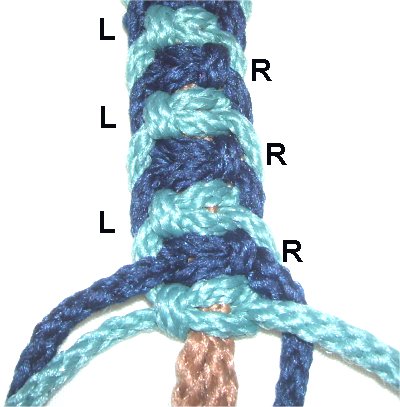
Alternating Pattern
Step
4: Mentally number the
cords 1 - 6. The fillers are cords 3
and 4.
Move cords
2 and 5 to the sides (color B).
Pass the color
A cords (1 and 6) under
them, and then tie a left
SK.
Step
5: Move cords 1 and 6 off
to the sides, and switch to using cords
2 and 5.
Use them to tie a right SK,
after you bring them under
cords 1 and 6.
Alternate between steps
4 and 5, until the Contrast Belt is half the size
you plan to make. So for a 40-inch belt,
stop at 20 inches.
As you progress, make sure you tighten all the
knots firmly, so the belt stays the same width.
Step
6: Turn the Contrast Belt
around, so you can work on the second
half. In order to maintain the
pattern, you need to make the following
changes:
When using cords
2 and 5 (color B), tie left
Square Knots. Those are the cords
you start out with, since you are again
working from the center towards the ends.
Step
7: When shifting to cords
1 and 6 (color A), make sure you
tie right
Square Knots.
Continue on, repeating
step 6 and 7, until both halves
of the belt are the same
size.
Add or remove knots from each
end if the belt is not the right
size.
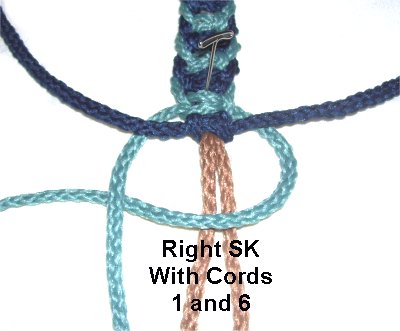
Finishing Touches
Step
8: Place one end of the Contrast
Belt in front of you, making sure it lies
flat and is not twisted.
Tie the first
half of a Square Knot with
whatever cord was next to be used.
Tie
the knot around 4 cords as you did the
one in the center (step 2).
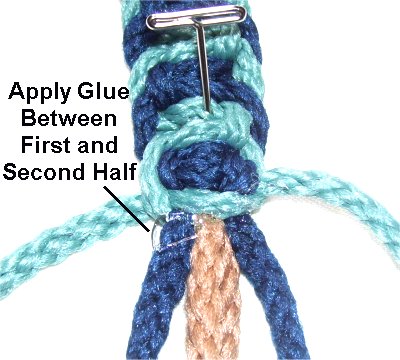
Step
9: Apply glue on the
fillers. Then tie the second half,
so it's resting on the glue. Tighten it as
much as you possibly can.
Repeat
steps 8 and 9 at the other end of
the belt. Make sure the belt is not
twisted and you are working at the front
of it.
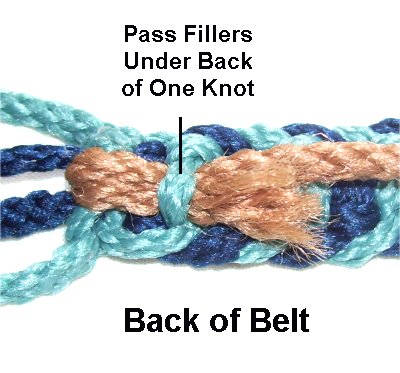
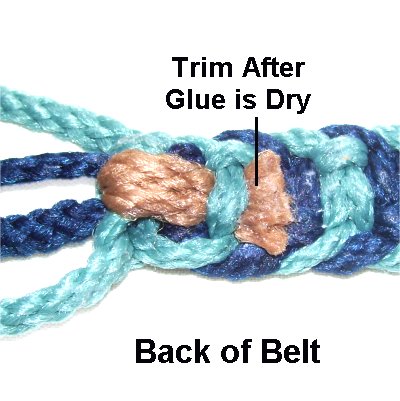
Step
10: Flip the Contrast Belt
upside
down, so you are working
in the back.
Pass the filler
cords under the back of one knot.
Apply glue below the two cords, so they
stick to the back of the belt.
Place something heavy on the area while
the glue dries.
Step
11: After the glue is dry,
trim the two filler cords and apply more
glue to the tips.
Repeat
steps 10 and 11 at the other end
of the belt.
Important:
Make sure the belt is not twisted, and you
are still working at the back.
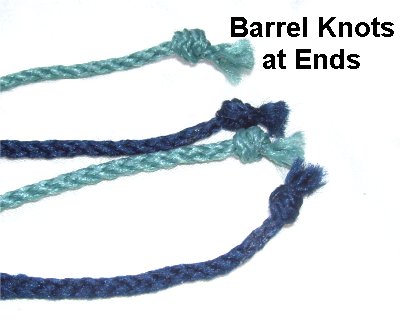
Step
12: Trim the four working
cords at each end, so they are even.
The length will depend on how much
material is left, but they should be at
least 8 inches.
Tie Barrel Knots at the ends. You
can tie an Overhand knot if you prefer
them, but make sure you use plenty of
glue.
By
using any text or images on Free Macrame
Patterns, you are agreeing to ourTerms
of Use