|
|
|
|
| |
|
|
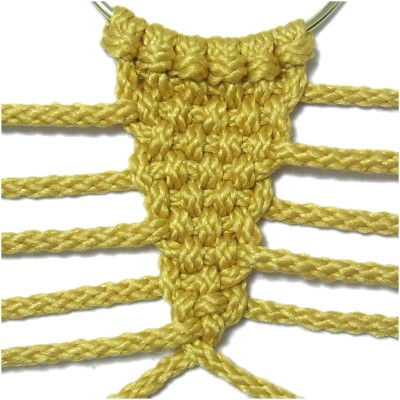
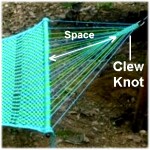
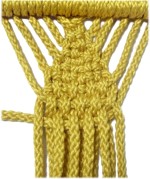
Description: The
Clew Knot is an interesting decoration
that is sometimes seen in manufactured
hammocks.
Its a type of weaving where the cords
are gathered together to form a V shaped
design.
At the top they are attached to a ring,
and at the bottom, a dowel.
You can also use this design as part of
wall hanging projects.
|
|
|
|
| Included on this page are instructions for
making the Clew Knot in reverse,
which is sometimes necessary when creating
hammocks. |
|
|
|
|
|
|
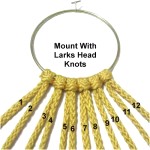
Preparation:
To practice, fold six
36-inch cords in half and mount them to a ring
with Larks Head knots.
Secure the ring close to the back of your board,
with the cords heading toward you (forward).
I recommend the first time you practice the Clew
Knot, you attach the cords to a ring that's at
least 4
inches in diameter, so you can spread
them out more easily. You can also
secure them directly to your board when
practicing.
Important
Tip: When making a Hammock,
sometimes you work from one end to the
other. In that case, it's better to mount
the cords to this first ring with REVERSE
Larks Head knots, so you can attach the cords to
the second ring with Double Half Hitches. |
|
|
|
|
|
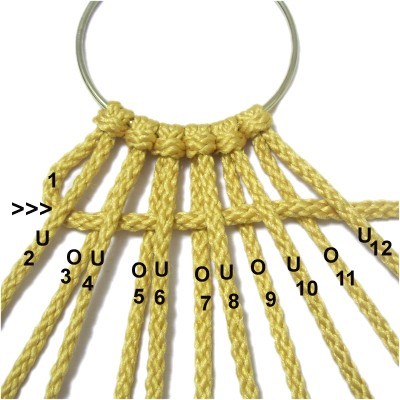
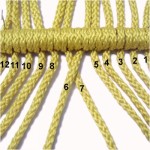
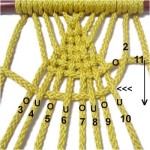
Stretch the cords so they have tension
and secure them close to the front of
your board.
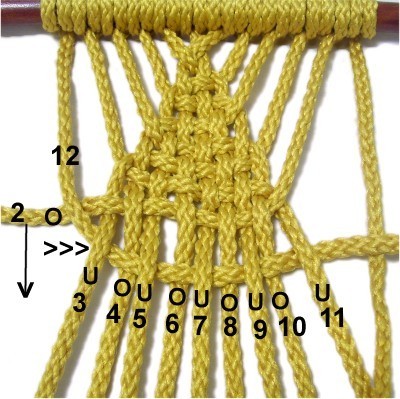
Mentally number the cords 1 - 12,
moving left to right.
|
|
|
|
|
| |
|
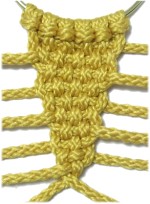
This chart provides a general overview of the
weaving process.
After you weave the cords, secure them off to
the side, since they are used only
once.
|
|
|
| |
Working
Cord
|
Direction
|
OVER
|
UNDER
|
|
|
1
|
Left to Right
|
3, 5, 7, 9, 11
|
2, 4, 6, 8, 10, 12
|
| 12 |
Right
to Left |
10, 8, 6, 4, 2 |
11, 9, 7, 5, 3 |
| 2 |
Left
to Right |
3, 5, 7, 9, 11 |
4, 6, 8, 10 |
| 11 |
Right to Left |
10, 8, 6, 4 |
9, 7, 5, 3 |
| 3 |
Left to Right |
5, 7, 9 |
4, 6, 8, 10 |
| 10 |
Right to Left |
8, 6, 4 |
9, 7, 5 |
| 4 |
Left to Right |
5, 7, 9 |
6, 8 |
| 9 |
Right
to Left |
8, 6 |
7, 5 |
| 5 |
Left to Right |
7 |
6, 8 |
| 8 |
Right to Left |
6 |
7 |
| 6 |
Left to Right |
7 |
n/a |
|
| |
| |
| |

|
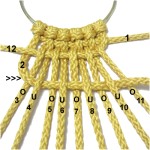
|
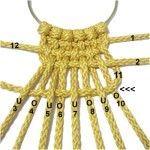
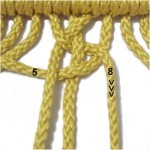
Step
1: Select cord
1 on the left, passing it under
cord
2 to start the weaving.
Alternate
under and over all the remaining
cords, moving left
to right horizontally.
Pull cord 1 to tighten, after moving it
close to the Larks Head knots (see next
image).
|
|
| |
|
| |

|
|
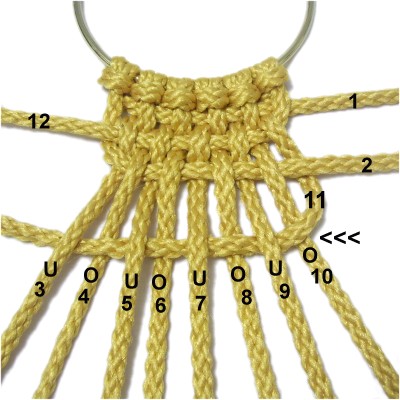
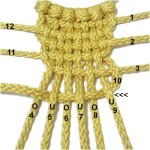
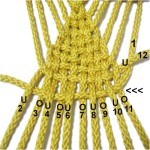
Step
2: Move cord
12 under
cord
11. Weave it through
the remaining cords right
to left.
The over - under pattern has changed,
so it's now the opposite of the previous
row.
Push cord 12 close to cord 1 and secure
it.
|
|
| |
|
| |
|
|
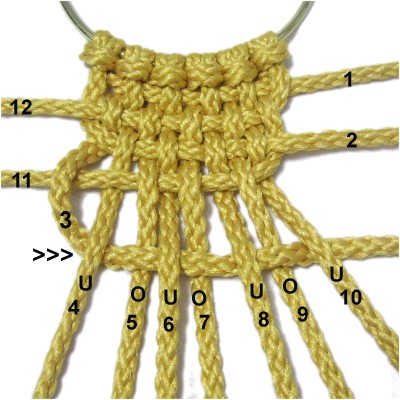
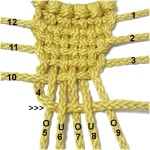
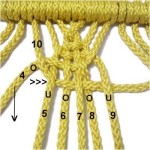
Step
3: Move cord
2 over
cord
3, then weave it under and over
the other cords left
to right.
|
|
| |
|
|
Designer's
Tip: It's important to change the
over - under pattern in
each step, so the weaving for the Clew
Knot alternates. That means the cord
you are using to do the weaving will sometimes
pass over
a cord as you begin, and other times it will pass
under
it.
You also alternate by using one cord from the
left, followed by one from the right.
Always push the cords close together after each
one is used. You will do a final tightening
later on. |
|
|
| |
|
|
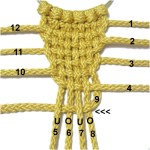
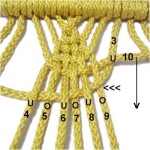
Step
4: Move cord
11 over
cord
10, then weave it under and over
the remaining cords right
to left. |
|
|
|

|
|
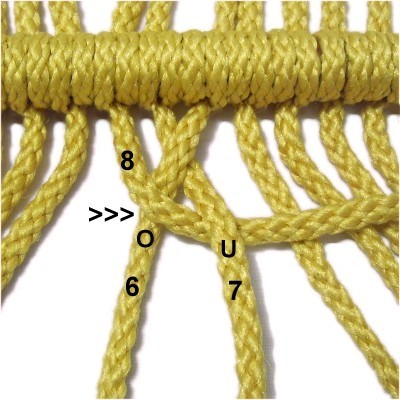
Step
5: Move cord
3 under
cord
4, then weave it under and over
the others left
to right. |
|
|
|
|
 |
|
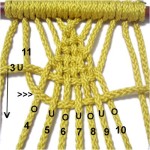
Step
6: Move cord
10 under
cord
9, then weave it through the
others from right
to left. |
|
|
|
|
|
|
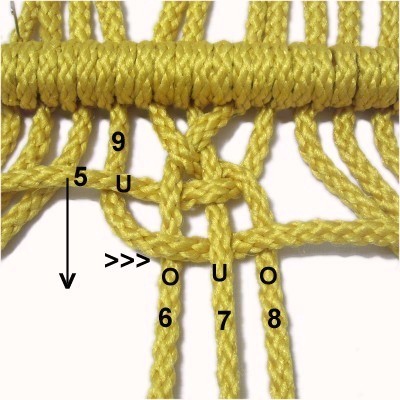
Step
7: Move cord
4 over
cord
5, then weave it through the
remaining cords left
to right. |
|
|
|
|
|
|
Step
8: Move cord
9 over cord
8, then weave it through the
remaining cords right
to left. |
|
|
|
|

|
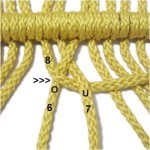
|
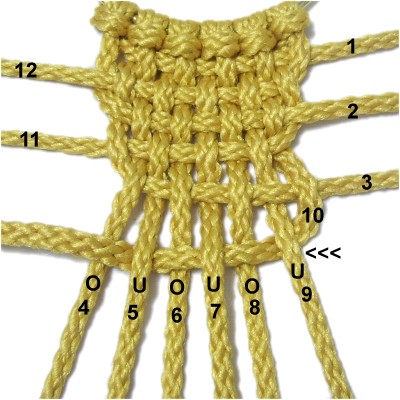
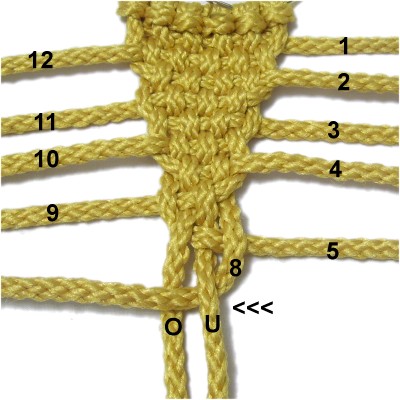
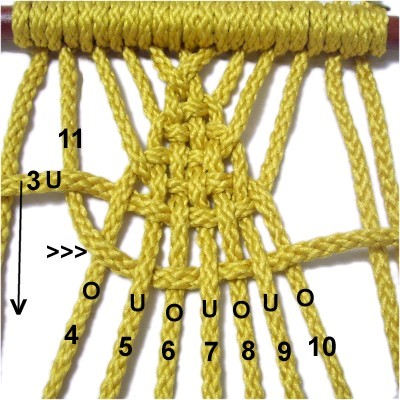
Step
9: Move cord
5 under
cord 6, then weave it over
cord 7 and under
cord 8.
|
|
|
|
|

|
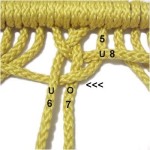
|
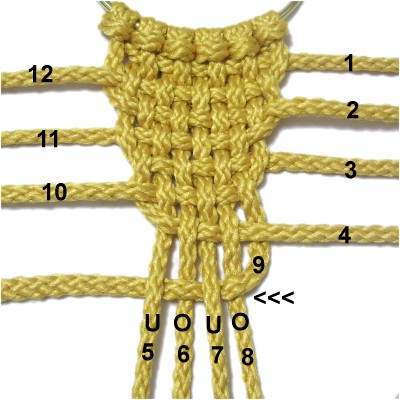
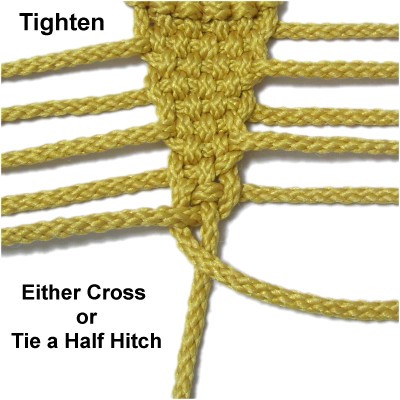
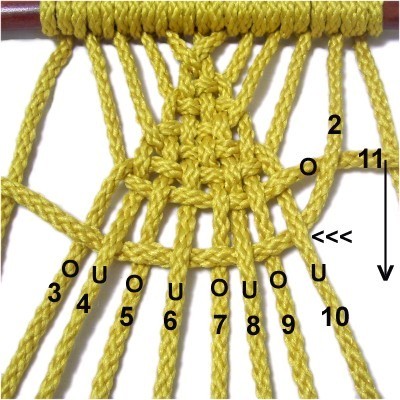
Step
10: Move cord
8 under
cord 7 and over
cord 6.
Pull each cord firmly to tighten the Clew
Knot, starting with cords 1 and 12. |
|
|
|
|
|
|
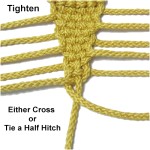
Step
11: To complete the design, you
must do something with cords 6 and
7.
You can simply cross cord 6 over 7, if you
plan to place the dowel close to the knot
(see images below).
|
|
|
|
|
|
When adding
space between the Clew Knot and
the dowel, tie a Half Hitch with cord 7
(onto cord 6) to keep the weave from
loosening.
|
|
|
|
|
|
|
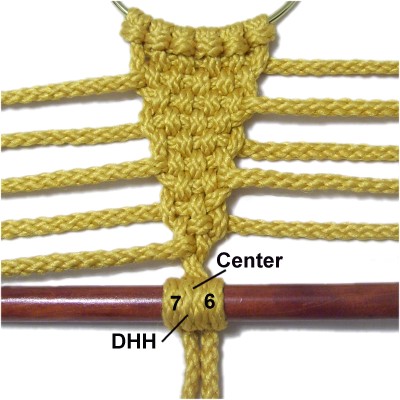
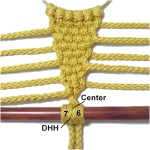
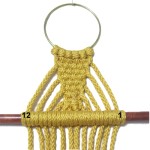
When using a
dowel, attach cords 6 and 7 first, placing
them at the center.
The best knot to use is the Double
Half Hitch (DHH).
|
|
|
|
|
|
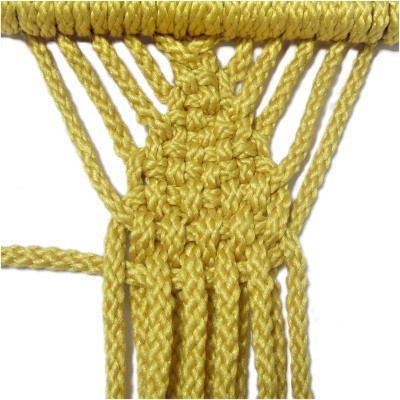
Attach cords 8
and 5, followed by 9 and 4. Attach
cords 10 and 3, followed by 11 and 2.
Cords 12 and 1 are the final pair,
attached to the right and left of the
others.
|
|
| |
| |
|
|

|
|
|
|
|
Reverse
Clew Knot
Some hammock patterns are made from one
end to the other.
The instructions below show you how to
make this knot in reverse, from the
dowel to the second ring.
|
|
|
|
|
Preparation:
To
practice, attach 12 cords to a dowel with Double
Half Hitches, to mimic what you would find in a
Hammock design.
Secure the dowel to your project board
horizontally, so the cords are vertical and
heading toward you (forward).
|
|
|
|
| Here's a general overview of the over - under
pattern and direction for the Reverse Clew Knot: |
|
|
|
Working Cord
|
Direction
|
Over
|
Under
|
| 6 |
Right to
left |
7 |
|
| 8 |
Left to
Right |
6 |
7 |
| 5 |
Right to
Left |
7 |
8, 6 |
| 9 |
Left to
Right |
6, 8 |
5, 7 |
4
|
Right to
Left
|
9, 7, 5
|
8, 6
|
10
|
Left to
Right
|
4, 6, 8
|
5, 7, 9
|
3
|
Right to
Left
|
9, 7, 5
|
10, 8, 6, 4
|
11
|
Left to
Right
|
4, 6, 8, 10
|
3, 5, 7, 9
|
2
|
Right to
Left
|
11, 9, 7, 5,
3
|
10, 8, 6, 4
|
| 12 |
Left to
Right |
2, 4, 6, 8,
10
|
3, 5, 7, 9,
11
|
1
|
Right to
Left |
11, 9, 7, 5,
3
|
12, 10, 8,
6, 4, 2
|
|
|
|
|
|
|
|
|
Step
1: Mentally number the
cords 1 - 12, moving right
to left, since you are making the
knot backward.
Cross cord 6 over
7, and secure both cords near the front of
your board.
|
|
|
|
|
|
|
Step 2:
Move cord
8 over
cord 6 and under
cord 7, arranging it horizontally (left to
right).
|
|
|
|
Designer's
Tip: After you weave a cord
horizontally, leave it that way until the next
step. This makes it easy to identify.
The next cord will either pass over or under it,
then the next row of weaving is done. |
|
|
|
|
|
Step
3: Move cord
5 under
cord 8, then curve it to the left, passing
over
cord 7 and under
cord 6 horizontally.
Remember that the weaving for each row
needs to alternate, so always compare the
rows to make sure the under - over pattern
changes.
|
|
|
|
|
|
|
Designer's
Tip: After you complete
a row of weaving, arrange the previous
cord vertically. In this
case, that's cord 8.
The only one that should remain horizontal
is the cord most recently used. |
|
|
|
|

|
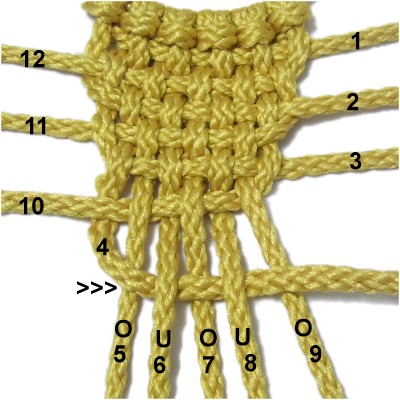
|
Step
4: Move cord
9 under
cord 5, then alternate over and under
cords 6 - 8 (left
to right).
Move cord
5 forward vertically, and secure
it next to cord 6. |
|
|
|

|
|
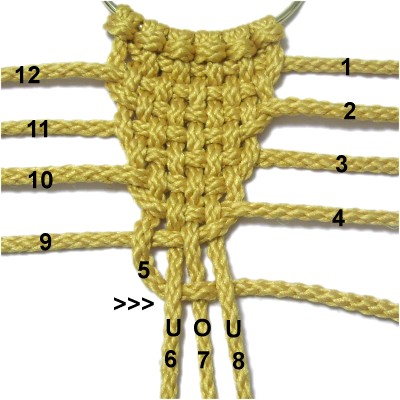
Step
5: Move cord
4 over
cord 9, then alternate over and under
cords 8 - 5 (right
to left).
Move cord
9 forward vertically and secure
it.
Double check to make sure all the vertical
cords have tension, which makes it easier
to weave the Clew Knot. |
|
|
|
|
|
|
Step
6: Move cord
10 over
cord 4, then alternate over and under
cords 5 - 9 (left
to right).
Bring cord
4 forward, and secure it next to
cord 5.
|
|
|
|
|
|
Step
7: Move cord
3 under
cord 10, then alternate under and over
cords 9 - 4 (right
to left).
Bring cord
10 forward and secure it.
Check the tension on all the cords.
You can now spread them out slightly if
necessary.
|
|
|
|
|
|
Step
8: Move cord
11 under
cord 3, then alternate over and under
cords 4 - 10 (left
to right).
Bring cord
3 forward, next to cord 4. |
|
|
|
|
|
|
Step
9: Move cord
2 over
cord 11, then alternate over and under
cords 10 - 3 (right
to left).
Bring cord
11 forward.
Increase the tension of all the cords, so
the next two rows of weaving will be
easier to make.
|
|
|
|

|
|
Step
10: Move
cord
12 over
cord 2, then alternate under and over
cords 3 - 11 (left
to right).
Bring cord
2 forward.
|
|
|
|
|
|
|
Step
11: The final row is made with cord
1. Bring it under
cord 12, then weave it through all the
others from right
to left.
|
|
|
|
|

|
|
Step
12: Tighten and adjust the
Clew Knot by pulling each cord gradually,
from where it starts on the dowel to the
end of it.
Keep the knot flat as you work. |
|
|
|
When making a Hammock, you would now attach the
cords to another ring.
You would have mounted the cords to the first ring
with reverse
Larks Head knots, so you can attach the cords to
this ring with Double Half Hitches.
Attach
the cords from
the center working outward to
the right and left. So
the first cords on the ring are 6 and 7.
Tighten each knot firmly, so the
ring rests close to the last row of weaving.
|
|
|
|
|
|
By
using any text or images on Free Macrame
Patterns, you are agreeing to our Terms
of Use
|
|
|
|
|
Have
any comments about the Clew Knot? Contact
Me.
|
|
|
|
|
|
|
| |

|
|