|
|
| |
|
|
Description:
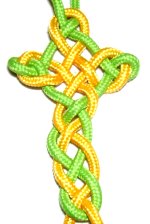
This beautiful Celtic Cross pattern is
easy to make, and requires only two
cords. It can be doubled, if you plan
to use very fine materials (less than
2mm thick).
This Macrame pattern demonstrates the
woven pattern typical of all Celtic
decorative knots. The Satin
Rosary includes this
design as a pendant, which is the best
way to use it.
I used Nylon Paracord to make the
Celtic Cross shown in the example, but
Satin and Leather work really well,
too.
|
|
| |
|
| |
|
Supplies Needed:
- 2mm to 4mm Macrame Cord, in two different
colors
- Project Board and pins (or tape)
|
| |
| |
|
| |
Cutting and Preparing Cords
|
| |
| |
IMPORTANT:
Secure all the loops in some manner.
When using Leather or Satin cord, use tape
or the Cross-Pin
Technique, to prevent the pins
from damaging the fibers. |
| |
| |
- Cord
A should be cut at least 30 inches
long.
- Cord
B should be cut 72 inches or
longer, since it is used to make the
necklace.
To figure out the length of the second cord,
just add 30
inches to what you need to make the
necklace.
In the images, Cord
A is yellow, and Cord
B is green.
Prepare the ends with glue or tape to prevent
unraveling.
|
| |
|
| |
Cord
A Details
|
| |
| |
 |
|
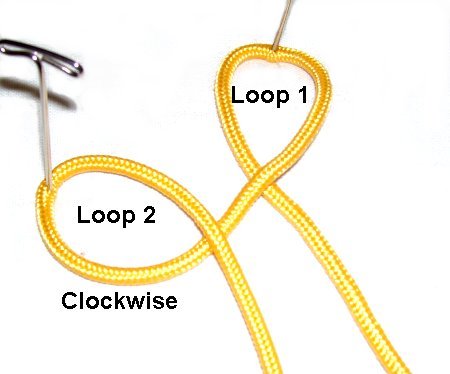
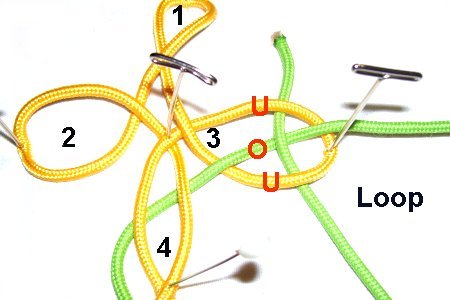
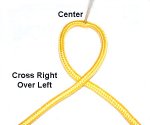
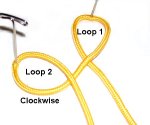
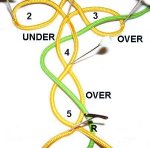
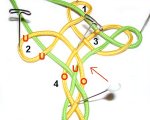
Loop
1: Use Cord
A to make loop
1 in the center,
so the right half crosses over the
left. |
|
| |
|
| |
 |
|
Loop
2: Use the portion that
is now on the left.
Make loop 2 in a clockwise
direction, positioning it below and to the
left of the first loop. |
|
| |
|
| |
 |
|
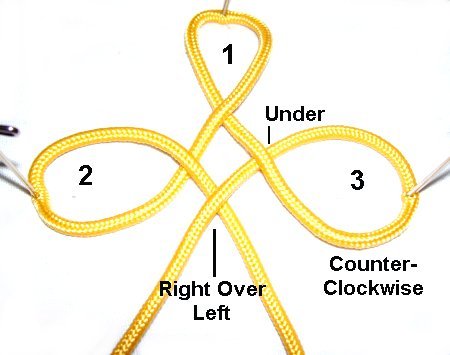
Loop 3: Use the
right half of the cord to make another
loop. Place it directly across from loop
2. Rotate in a counter-clockwise
direction.
The working end should pass under
to make the crossing point.
|
|
| |
|
| |
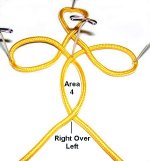
Cross the two halves
right over left, and secure them to your board.
The crossing point
should be lined up with the center of Loop 1. |
| |
|
| |
 |
|
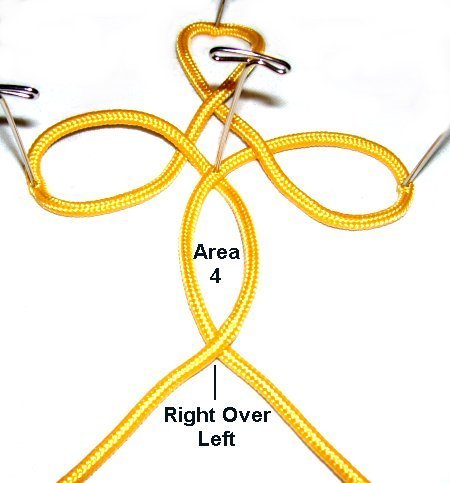
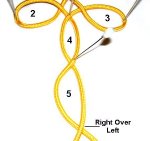
Area 4: Cross the
portion that is now on the right over
the other half. Secure the crossing
point.
The crossed area should line
up with the one you made in the
last step.
|
|
| |
|
| |
 |
|
Area 5: Cross the
portion that is now on the right over
the other half.
The
crossed area should line
up with the other two you
made previously.
The first half of the Celtic Cross is
now finished.
|
|
| |
|
| |
| |
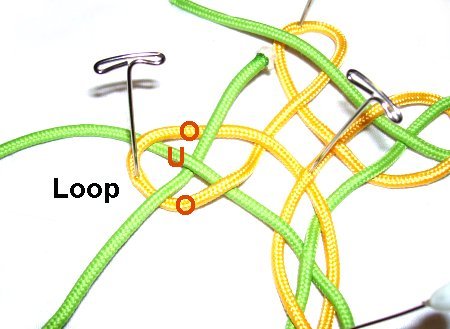
Cord
B -- Weaving Process
|
| |
|
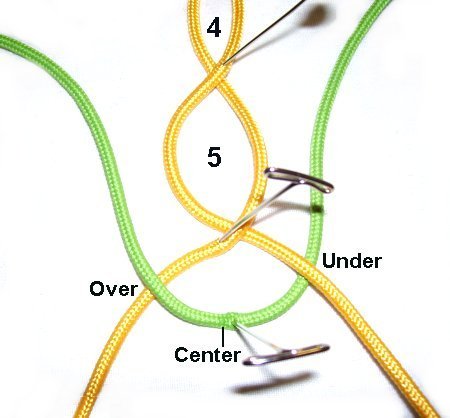
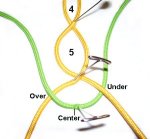
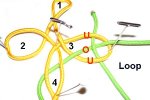
| Step 1: Fold Cord
B in half, and secure it in the center, between the
two parts of Cord
A (near area 5). |
|
|
| |
 |
|
The right half should pass under
cord A on the right.
The left half should pass over
cord A on the left.
|
|
| |
|
| |
 |
|
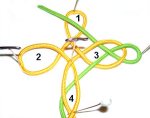
Step 2: Move the right
portion of Cord
B backward to the left, passing
over
Area
5.
Bring it back to the right, passing under
Area
4.
Continue backward and to the right, over
Loop
3, then secure it.
|
|
| |
|
| |
 |
|
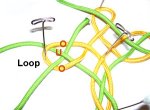
Step 3: Make a clockwise
loop with the right portion of Cord
B.
Weave it under
- over - under the three
segments of loop
3.
|
|
| |
|
| |
 |
|
Step 4: Move
the right portion towards the
upper left area of the Celtic Cross.
It should rest on
top of Loop
1.
|
|
| |
|
| |
 |
|
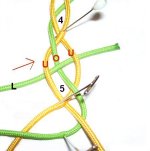
Step 5: Use the left
portion of Cord
B.
Weave it towards the right through Area
5, passing under
- over - under the three
segments.
|
|
| |
|
| |
 |
|
Step 6: Weave it back
to the left, through Area
4, over
- under - over
the three segments.
Pass it under
Loop
2.
|
|
| |
|
| |
 |
|
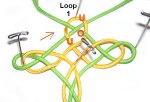
Step 7: Make a counter-clockwise
loop by weaving the left portion through
Loop 2, over
- under - over the three
segments.
|
|
| |
|
| |
 |
|
Bring it to Loop
1, heading left to right.
Weave through, passing under
- over - under.
|
|
| |
|
| |
|
Step 8:
Tighten the Celtic Cross gradually and evenly so
its balanced.
Finish off the ends of the Cord
A by securing them to the back
of the cross and applying glue to hold them in
place.
Since the Cord B
was cut longer, you can now use it to make the
necklace.
|
| |
|
|
|
By
using any text or images on Free Macrame
Patterns, you are agreeing to our Terms
of Use
|
|
|
|
|
Have
any comments about the Celtic Cross? Contact
Me.
|
|
|
| |
 |
| |
| |
| |