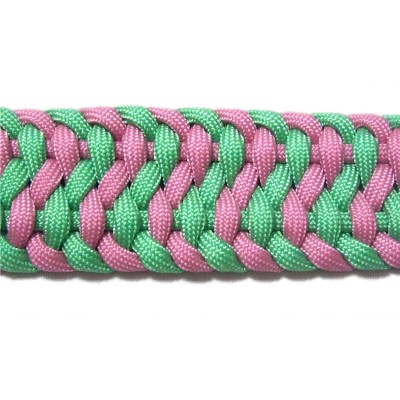
Description: The Bush Bar is a
unique decorative knot suitable for many Macrame
projects. Kids will find this knot easy to
tie, so it can be used for a craft party or a
school art project.
You can use it to make Macrame bracelets and
chokers, belts, purse straps, dog collars, and
more.
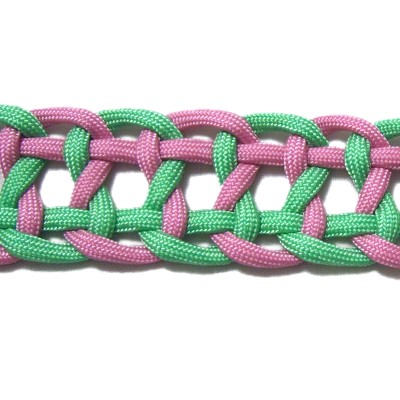
It's usually tied with the knots close
together. But you can expand the knots to
add space and create a more open weave.
After you have
practiced this knot, try making the Bush Bar
Bracelet.
The video
gallery contains tutorials for
a variety of very unique and appealing
knot designs.
Click
on the link or image to visit the
website.
Preparation:
To practice, you need 2 cords at least 60 inches
long.
When using the Bush Bar for a project, you will
need to decide ahead of time whether you want a
close weave with the knots close together, or an
open weave with space between the knots.
Then use the formula that applies:
Close Weave: Both cords should be the
finished length x 10.
Open Weave: The cords should be the finished
length x 8.
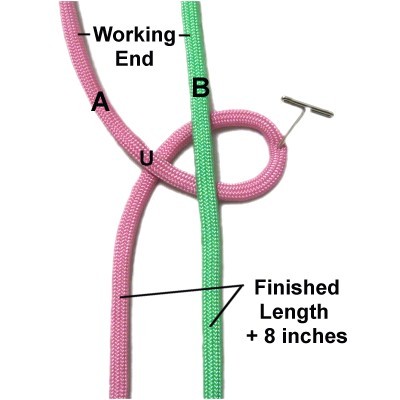
Measure both cords starting from one end down
to the finished length you are planning to
make. Add at least 8 inches if you plan to
make a button knot for a clasp.
This measured portion is called the short
segment in the instructions. The
rest of the material is called the working
end.
Step
1: Secure both cords
vertically close to the measured
point. Cord
A should be on the left.
Make a counter-clockwise
loop with the short
segment of cord
A, passing under
the working end to form the crossing
point. Slide the loop under
cord B.
Start a clockwise
loop with cord
B (short segment), passing under
the short segment of cord A, and over the
working end of cord A.
To complete the left loop, pass
it under
the right loop, over
cord B, and under
the right loop again.
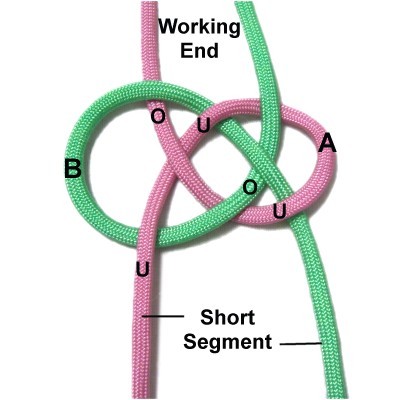
Step
2: Tighten the Sailors knot
so the space in the center is 3/4 to
1-inch in size, if you plan to use it as a
clasp.
Secure the short segment of both cords with
tension.
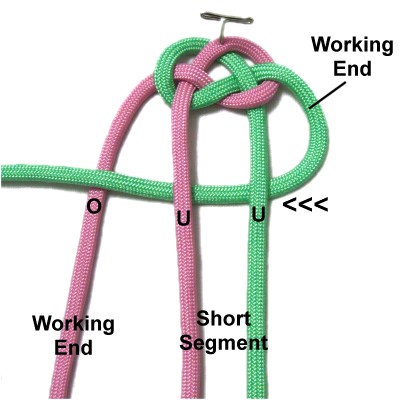
Step 3: Curve the
working end of cord
B to the left horizontally,
passing it under
the short segment of both cords and over
the working end of cord A.
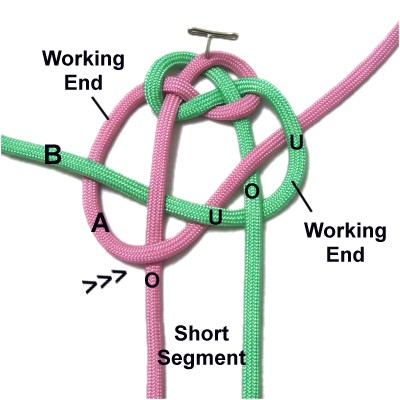
Step 4: Curve the
working end of cord
A to the right, passing over
the short segment of cord A.
Moving diagonally,
bring it under
the working end of cord B, over
the short segment, and under
the working end again near the curve.
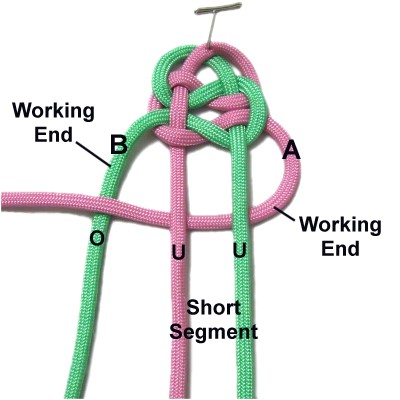
Step
5: Tighten the knot made in
steps 3 and 4 so it's close to the width
of the first knot (step 1).
Curve the working end of cord
A to the left, passing it under
the short segment of both cords and over
the working end of cord B.
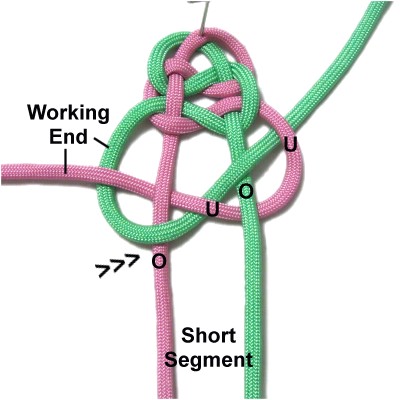
Step
6: Curve the
working end of cord
B to the right, passing over
the short segment of cord A.
Moving diagonally,
bring it under
the working end of cord A, over
the short segment of cord B, and under
the working end of cord A near the
curve.
Designer's
Tip: Steps 5 and 6 are the same as
steps 3 and 4, but the cords have switched
positions.
As you continue, just repeat the over - under
sequence rather than focus on the colors.
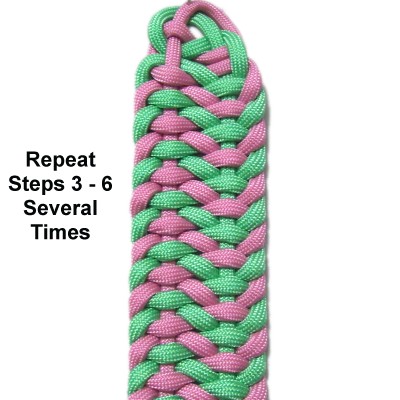
Step
7: Repeat
steps 3 - 6 several
times if you are practicing.
Continue until you reach the finished
length if you are making a project.
Keep the knots close together as you build
the bar.
Step
8 (optional): To create an
open weave, slide the knots forward
while holding the short segments so they
remain straight and taut.
Then measure the length of the
sennit. You may need to remove a few
knots to make it the right length for your
project.
Step
9: Secure the working ends
in the BACK of the Bush Bar.
Use the short segments to make a button
knot if you need one for a clasp.
The Knife Knot
is the one shown in the image.
By
using any text or images on Free Macrame
Patterns, you are agreeing to ourTerms
of Use