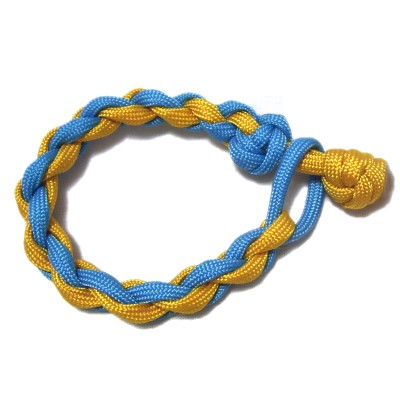
Description: This interesting
Braid Bracelet is an easy Macrame project for
kids as well as beginners. It's made with the
two color Round Braid
technique and has a loop with a button knot
closure.
Make sure you practice the knots before you try
creating this Macrame bracelet.
You can use any type of material to make this
bracelet design.
In the example, 4mm Paracord was used to make
the bracelet shown. Make sure you read the
instructions in Cord Preparation
about the proper way to prepare this material,
if you plan to use it.
Supplies Needed:
2mm to 4mm cord material in two colors
Glue
Project Board and Pins
Knots
Used: The instructions for all 3
knots are below.
Round Braid
Instructions
Step 1:
Determine the finished size you want to make by
measuring your wrist.
Multiply that measurement by 4, and cut both cords
to that length. Prepare the tips to prevent
unraveling.
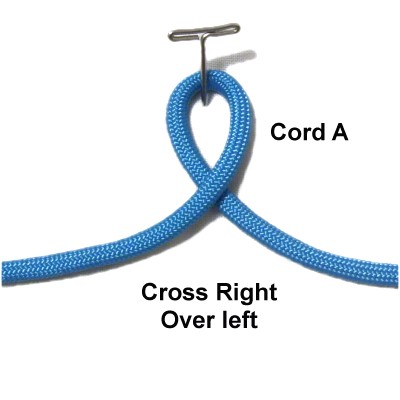
Make a loop in the center of the first
cord, crossing right
over left.
Mentally
label it Cord
A.
Arrange
the two halves horizontally.
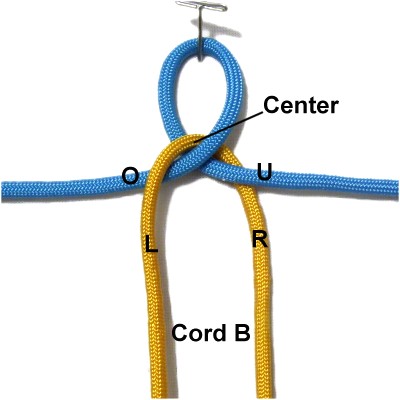
Step
2: Slide Cord
B through the loop, placing the
center of it at the crossing point.
The left half should pass over
Cord A on the left and under
it on the right.
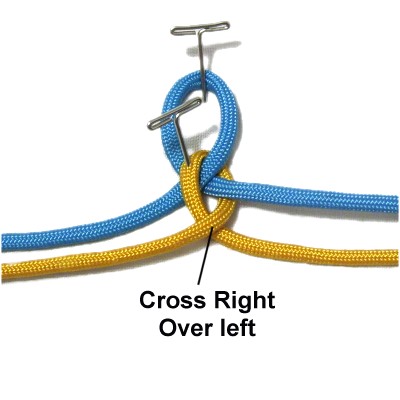
Step 3: Cross the two
halves of Cord
Bright
over left to make the next
loop.
Adjust the size of the first loop (Cord
A) so it measures 3/4-inch
from the top to the crossing
point.
Arrange each half horizontally.
Designer's
Tip: The Braid Bracelet should be
tightened as you progress.
Starting with the second loop, make sure each one
is firmly tightened before moving on to the next.
Step 4: Move one
half of Cord
Aover
Cord B on the right.
Move the other half under
Cord B on the left.
Cross the two halves of Cord A right
over left, then arrange them
horizontally.
Step 5: Move one half
of Cord
Bunder
Cord A on the right. Move the
other half over
it on the left.
This is the opposite
of how you arranged Cord A in the
previous step.
Cross the two halves right over left,
then arrange them horizontally.
As you
continue, remember these details:
When using Cord
A, the starting position of the two
halves is always OVER on the right, and UNDER on
the left.
When using Cord
B, their position is always UNDER on the
right, and OVER on the left.
The loop is always completed by crossing right
over left.
Step
6: Repeat
steps 4 and 5 until the Round
Braid is close to the finished size you
determined in step 1.
The last loop you make should be with Cord
A if possible, so the
instructions below make more sense.
Square Knot Instructions
To finish the Braid Bracelet, you need to tie
some type of knot to hold the cord together.
Below are instructions for a RIGHT Square Knot,
which I recommend.
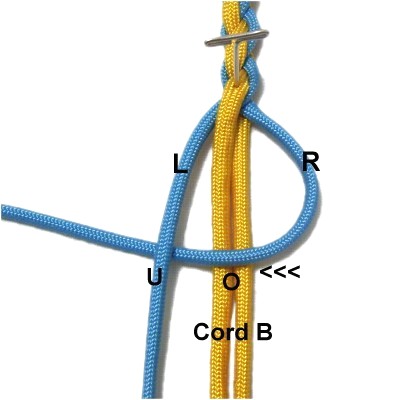
Step 7:
Move both halves of Cord
B into position, but do not cross
them. They should remain vertical and
rest side-by-side.
Mentally label the two halves of Cord
A where they rest now (Left or Right).
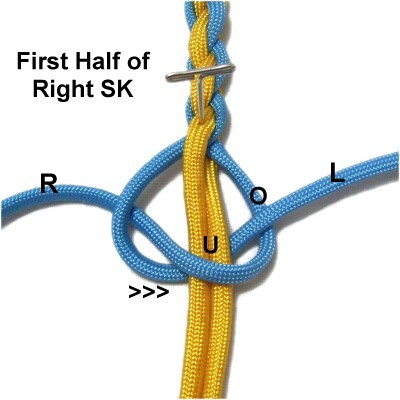
Move the right
half of Cord A to the left,
passing over
Cord B.
Bring it under
the left half of Cord A.
Move the left
half of Cord A to the right,
passing under
Cord B.
As you pull it out on the right, move it over
the right half of Cord A.
Tighten
firmly.
The two halves
of Cord A have switched
places.
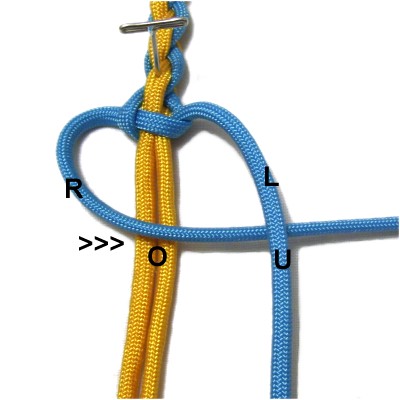
Move the right
half of Cord A to
the right, passing over
Cord B.
Bring it under
the left half of Cord A.
Move the left
half of Cord A to
the left, passing under
Cord B.
As you pull it out on the left, move it over
the right half of Cord A.
Make sure the Square Knot isvery tight.
Oysterman Knot
Instructions (Clasp)
You can use any type
of round knot for the clasp. You can also use a
regular plastic button or a bead, instead of a
knot. Below are the instructions to make the
Oysterman Knot.
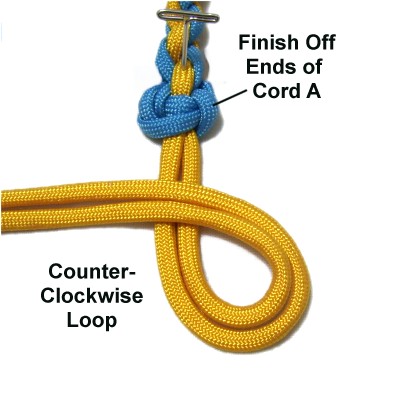
Step 8:
Finish off the two ends of Cords
A. You can pass them through two loops in
the BACK of the Braid Bracelet and apply glue to
hold them in place.
Make a counter-clockwise
loop with the two halves of Cord
B, which act together as if
they were one cord.
Fold the working ends to form a bight,
then pass it through the loop under
- over (from below).
Tighten the loop by pulling on the
bight, gradually working out the
slack. Tighten
FIRMLY.
Try to keep it
1/2-inch from the Square Knot.
Bring the working ends under
the area near the SK, heading left to
right. Pass them through the bight
(over - under).
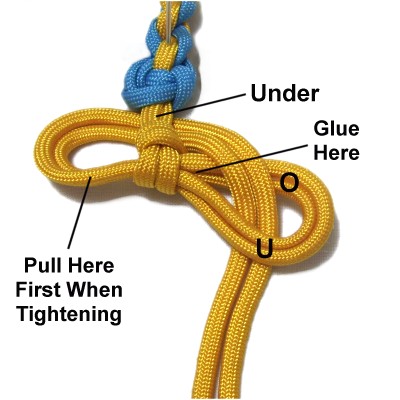
Add glue near the tightened
portion. Pull on the area shown,
to tighten the bight.
Then pull on the ends to tighten the
rest of the Oysterman knot. Make
sure it's very
tight.
To secure the
Braid Bracelet, pass the Oysterman Knot
through the loop at the top.
By
using any text or images on Free Macrame
Patterns, you are agreeing to ourTerms
of Use