Description:
These Beaded Teardrops feature the Half
Hitch Spiral, which is an easy knot to tie. They
can be made any size.
Micro-Macrame earrings need to be delicate, so use
tiny beads and fine material to cover the teardrop
hoops. Use hoops with an extra loop if you
want a charm in the center as shown.
The material used in the example is cotton
embroidery cord.
This Macrame project is rated Easy, and is
suitable for beginners with experience using fine
materials.
Cut the cords as shown in the chart below.
For earring hoops larger than 2 inches, increase
the length by 10 inches for every half inch
increase in the hoop size. You should use 3
cords for hoops larger than 2 inches.
Prepare the tips of all cords with glue and allow
it to dry and stiffen.
Important: The
cords work together if you are using more than
one.
When describing the steps for the Beaded
Teardrops, I sometimes use the word "cord", which
means the entire group (1 - 3 cords).
Hoop size
(top to bottom)
Length of
cords
1-inch
1 cord, 25
inches long
1.5-inch
1 or 2
cords, 35 inches long
2-inch
2 cords, 45
inches long
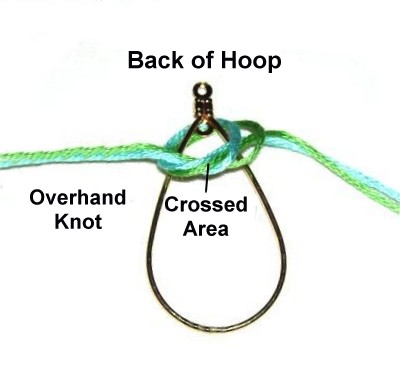
Step
1: Tie a loose Overhand
knot in the center of the cords.
Slide the knot around the top of the
teardrop hoop so the crossed
area is in theback.
Tighten the knot firmly.
Turn the hoop over so you work in the
front next.
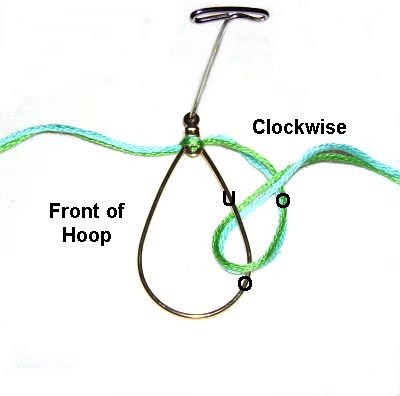
Step
2: Separate the cords into
two groups - one set for each half of the
Beaded Teardrops.
Make a Half Hitch with the cords on the
right in a clockwise
direction, passing the cord over
- under the hoop. As you
pull it right, pass over
the cord.
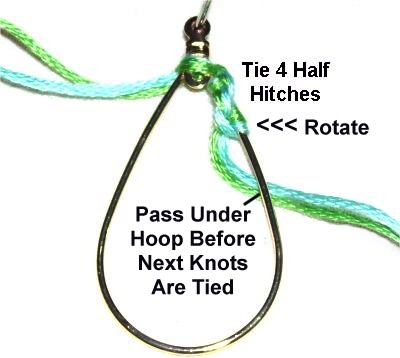
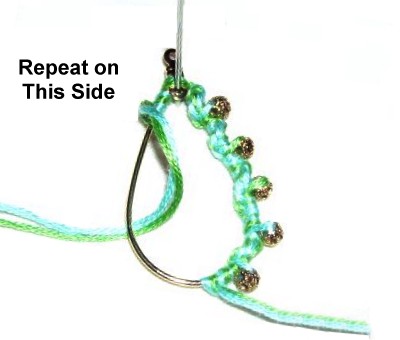
Step
3: Tie four
more Half Hitches. To create the
Spiral, rotate the
cord towards the center
of the hoop.
Then curve the working ends under
the metal toward the outside before tying
the next knots.
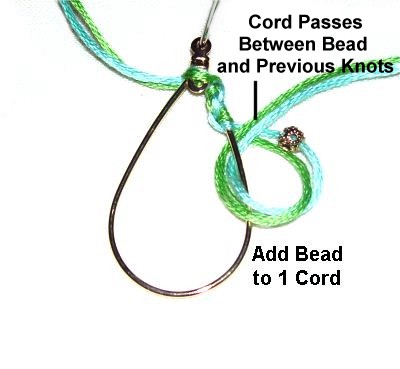
Step
4: Add a bead to one
of the cords in the set. Then tie a
Half Hitch to secure it.
Important:
Make sure the loose end of the cord passes
between the bead and the knots previously
tied.
Click
on this image to see a larger view.
Step
5: Tie the next Half Hitch so it
rests on the other side of the
bead. Tighten this knot firmly
so it rests against the bead, with no gap
between it and the previous knot.
Repeat
steps 3 - 5 several times, tying
5 Half Hitches between each bead.
Stop when the right halfof the hoop is covered.
Step
6: Repeat
steps 2 - 6 to create
the left half of the Beaded Teardrops.
Step
7: Turn the hoop upside
down so you are working in the BACK.
Tie 2 tight
Overhand knots with one
cord from each half.Apply
glue before tightening.
Do the same with the other cords.
When the glue is dry, cut off the excess
material.
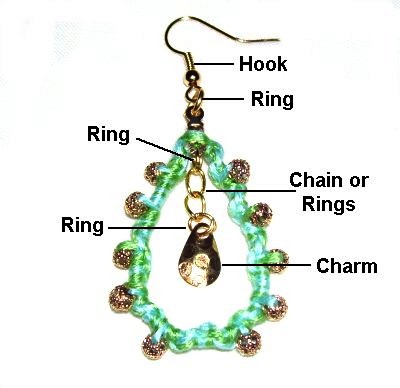
Step
8: Attach a jump ring to the
hole at the top of the hoop, as well as
the hook. The ring helps the Beaded
Teardrops dangle more freely.
Most earring hoops have an opening at the
top for charms. You can attach rings
and/or chain so the charm dangles in the
middle of the hoop as shown.
By
using any text or images on Free Macrame
Patterns, you are agreeing to ourTerms
of Use