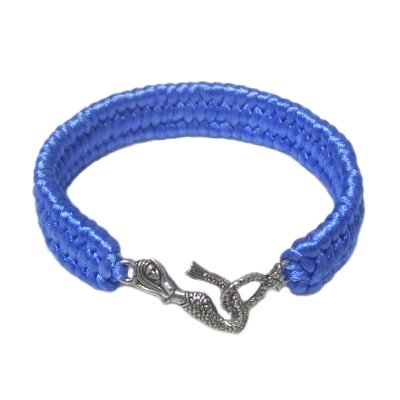
Description:
The Weave Bracelet features a crossed weaving
technique, which has three segments and resembles
a tire tread. It's the same technique
used to make the Trilobite Knot.
This simple Micro-Macrame design is a perfect way
to display a special clasp, like the Mermaid shown
in the example. Shipwreck Beads
is a great online source for decorative clasps.
This Macrame project is easy to make, so is
suitable for beginners. Children should be
able to make it with help from an
adult.
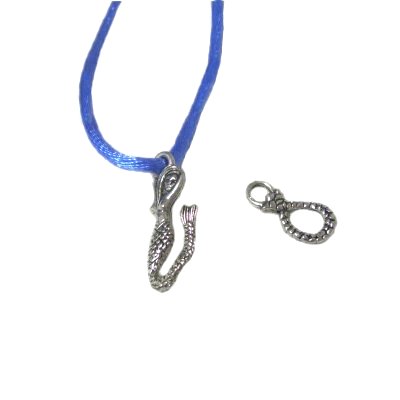
The material used in the example is 2mm Satin cord
(rayon). You can use any type of material,
including Parachute cord. The width
of the bracelet is determined by the thickness of
the material.
Supplies
Needed:
2mm - 4mm cord material
2-part Hook Clasp
Project board, pins, glue
Preparation
and Mounting
Step 1:
Measure your wrist (in inches) to determine the
finished size of the Weave Bracelet. This
should include the clasp.
Multiply
the finished size by 16, then divide the result
by 36 to get the yards. Cut one cord to that
length.
Prepare the tips with glue to prevent unraveling.
Pass the cord
through the opening in the HOOK portion of
the clasp.
The hook should rest at the center of the
cord.
Secure the clasp near the front of your
board.
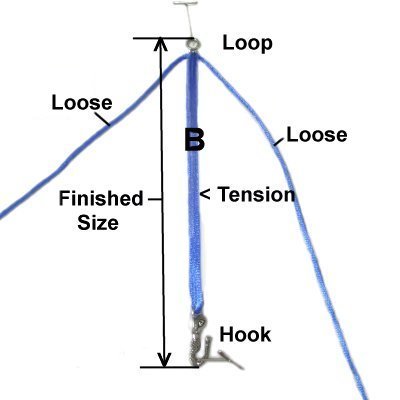
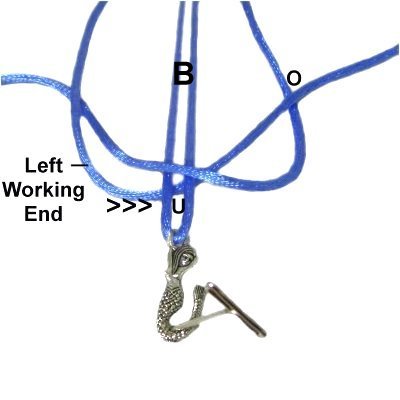
Step
2: Pass both ends of the
cord through the opening in the LOOP forthe
clasp. Make sure the cord is not
twisted or crossed.
Adjust the placement of the loop
until the cord and both
parts of the clasp measure the
finished size you wish to
make.
Step 2,
continued: Secure the loop so the
cord has tension in the area between the two parts
of the clasp. Mentally label that area segment
B.
The loose portions of the cord are used to create
the weaving. They are referred to as working
ends in the following instructions.
Weaving Process
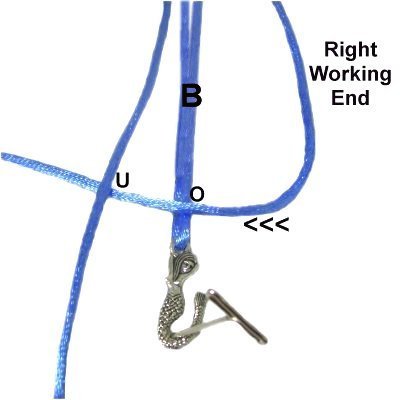
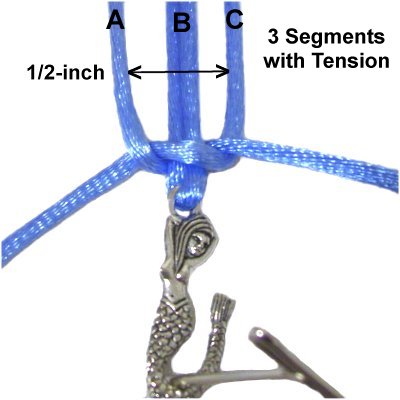
Step
3: Bring the working ends
forward, so they are near the hook portion
of the clasp.
Curve the right
working endover
segment B, heading left. Pass it under
the left working end.
Step
4: Move the left
working end to the right, passing
under
segment B, and over
the right working end.
Step
5: Pull both ends horizontally
to tighten. The width
of the 3 segments will be close to
1/2-inch if you are using 2mm cord
material.
Push the knot close to the hook, making
sure all three segments have lots of
tension.
Step 5,
continued: Mentally label the
vertical portions A - C as shown in the image
above.
The working ends switch places every row, so
mentally label them where they are currently
resting (right or left).
Place a pin next to the knot you just tightened,
and lean it backward to hold the cord in that area
(see image below).
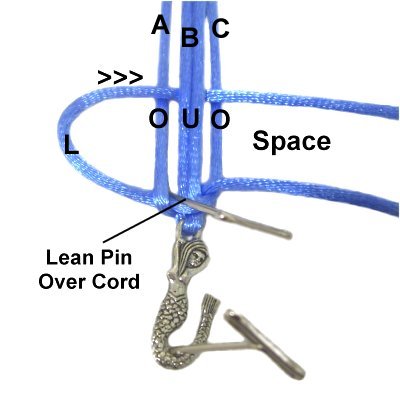
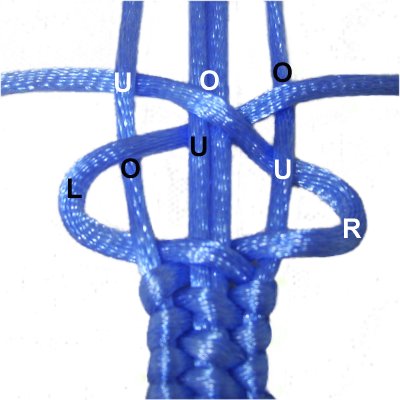
Step
6: Curve the left
working end to the right, passing
over
segment A, under
segment B, over
segment C.
On the right, leave a space below the
working end.
Step
7: Weave the right
working end to the left, passing
under
segment C in the space below
the left working end.
Move it diagonally over
segment B, where the two ends will cross.
Pass it under
segment A, above
the curved area of the left working end.
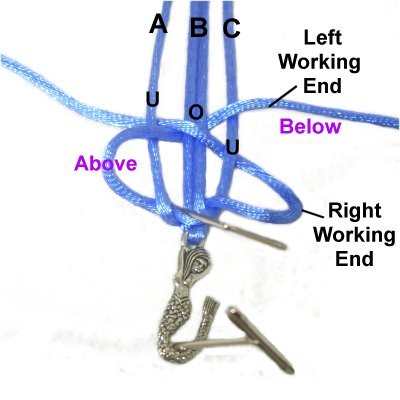
Step
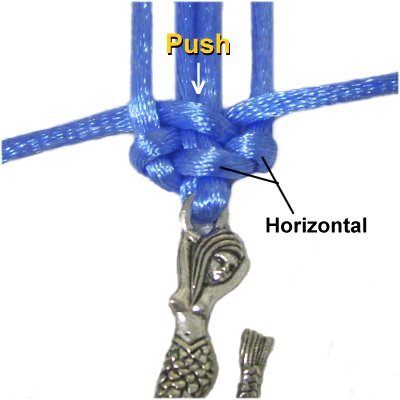
8: The best way to tighten
each row of the Weave Bracelet is to pull
the working ends firmly,
so the loops arehorizontal.
Then remove the pin.
Push the woven area closer to the previous
knot, to eliminate the gaps between rows
of weaving. You can now lean a pin
over the new row (optional).
Step
9:Repeat
steps 6 - 8 over and over, until
you reach the loop for the clasp.
Tie as many rows as possible, but stop
before the last row (see step 10).
Left working end (black): Over -
Under - Over
Right Working end (white): Under -
Over - Under
Important:
To make sure the Weave Bracelet is neat along the
edges, tighten each row of weaving the same
amount. Measure the width as you progress,
so it remains the same. The loops on
segments A and C should be the same size.
Make sure the loops sure are not twisted, and they
are all horizontal. Pushing them closer together
will help straighten the entire bracelet.
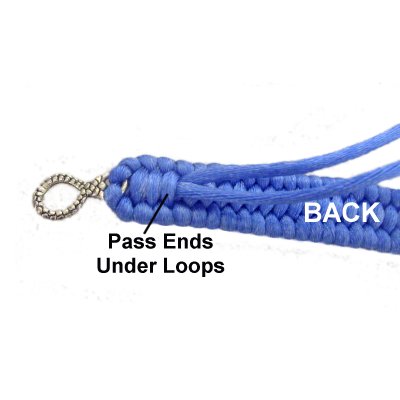
Step
10: The last row for the
Weave Bracelet is a little different from
the others.
Move the left working end over
segment A, and stop there, so it rests in
the back.
Pass the right working end under - over -
under segments C - A (same as in previous
rows).
Step
11: Use fine tip pliers or
tweezers to slide the ends under two or
more loops in the BACK of the Weave
Bracelet.
Apply glue (optional), and cut off the
excess material.
By
using any text or images on Free Macrame
Patterns, you are agreeing to ourTerms
of Use