Description: The
Trilobite Knot is a very unique
decoration you can use for key chains,
necklaces, ornaments, and similar types
of Macrame projects.
This knot has the three ribbed lobes
typical of Trilobite fossils. The woven
design can be made any size.
Children will love this interesting
decorative knot, since it is easy to
make. Try using it as a group
activity for school, home, scouts, etc.
The material used in the example is 4mm
Paracord. Please read Cord
Preparation to learn how
to prepare it properly if you intend to
use this material.
History:
A Trilobite is a fossil of an extinct
marine arthropod. Back when they were
still in existence, some were scavengers
and hunters, while others fed on
plankton.
These fossils have been found in every
ocean and continent, so are well known.
Please visit his website, by clicking
on the link or image.
The video
gallery contains tutorials for
a variety of unique decorative knots and
designs.
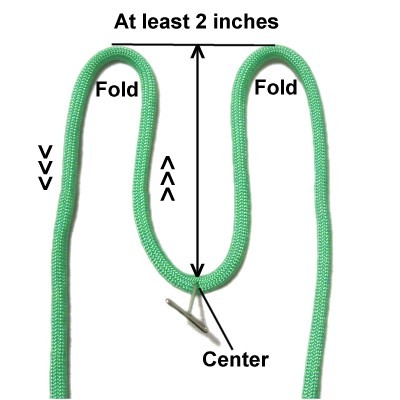
Step 1: Secure the
center of a60-inch
cord to your board
(center fold forward).
Measure from the center backward at
least 2 inches,
then fold each half of the cord at that
point. Bring the ends forward, so it
looks like this image.
(See size information below)
Size
Information: Some Trilobites were
long and slender and others were short and
fat. Do an internet search to view images,
to see which size appeals to you.
You have enough material to make a knot 3 inches
long. The one you see in the example is 2.5
inches long, which is the size I recommend.
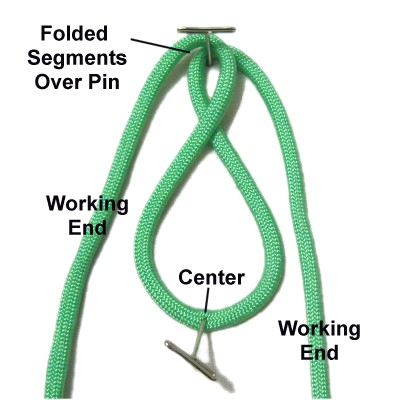
Place a pin on your project board,
between the two folded segments.
Move the segment on the right over the
pin, then do the same with the left
segment.
The working ends should still rest on
either side of the center fold.
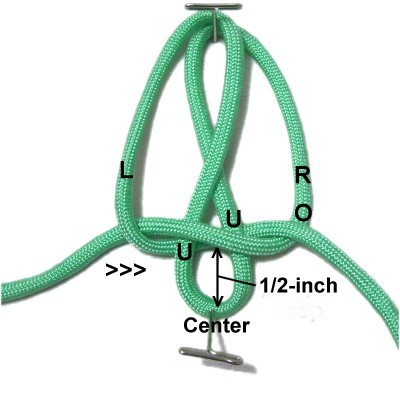
Step 2: Curve the
right working end to the right,
passing over
the center fold close to where it's
secured.
Pass it under
the left working end.
Pass the left
working end under
the center fold, and over
the right end, as you pull it out on the
right.
Tighten the knot slightly, making sure
that area is at least 1-inch wide.
The center should be 1/2-inch from the
tightened portion.
Designer's
Tip: This is the best place to
arrange the Trilobite knot in the shape you are
aiming for. You will be able to change
it again while tightening.
Notice that I changed the shape between the images
above and below.
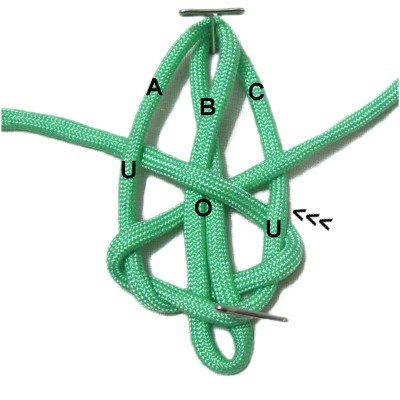
Step 3: Mentally label
the three vertical segments as shown (A
- C). Segment B has two parts.
Move the working end currently on the leftover
segment A, under
segment B, and over
segment C. Make sure the cord is diagonal.
Step
4: Move the working end
currently on the rightunder
segment C.
Bring it over
segment B and the left end.
Move it under
segment A.
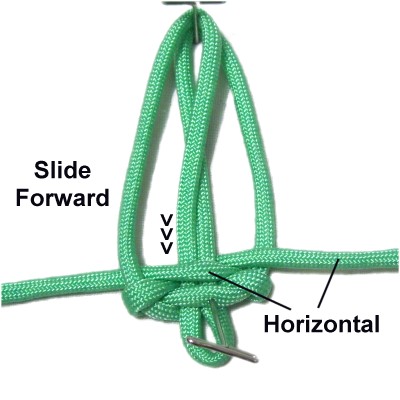
Step
5: Slide the two working ends
forward (toward you), so they become
horizontal. The woven areas should
be horizontal, too.
You can tighten slightly, but be
cautious This area of the Trilobite
knot should be as wide as possible.
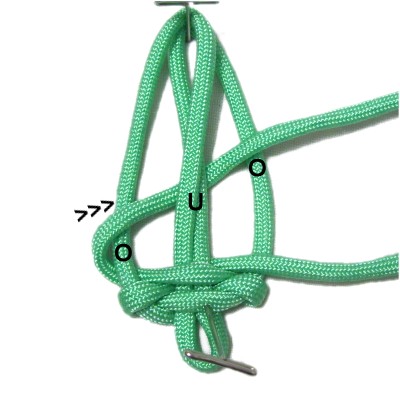
Step 6: Repeat
Step 3 using the
working end currently on the left.
Step
7:Repeat
Step 4 using
the working end currently on the right.
Repeat
Step 5 and tighten slightly.
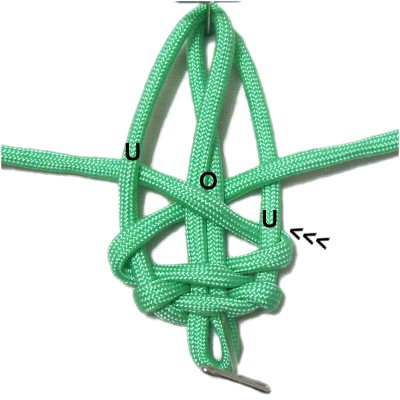
Step 8:Repeat
steps 3- 5 several times, until
you reach the folded areas and can't do
any more weaving.
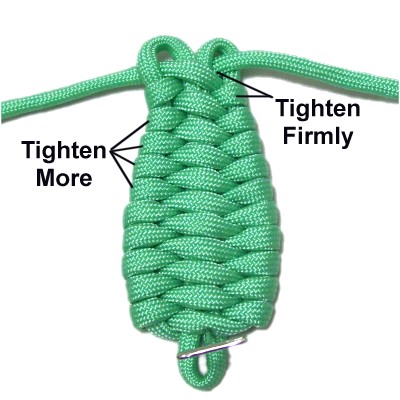
When you reach the halfway point,
tighten each row a little more, so the
shape tapers.
The last
two rows of weaving should be
tightened firmly.
Step 9: Pull the
center fold (loop) as much as possible,
which tightens the entire Trilobite
knot.
Finish off the ends in the manner most
appropriate for the material you are
using.
By using any
text or images on Free Macrame Patterns, you are
agreeing to ourTerms of Use