|
|
|
|
|
|
|
|
|
|
|
|
|
|
|
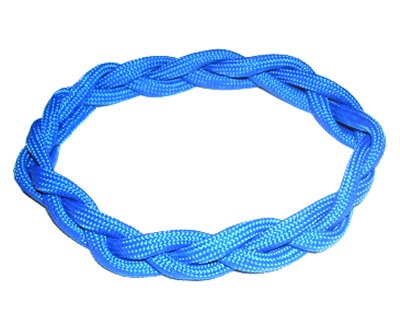
Description: The Turks Head
Knot is a historical knot based on the ancient
symbol for eternity, the never-ending circle.
The Celtic design is typical of the interweaving
patterns favored by European craftsmen.
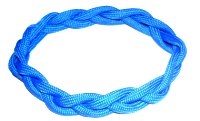
This decorative knot is a type of circular
braiding that makes a continuous
loop. So it's sometimes called the
Turks Head Braid.
It is perfect for Macrame bracelets, headbands
and other projects where you need a circular
ring.
The instructions for the Small Turks Head are
also on this page, since it is a related
technique.
It can be used to make items like Paracord
rings. By tightening it completely you can
make a button knot as well.
Please be sure to visit the Bangle
Bracelet, which features another
variation of this knot.
|
|
|
|
|
|
|
|
|
|
|
|
Turks Head
Braid
|
|
|
|
|
|
Preparation:
You need an item you can use as a support, such
as a glass or a thick dowel. The size of the
Turks Head knot will be the same as the
thickness of the support.
So if you want to make a ring for your finger,
for example, a dowel should be used as the base
(the size of your finger). A glass was
used in the example, so the knot was bracelet
size.
Cut one cord, at least 60 inches long.
Cut the cord double
the length if you plan to widen
the Turks Head with the same
cord.
You can cut a second cord to double the Turks Head
Knot, and to add a new color.
Make sure you have tape available.
Secure the support so it cannot roll unless you
deliberately move it. |
|
|
|
|
|
|
|
|
|
|
|
|
|
|
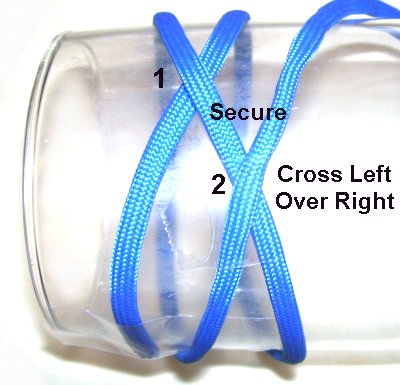
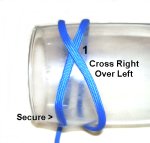
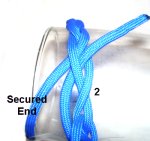
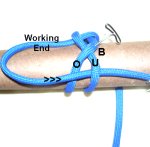
Step 1: Secure one end of the
cord to the lower left area
of the support. Wrap the cord around, from the
front to the back.
Bring the end to the front again, crossing over
the segment in place
right to left.
This is considered cross
1.
|
|
|
|
|
|
|
|
|
|
|
|
|
|

|
|
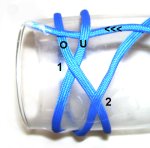
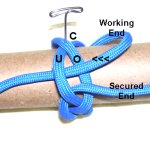
Step 2: Wrap the working end
around the support again. Bring it to the front,
passing between
the secured tail and the segment on the right.
Cross over
the right segment, heading left
to right. This is cross
2 and it should be lower
than cross 1.
Important:
Secure cross 2
with tape.
|
|
|
|
|
|
|
|
|
|
|
|
|
|
|
|
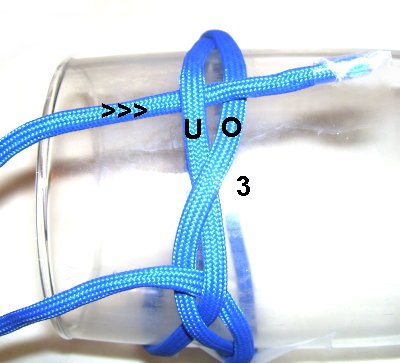
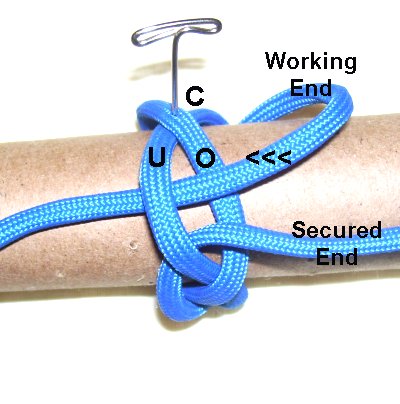
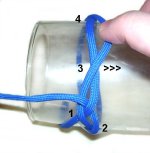
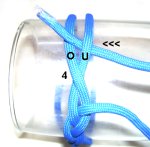
Step 3:
Move the working end up to cross
1.
Move it through the area above
the cross, passing
under - over the two segments.
It should be heading right
to left. |
|
|
|
|
|
|
|
|
|
|
|
|
|
|
|
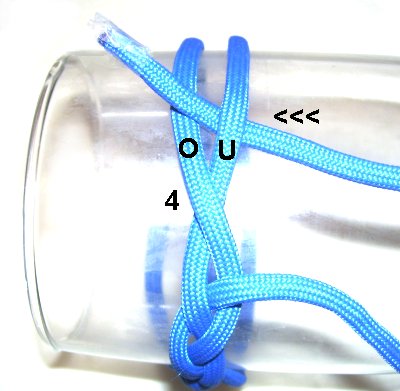
Step 4: Just above
the place where you were in the last step, move
the
left
segment over
the right, with your finger.
Do not
flip the cord upside down.
This gives you two new crossing points (3 and
4).
|
|
|
|
|
|
|
|
|
|
|
|
|
|
|
|
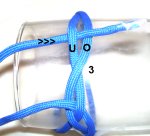
Step 5: Move the working end
through the area above Cross
3.
Pass under-
over, heading left to right.
|
|
|
|
|
|
|
|
|
|
|
|
|
|
|
|
Step 6: Just above Cross
4, pass the working end through from right to left,
under
- over.
Step 7: Repeat
Steps 4 - 6, making new crossed areas
for the rest of the Turks Head knot.
|
|
|
|
|
|
Important:
Try to get as much weaving done as
possible, pushing everything close
together as you progress.
Stop when you reach the starting point,
near the secured tail. |
|
|
|
|
|
|
|
Step 8: Locate Cross
2 (secured),
and remove the tape. Put your finger just above
it, and slide it down.
Pass the end through the area above it under
- over, heading left
to right. Both ends are now in
the same area.
|
|
|
|
|
|
|
|
|
|
|
|
|
Step 9: To finish the Turks
Head knot, you have three options:
- Move
the ends to the inside,
and then trim them to 1-inch. Apply glue
to hold them in place. For Paracord, melt the tips
to seal the inner fibers.
- You can use the working end of the same
cord to double the knot and make it
wider. Just follow
the path all the way through. When
you are finished doubling the knot, slide the
ends under one segment on the inside,
to hold them in place. Trim the ends and
apply glue.
- You could use a separate
cord to double the knot. Make sure
you start at the secured end. To
finish, slide
the ends under one segment on the inside,
to hold them in place. Trim the ends and
apply glue.
|
|
|
|
|
|
|
|
|
|
|
|
|
|
|
|
|
|
|
|
|
|
 |
|
|
|
|
|
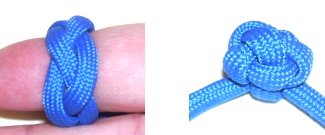
Small Turks Head
|
|
|
|
|
|
|
|
 |
|
|
|
|
|
|
|
|
|
This
variation of the Turks Head knot is actually a
shortcut, and is the best technique to use when
making Macrame rings and other small items. |
|
|
|
|
|
You need 1
cord, at least 36 inches long, to practice.
You also need rolled up piece of heavy paper or
cardboard tube, slightly larger than the size of
your finger.
Consider this to be the equivalent of a project
board, since you will be securing the cords to it
with pins or tape. |
|
|
|
|
|
|
|
|
|
|
|
|

|
|
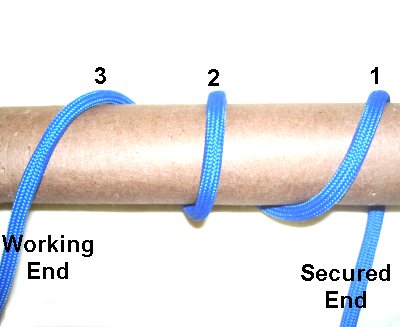
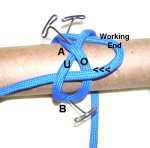
Step 1: Secure
one end of the cord under
the tube, on your right.
Wrap the working end around 3 times, moving
towards the left. Make sure the end is in
the front
when you finish. Mentally number the three
segments.
|
|
|
|
|
|
|
|
|
|
|
|
|
|

|
|
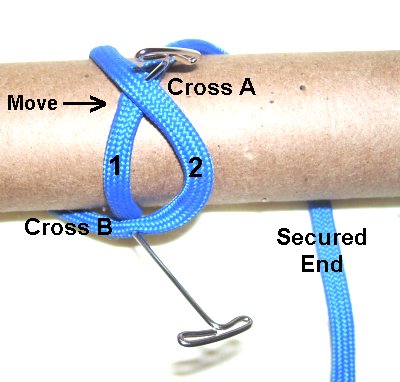
Step 2: Move
segment
2 over
segment 1, heading left to right.
This will form two crossed areas, one at the top
(A), and another at the bottom of the tube
(B).
Secure both crossed areas to the paper
tube.
|
|
|
|
|
|
|
|
|
|
|
|
|
|

|
|
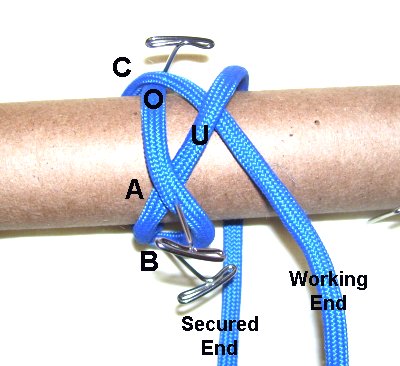
Step 3: Move
the working end (segment 3) to the right, passing
over -
under the two segments above
cross A.
This creates the third crossed area (C).
The portion you pass under
leads to the secured end.
|
|
|
|
|
|
|
|
|
|
|
|
|
|
|
|
Step
4: Roll the tube slightly,
so you can see the area just below
cross
A.
Move the working end right
to left, over
- under the two segments.
You can now remove the pin on cross
A.
|
|
|
|
|
|
|
|
|
|
|
|
|
|
|
|
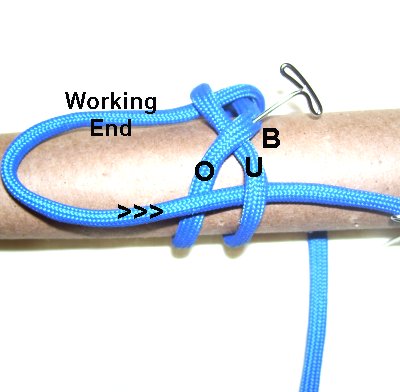
Step 5: Roll
the tube away from you so you can see the area below
cross B.
Pass the working end over
- under the two segments, moving left
to right.
Remove the pin on cross
B.
|
|
|
|
|
|
|
|
|
|
|
|
|
|
|
|
Step 6: Move
the tube again and find the area below cross C.
The secured end rests in that same area.
Pass the working end through over
- under, moving right
to left.
|
|
|
|
|
|
|
|
|
|
|
|
|
|
|
|
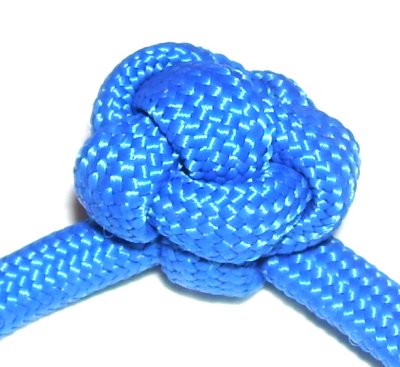
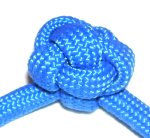
Step 7: Tighten
the Turks Head knot to the size you want.
For a ring, you will need to trim the ends and
attach them on the inside
with glue. |
|
|
|
|
|
|
|
|
|
|
|
|
|
|
|
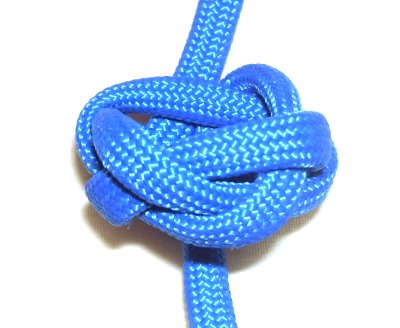
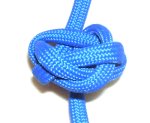
To make a Button knot, tighten it slowly and
carefully, until the design is round and firm.
|
|
|
|
|
|
|
|
|
|
|
|
|
|
|
|
|
|
|
|
|
|
|
| By
using any text or images on Free Macrame
Patterns, you are agreeing to our
Terms of
Use |
|
|
Have
any comments about the Turks Head Knot? Contact
Me.
|
|
|
|
|
|
|
|
|
|
|