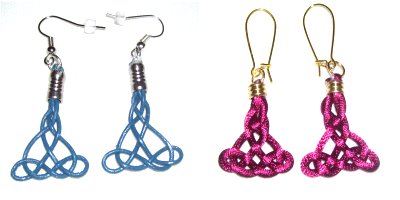
Description:
The Triangle Earrings are based on the
Celtic Triangle knot, which is an artistic design
called the Triquetra.
This Celtic symbol represents the Holy Trinity as
well as Body, Mind and Spirit.
You can use any type of material, hooks and beads
to make these Micro-Macrame earrings. In the
image above, Leather was used for the earrings on
the left. Satin cord was used for those on
the right.
You should use material that is somewhat stiff or
waxed. For the Satin Earrings, Beeswax
was applied to condition the material.
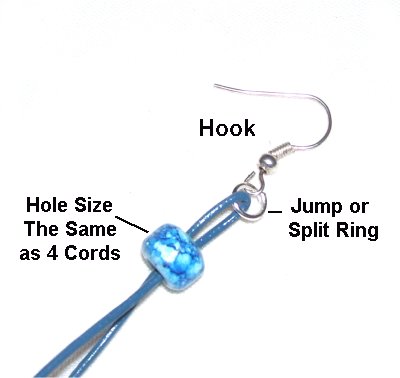
Important:
The bead at the top is used to secure the
ends. Make sure the hole is at
least 2.5 - 3 times the thickness of the
material you are using.
You have to be able to pass the ends back through
the bead after the knot is tied. So if you
use 2mm material, the hole size should be 5mm -
6mm.
Be sure to use split or jump rings on the
hooks. They help the earrings dangle more
freely.
Supplies
Needed:
1mm to 2mm cord material
2 Earring Hooks
2 jump or split rings
2 beads
Project board and pins
Fabric Glue that dries clear
Step
1: Attach the jump or
split ring to the hook.
Cut
one cord, at least 20 inches long.
Slide it through the ring and center it by
matching the ends.
Slide a bead over both halves of the
cord. Position it close to the
ring. Mentally label the two ends
right and left.
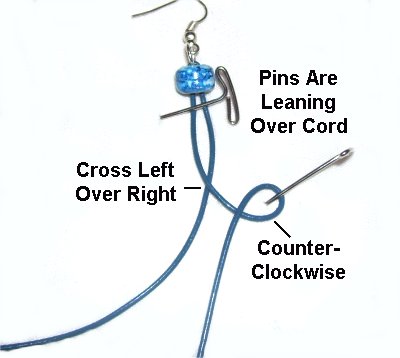
Design
Tip: When using fragile material
such as Leather or Satin, LEAN
the pins over the cords to secure
them.
Step
2: Cross the ends of the
cord left
over right to make the first
loop. It will be long and skinny.
Make a counter-clockwise
loop to the right
of the crossed area, using the left
half of the cord.
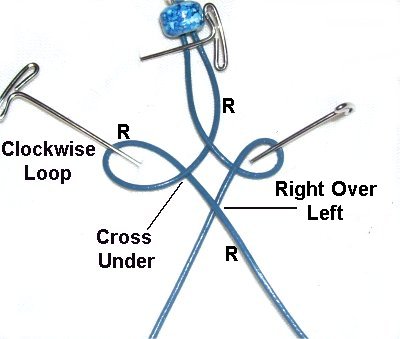
Step
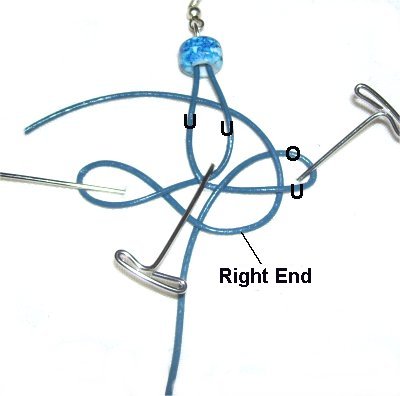
3: Make a clockwise
loop with the right
half of the cord. Position it on the
left.
Pass the end under
to form the crossing point.
Cross ends right
over left, in the center of the
Triangle Earrings design.
Step
4: Bring the right
end through the right
loopfrom
below, which isunder
- over.
Bring the end up to the top, and pass it
underneath both sides of the first loop,
near the bead.
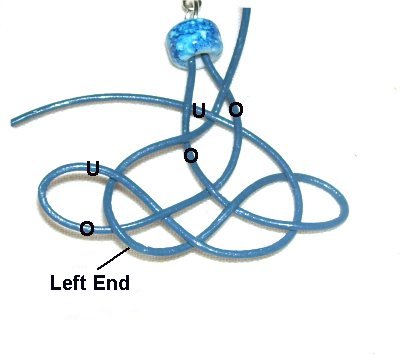
Step
5: Pass the left
end through the left
loop, from the top, which is over
- under.
Weave it through the first loop at the
top, so it goes over
- under - over. The segment
you pass under is the right half of the
cord.
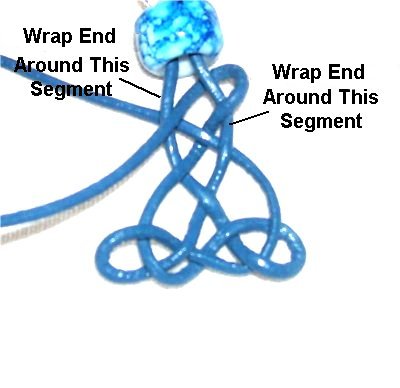
Step
6: Tighten the knot by removing
the slack from each half of the cord.
The Triangle Earrings can be any size, but they
look best if they are 1 to 2 inches long.
To prevent the
Celtic Triangle from being distorted, wrap
the ends around the two segments just
below the bead (loop 1).
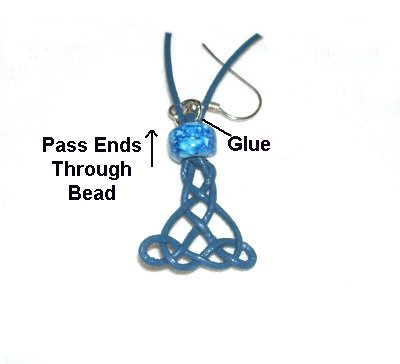
Step
7: Pass both ends back
through the bead, heading upward, towards
the hook.
Slide the bead down slightly and apply
glue to the area where the cord is
attached to the ring. Move the bead
up, so the glue is inside
it. When the glue is dry, cut off
the extra material flush with the top of
the bead.
Step
8:Repeat
steps 1 - 7 to make a second earring.
Measure
both earrings to make sure the second one is the
same size as the first Triangle Earring.
By using any
text or images on Free Macrame Patterns, you are
agreeing to ourTerms of Use