Description:
The Snake Braid is sometimes called the
Snake Weave. It is a flat type of braid,
which makes it suitable for jewelry.
It's easy to make and a good choice for kid's and
beginner's projects.
This braid is sometimes tied with one cord,
crossing the working ends around a loop. In
this case, two cords were used to make it easier
to practice.
I recommend you use two contrasting colors, which
will show the striped pattern more clearly.
Since this decorative knot can be used for jewelry
and belts, you will need to form a loop for a
clasp, and the method shown in step 1 is just one
of the many options. Feel free to experiment
with other techniques.
You can start the design in the center of the
cords and work in both directions, if you project
works out better that way.
Be sure to use a project board and pins while
learning this style of braiding.
Preparation:
You need two cords, at least 36 inches long, to
practice the Snake Braid.
When using Paracord, melt the tips of the cords to
seal the inner fibers. See Cord Preparation
for details.
Step
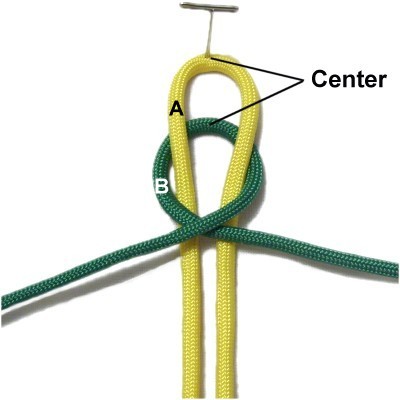
1: Fold one cord in half
and secure it at the center (A).
Fold the second cord (B) and place it
under the first one, so the centers line
up. You can secure it if you
wish.
Cross the two halves of cord B right
over left.
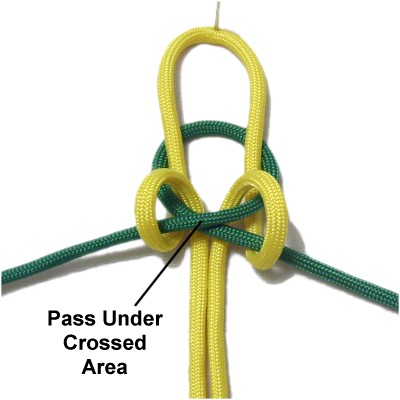
Move both
halves of cord
Abackward,
then pass them under
the crossed area of cord B.
Pull both halves of each cord to tighten,
after adjusting the size of the loop at
the top (cord A).
Turn the loop design upside down and
secure it to your board (next image).
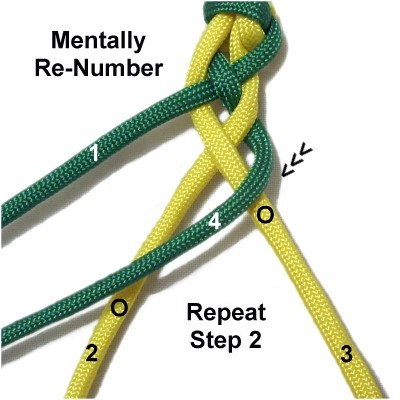
Step
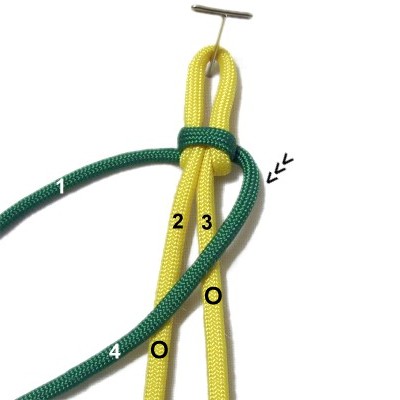
2: Mentally label the
four parts as if they were four separate
cords.
Move cord
4 to the left diagonally, passing
over
cords 2 and 3.
Step
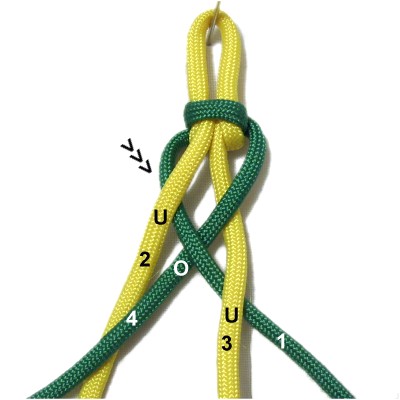
3: Move cord
1 to the right diagonally,
passing under
cord 2, over
cord 4, and under
cord 3.
Tighten by pulling on cords 1 and 4 while
holding cords 2 and 3 steady.
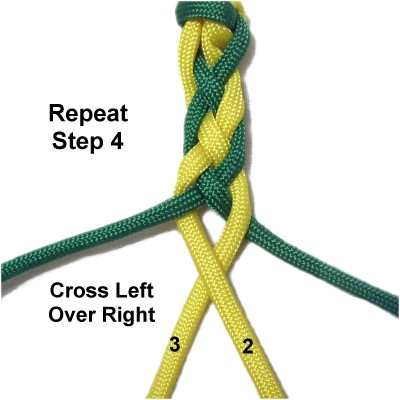
Step
4: Cross cords 2 and 3 left
over right.
You should tighten the Snake Braid as you
progress, so do that now. The two
crossed areas should rest against each
other.
Step
5: Mentally re-number the
cords where they rest now.
Repeat
step 2.
Step
6: Repeat
step 3.
Step
7:Repeat
step 4.
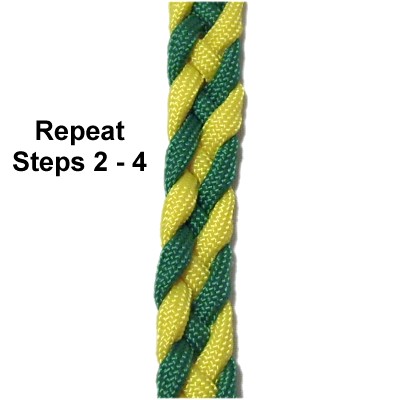
Step
8: Repeatsteps
2 - 4 several times,
mentally re-numbering before you repeat step 2.
Stop when the Snake Braid is finished size
you wish to make.
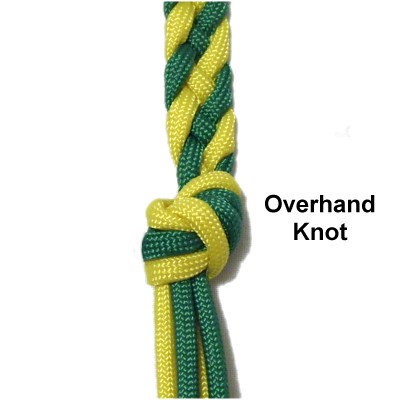
Keep in mind you need to tie one more knot
to secure the braid.
Step
9: Tie a finishing knot to
secure the braid. When practicing,
an Overhand knot is a good choice, since
you can tie it with all four cords.
The best way to form a clasp is to finish
off two cords in the back of the braid,
then tie a button knot with the remaining
two.
By
using any text or images on Free Macrame
Patterns, you are agreeing to ourTerms
of Use