|
|
| |
|
|
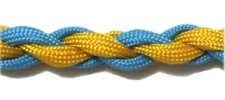
Description:
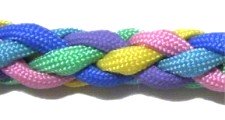
These Round Braids feature techniques that create
four surfaces rather than two. So they are
not flat like other forms of braiding. Think
of them as round ropes made from two or more
cords.
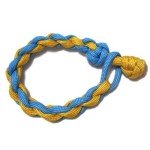
These designs can be used to make Paracord
bracelets, choker style necklaces, dog collars and
leashes, and much more. Jump ropes and dog
toys are sometimes made with the 4-cord and 6-cord
styles.
Multiple colors are used in the examples shown for
instruction purposes, but they can all be made
with fewer colors.
Each of the braids on this page increase in
complexity. The first one is easy to make,
since it requires only 2 cords. The third one is
challenging, since you are working with 6
cords.
It will take time
and patience to master all three
styles. Be prepared to spend several hours
practicing!
|
| |
| |
| |
| |
 |
| |
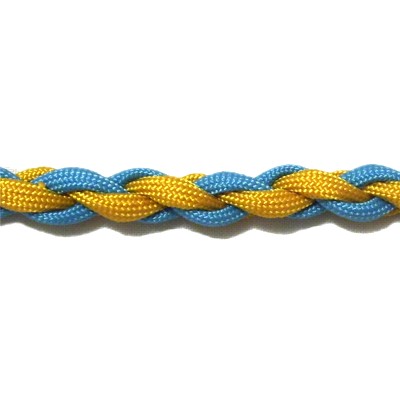
Round Braids - Style A
|
 |
|
Description:
The first of the Round Braids you will learn is
the easiest to make. It's actually called
the Round Braid, because most people use this
version.
The best way to start it is with a loop, which can
be used as a clasp. That's another reason
why it's so popular. |
|
|
|
|
|
The Braid
Bracelet is an easy project
based on this technique.
Click on the image or link to view the
page, if you wish to give it a try after
practicing. |
|
|
|
|
|
Preparation:
To practice
the Round Braid, you need two cords, each at least
25 inches long.
When using it in a Macrame project, the cords
should be at least 4
x the finished length you wish to
make. |
|
|
|
|
|
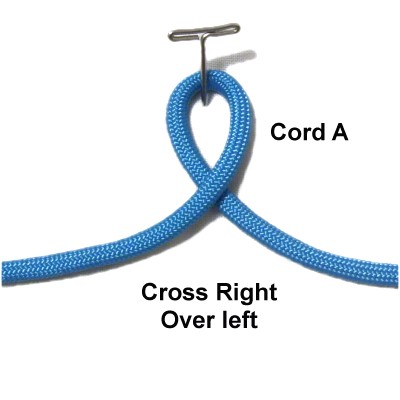
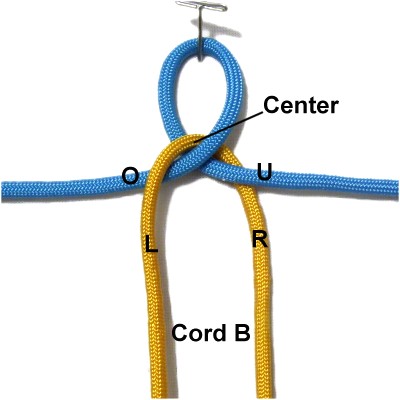
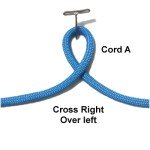
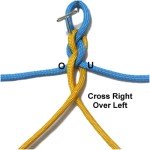
Step
1: Make a loop in the
center of the first cord, crossing right
over left.
Mentally
label it Cord
A.
Arrange
the two halves horizontally
(next image).
|
|
|
|
| |

|
|
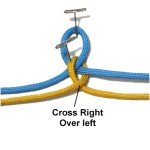
Step 2:
Slide Cord
B through the loop, placing the
center of it at the crossing point.
The left half should pass over
Cord A on the left and under
it on the right. |
|
|
|
Designer's
Tip: When first learning the Round
Braids, I recommend you make them on a project
board. Later, try holding the cords in your
hands.
When you try this one in hand, Cord B folds around
the front and back of the crossing point. In
other words, it will be sideways in comparison to
the other cord. |
|
| |
|
|
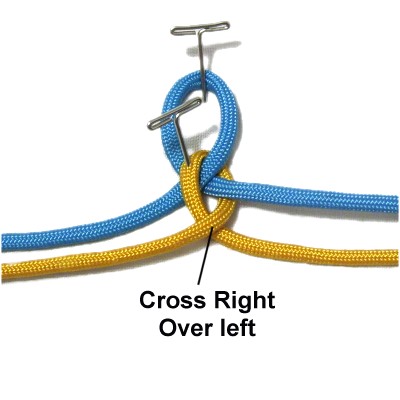
Step 3: Cross the two
halves of Cord
B right
over left to complete the loop
(back over front if you are holding the
cords).
Arrange each half horizontally.
|
|
| |
|
|
Designer's
Tip: After the second loop is tightened,
adjust the size of the first loop to the length
most appropriate for your project.
When using it as a clasp, 1/2-inch to 1-inch is
usually the best size, depending on the thickness
of the material.
4mm size Paracord was used for the Round Braids
shown, so the best loop size was 3/4-inch. |
|
|
| |

|
|
Step 4: Move one
half of Cord
A over
Cord B on the right.
Move the other half under
Cord B on the left.
Cross the two halves of Cord A right
over left, then arrange them
horizontally.
|
|
| |
|
| |
|
|
Step 5: Move one half
of Cord
B under
Cord A on the right. Move the
other half over
it on the left.
Note that this is the opposite
of how you arranged Cord A in the
previous step.
Cross the two halves right over left,
then arrange them horizontally.
|
|
| |
|
|
Here's the
concept:
When using Cord A, the starting position of
the two halves is always OVER on the right, and
UNDER on the left.
When using Cord B, their position is always UNDER
on the right, and OVER on the left. (That
would be in front on the left and behind on the
right, if you were holding the cords).
The loop is always completed by crossing right
over left (or back over front).
|
|
|
| |
|
|
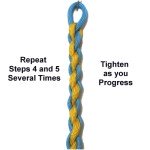
Step
6: Repeat
steps 4 and 5 several times,
until the Round Braid is the size you
want.
Tighten each loop as you progress.
|
|
| |
|
|
|
|
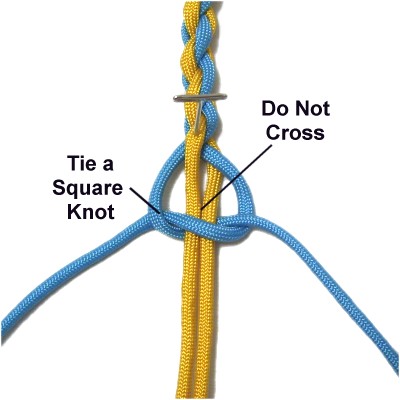
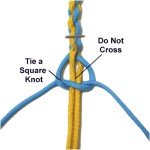
Step 7: After you
have made the last loop with one cord,
bring the two ends of the other cord
into position without
crossing.
Then tie a Square
Knot with the cord used
to make the last loop. This is optional,
if you prefer to secure the braiding
with a different knot.
|
|
| |
|
|
|
|
|
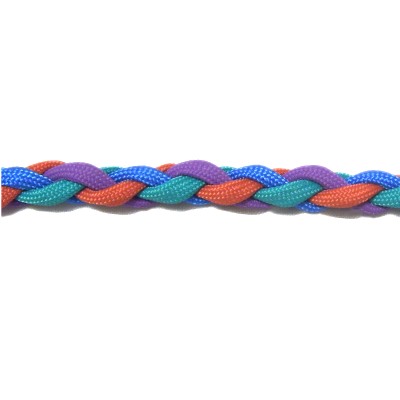
Round Braids - Style B
|
 |
|
Description:
Style B is a 4-cord braid that features a maneuver
called a "hook back". You move each cord in
two directions. This results in four
surfaces, making the braiding rounded rather than
flat.
The best way to start is at one end of the cords,
but you can also begin in the center and work both
directions.
Another option is to make a stable loop with two
folded cords, then start the braiding. Add a
button knot at the end to form a clasp.
I recommend you tighten as you progress, even if
that means you need to use pins. Usually you
can make this braid in hand quite easily, once you
understand the concept. That makes tightening a
lot easier. |
| |
|
| |
Preparation:
To practice, you need four cords at least 36
inches long. Using different colors is
extremely helpful.
When making a project with any of these Round
Braids, the cords should be at least 4 x the
finished length you plan to make. This gives
you extra material for other knots if you need
them. |
|
|
|

|
|
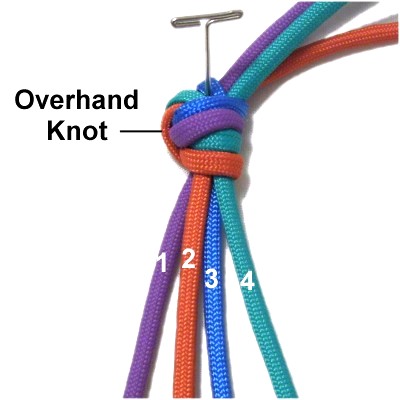
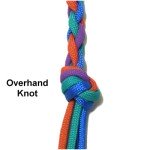
Step
1: Tie an Overhand Knot
near one end of the cords if you are
practicing. Secure the knot to your
board.
When making a project, secure the cords in
the most appropriate manner.
Mentally number the four cords. |
|
|
|

|
|
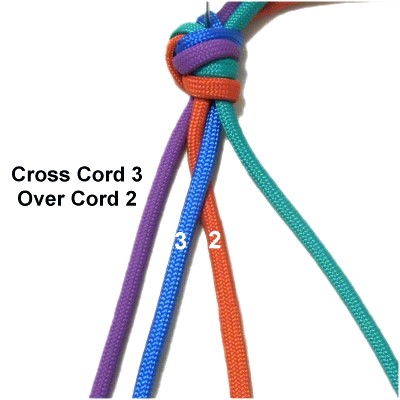
Step
2: Move cord
3 to the left, crossing over
cord 2.
When starting at the center
of the cords, you should secure the two
cords at the crossing point. |
|
|
|
|
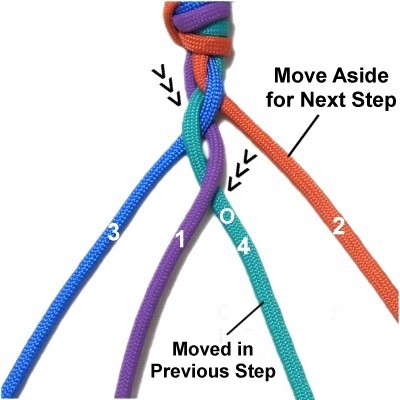
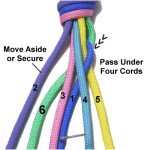
Step 3:
Select the cord furthest to the RIGHT for this
step (cord
4).
Move cord 1
aside, since it will be used in step 4. |
|
|
|
|
|
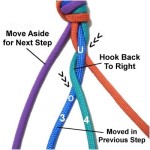
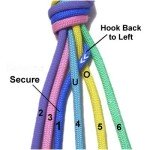
Move cord
4 under
cords 3 and 2 at the crossing point,
heading right
to left.
Hook it back to the right,
passing over
cord
3, which was
moved in the previous step.
Arrange it between
cords 3 and 2. You can secure it if
you wish.
|
|
|
|
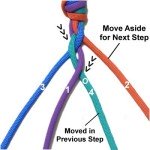
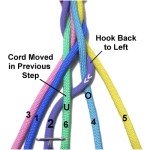
Step 4:
Locate cord
1, which was moved aside in step 3.
It's furthest to the LEFT, so will be used in this
step.
Move cord
2 aside, since it will be used in step 5.
|
|
|
|
|
|
|
Move cord
1 under
the crossed area made in step 3, heading left
to right.
Hook it back to the left,
passing over
cord
4, which was moved in the
previous step.
It should rest between cords 3 and 4.
|
|
|
|
The Round Braids each have a specific
concept. For this design, there are five
elements:
- Alternate between the cord furthest to the
left or right when you choose which one to use
for the current
step.
- Identify the cord that will be moved in the
following
step.
Move it off to the side.
- Move the cord you are currently using UNDER
the crossed area made in the previous step. It
should be heading toward the opposite side
from where it started.
- Hook it back the other direction, passing
OVER the cord moved in the previous step.
- Arrange the cord between
the two closest to it.
|
|
|
|
|
|
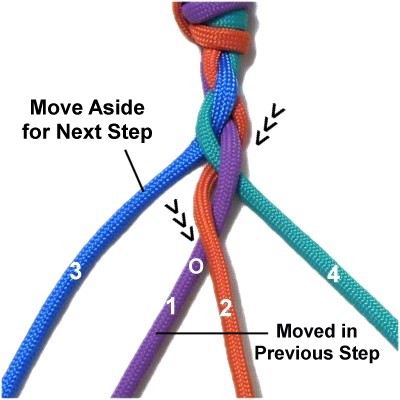
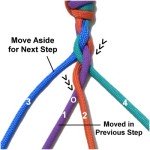
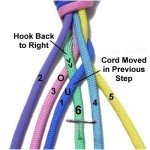
Step
5: Locate cord
2, which is furthest to the
RIGHT. Move cord
3 aside, since it will be used in
the next step.
Move cord 2 under
the crossed area made in step 4, heading left
to right. Hook it back to
the right,
passing over
cord
1 (moved in previous step).
Arrange it between cords 1 and 4.
|
|
|
|
|
|
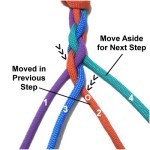
Step
6: Locate cord
3, which is furthest to the
LEFT. Move cord
4 aside, since it will be used in
the next step.
Move cord 3 under
the crossed area, heading right
to left. Hook it back to
the left,
over
cord
2.
Arrange it between cords 1 and 2.
|
|
|
|
Step 6,
continued: The cords are now in the
positions they were when you started braiding
(step 3).
Round Braids are supposed to be well tightened, so
pull each cord firmly to eliminate any gaps
between them. |
|
|
|

|
|
Step
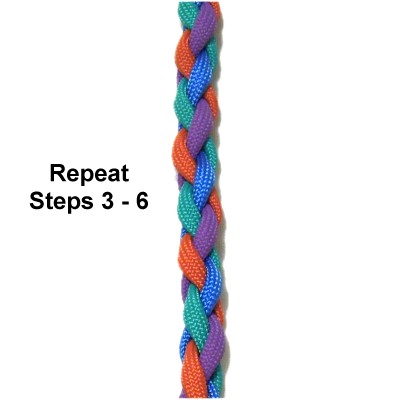
7: Repeat
steps 3 - 6 at least one more
time if you are just practicing.
Round Braids look better if they are long.
When making a project, continue until the
braiding is the length you need.
|
|
|
|
|
|
Step
8: You will need to secure
the braid with some type of finishing
knot.
Since you started with an Overhand knot,
you can finish with one. Great option
for dog toys! |
|
|
|
|
|
|
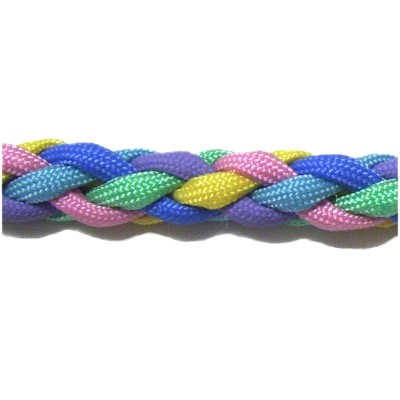
Round Braids - Style C
|
|
|
Description:
Round Braids get more complicated as you add more
cords, and this one is a real
challenge. It's made with six cords,
and is much harder to untie than the other two
designs.
You will need to construct the braid on a project
board, since pins are needed to help identify
certain cords. Use as few pins as possible.
It's better to tighten Round Braids as you
progress. In the example shown, the braiding
was done more loosely than it should have been, so
photos could be taken.
You should start near one end of the cords.
Starting at the center makes things more
complicated, since you need to reverse
direction.
|
|
|
|
|
|
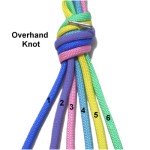
Step
1: When practicing, tie an
Overhand knot with all the cords in a
bundle, close to one end.
Secure the knot to your board.
Mentally number the cords 1 -
6. |
|
|
|
|
|
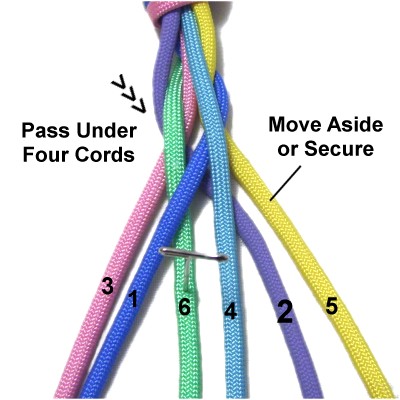
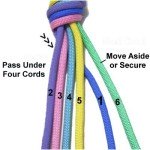
Step
2:
Move the cord
furthest to the LEFT (cord
1) under the four
cords next to it (2 - 5),
heading left
to right diagonally.
Cord 6
is used in step 3, so move it aside or
secure it.
|
|
|
|
Designer's
Tip: When making Round Braids,
always anticipate which cord will be used in the
following step.
Since you alternate between the cord furthest to
the left or right, choose the appropriate cord and
move it aside (or secure it). |
|
|
|
|
|
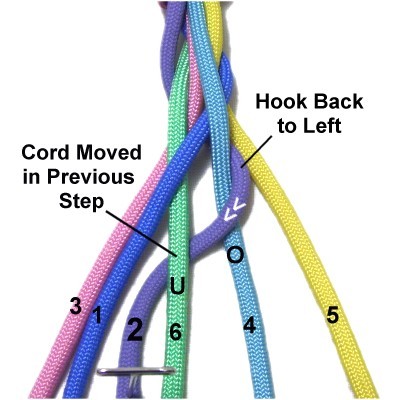
Hook cord
1 back to the left (arrows),
passing over
cord 5 and under
cord 4.
Secure it between cords 3 and 4.
|
|
| |
|
|
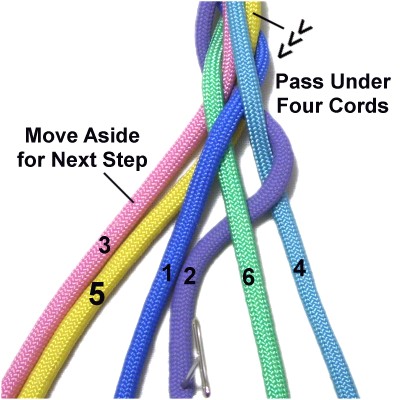
Step
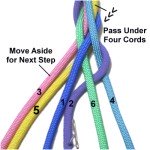
3: Move the cord furthest
to the RIGHT (cord
6) under
the four
cords closest to it (5, 4, 1, 3),
heading right
to left
diagonally.
Move cord
2 aside (or secure it), since it
will be used in step 4. |
|
|
|
| |
|
|
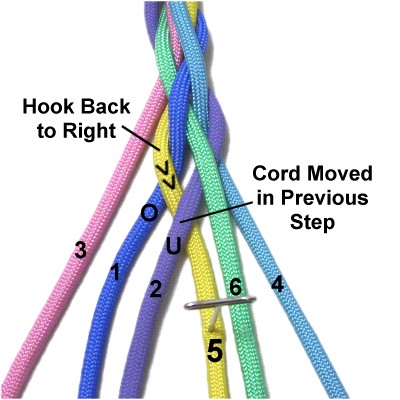
Hook cord
6 back to the right (arrows),
passing over
cord 3 and under
cord 1 (moved in the previous step).
Secure it between cords 1 and 4. You
can remove the pin from cord 1.
|
|
|
|
Here's the
concept:
- Always use the cord furthest to the right or
left, alternating back and forth.
- The cord that will be used in the following
step should be moved aside.
- Move the cord you are currently working with
under
the four
cords closest to it, heading in the
opposite direction from where it starts.
- Hook back the other direction, over
- under the two cords closest to it.
The cord you pass it UNDER will be the one
moved in the previous step. It's secured
with a pin, so is easy to identify.
- Secure it next to the cord moved in the
previous step. There should always be
two cords on either side of it (the 6th cord
you moved aside doesn't count).
|
|
|
|

|
|
Step
4: Locate cord
2, since it furthest to the LEFT.
Move it under
the four cords closest to it (3, 1, 6, 4),
heading left
to right diagonally.
Move cord
5 aside, since it will be used in
step 5.
|
|
|
|
|
|
Hook cord
2 back to the left, passing over
cord 4 and under
cord 6 (moved in the previous step).
Secure it between cords 1 and 6.
Remove the pin from cord 6.
|
|
|
|
|
|
Step
5: Locate cord
5, since it is furthest to the
RIGHT. Move it under
the four cords (4, 6, 2, 1) heading right
to left diagonally.
Move cord
3 aside for the next step.
|
|
|
|

|
|
Hook cord 5
back to the right,
passing over
cord 1 and under
cord 2.
Secure it between cords 2 and 6. Remove
the pin from cord 2.
|
|
|
| |
|
|
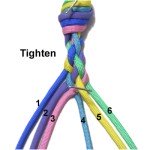
Step
6: Continue on, alternating
between the cords furthest to the right
and left. The next cord you use will
be cord 3, followed by cord 4.
The cords will be in order again (1 -
6).
Round Braids need to be tightened well, so
this is the best place to stop and check
the tightness. |
|
|
|
|
|
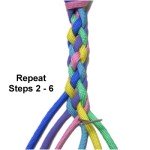
Step
7:
Repeat steps 2 - 6 at least one
more time, if you are just practicing
Round Braids.
Stop when the braid is the size you need,
if you are making a project.
Secure the braid by tying an Overhand
knot, or another type of finishing knot. |
|
|
|
| |
|
|
| By using any
text or images on Free Macrame Patterns, you are
agreeing to our Terms of Use |
|
|
|
| Have
any comments about the Round Braids? Contact Me. |
|
|
|
|
|
|
|