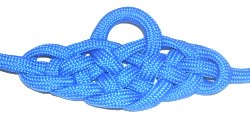
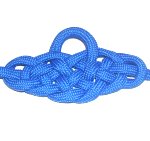
River Knot
|
| |
 |
|
| |
| |
|
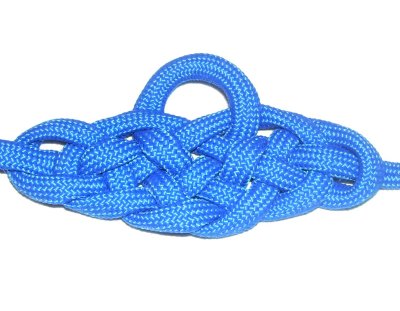
Description: The River Knot
represents the sun rising over a rippling river.
It starts out with the Josephine knot,
which is a historical knot often used to form
other types of decorative knots.
You could use this design as the focal point
for a Macrame bracelet or belt, since the ends
come out at the sides.
A wide pendant can also be made with this
knot. You would finish off the ends and
then add a new cord for the necklace (at the
top).
The material used in the example is Paracord,
which needs to be prepared and finished by
melting the tips with a flame.
|
| |
| |
|
This knot is in Decorative
Fusion Knots
written by
J.D. Lenzen.
Click on the link or image to visit his
website.
See the video
gallery, which contains
tutorials for many unique and
interesting decorative knots.
|
|

|
|
| |
| |
| |
 |
|
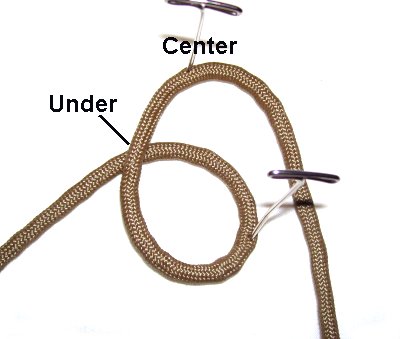
Step 1: Secure the
center of a 60-inch cord to your board.
Use the left
half to make a counter-clockwise
loop, passing under
to form the crossing point.
|
|
| |
|
| |
 |
|
Bring the right
half down, over the
middle of the first loop.
Bring it back up moving clockwise.
Pass it under
the left end, to complete loop
2.
|
|
| |
|
| |
 |
|
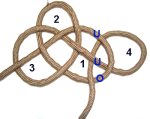
To make loop
3, weave the right
end clockwise
through loops 1 and 2 over
- under- over - under.
Balance the three loops, but don't
tighten.
|
|
|
|
| |
 |
|
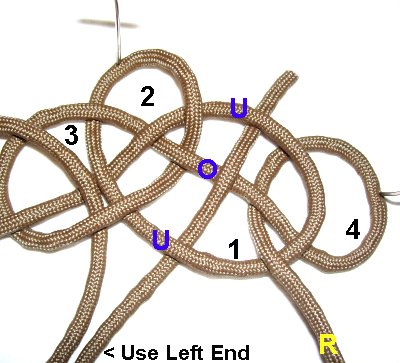
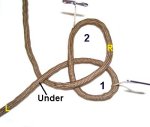
Step 2: Move the
end
on the right
(near loop 1), to
make loop
4.
Weave
under
- under - over
the three segments of loop
1, rotating
counter-clockwise.
|
|
| |
|
| |
 |
|
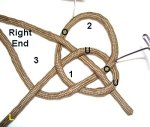
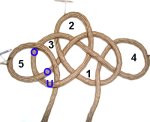
Step 3: Make loop
5 using the end on the left
(next to
loop 3).
Pass it
over
- over - under
the three segments, rotating clockwise.
|
|
| |
|
| |
 |
|
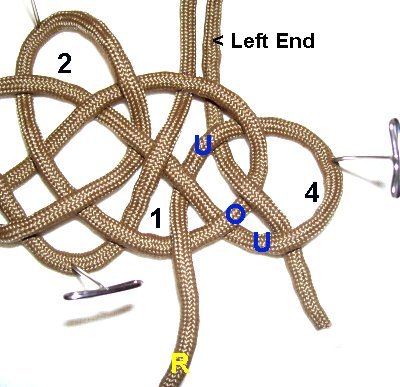
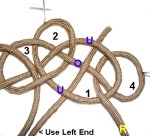
Step 4: Push loop
4 to the right,
so there is space between it and loop 2.
Weave the left
end through the middle of loop
1, passing under
- over - under the three
segments.
|
|
| |
|
| |
 |
|
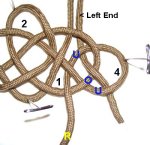
Step 5: Bring the left
end
back down and to the right.
Weave it through loop
4, under
- over - under the three
segments.
|
|
| |
|
| |
 |
|
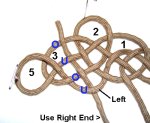
Step 6: Push loop
5 to the left
to create a space between it and loop 2.
Pass the right
end under
the left at the bottom
of the River knot.
Weave it over
- under - over the three
segments of
loop 3,
heading towards the top.
|
|
| |
|
| |
 |
|
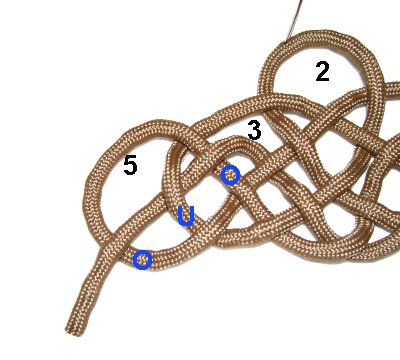
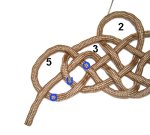
Step 7: Curve the
right end back down and to the
left.
Weave it over
- under - over the three
segments at Loop
5.
|
|
| |
|
| |
|
|
Step
8: Tighten the River Knot
gradually, removing the slack from the
loops in
the order they were made.
Secure the ends to the back or use them to
make other knots. |
|
| |
| |
|
|
|
By
using any text or images on Free Macrame
Patterns, you are agreeing to our Terms
of Use
|
|
|
| |
|
Have
any comments about the River Knot? Contact
Me.
|
|
|
|

|
|
| |