Description:
Locking Patterns were often used in the
past to make Macrame hammocks and nets. I
found these three Square Knot designs in a book
written in 1903, so they are considered vintage
techniques.
These unique interlocked patterns are used to form
panels with straight edges, and large spaces
between the rows (open weave). The crossed
elements of these designs makes the open weave
more secure.
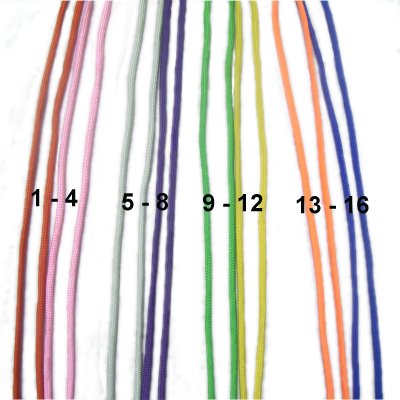
Only a limited number of cords were used in the
examples, but you can make them as large as you
wish. Make sure you know how to tie Square
Knots.
I recommend you use several colors when practicing
the three techniques on this page:
The Straight
Lock is the easiest pattern.
It's not as busy as the other two designs.
The Daisy
Lock is also called the Crazy Daisy
(seriously). The names comes from the
petal-like designs formed by the crossed
elements.
The Cross
Lock features a crisscross pattern
similar to the Daisy Lock. But there are
fewer filler cords, which makes it more
flexible.
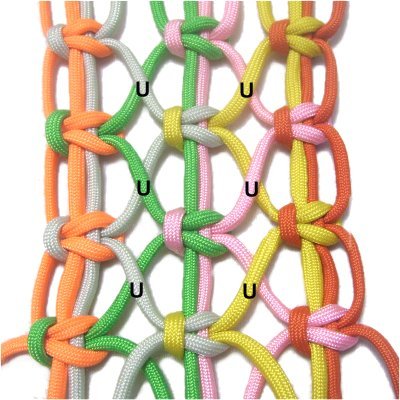
Straight Lock
The Straight
Lock is the most popular of the Locking
Patterns on this page. You can use it to make
items like belts and bracelets.
Focus on the two working
cords coming from the
center group, because those are the ones
you will use to form the crossed elements.
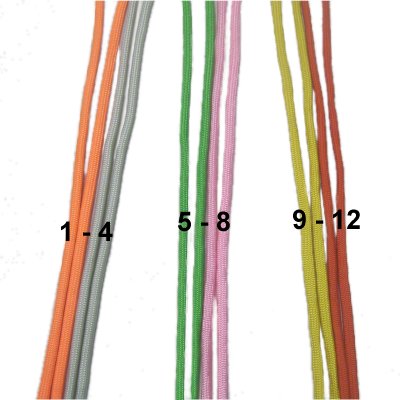
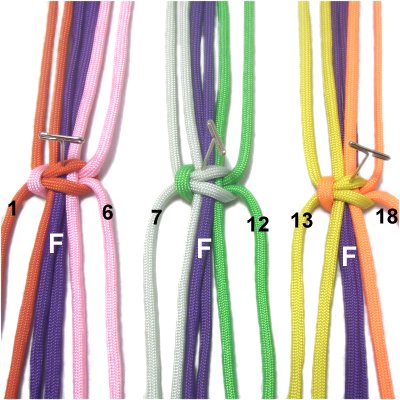
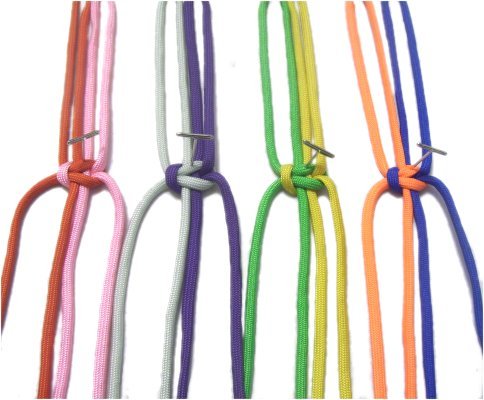
Step
1: You need six 2-yard cords
folded in half and secured at the top of
your board.
Arrange them into 3 separate groups of 4,
and place them at least 1-inch apart.
Mentally number the cords as shown.
Designer's
Tip: Locking
Patterns need to have straight
horizontal rows of Square Knots.
Tie one Square knot, then apply a piece of tape
above it, arranged across all the cords
horizontally.
When you tie the next two knots, tighten them so
they rest against the lower edge of the tape.
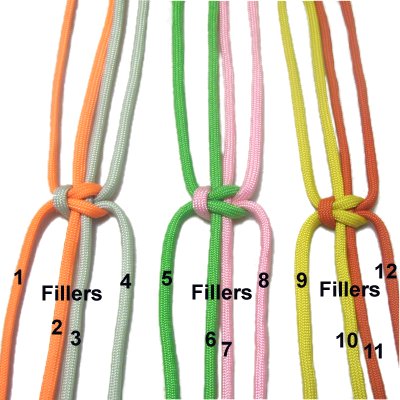
Step
2: Tie 1 Square
Knot with each group of 4 cords.Make
sure theyline
up horizontally.
Identify
the fillers for each
set of cords and place them close
together.
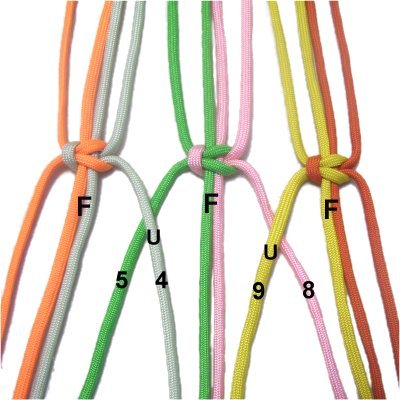
Working
cords 4,5, 8, and 9 will be crossed
in the next step.
Important:
The over
- under sequence of all Locking Patterns
is an essential part of the design, so pay close
attention to the following steps.
F = Fillers
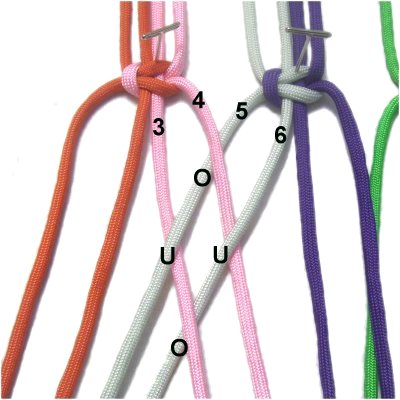
Step
3: From the center group,
pass cord
5undercord 4,
moving it to the left next to filler cord
3.
Pass cord
8undercord
9, and move it to the
right next to filler cord 10.
Cords 4 and 9 should rest next to filler
cords 6 and 7, in the center.
Designer's
Tip: It's important to keep the
edges straight in Locking Patterns.
ALWAYS tie the knots starting from the middle of
the panel, working outward in both directions.
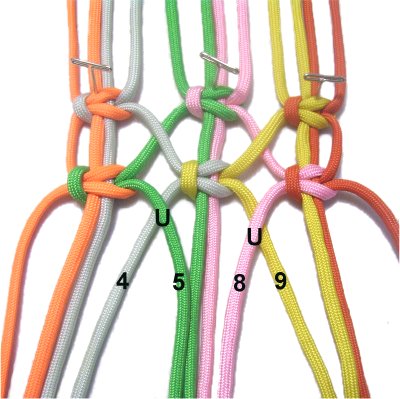
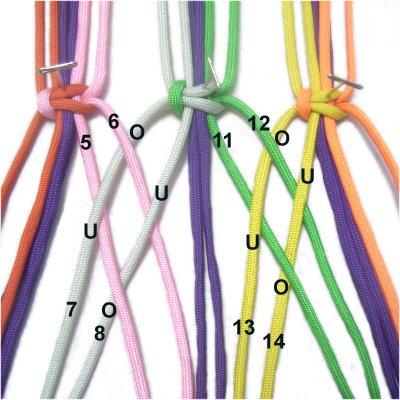
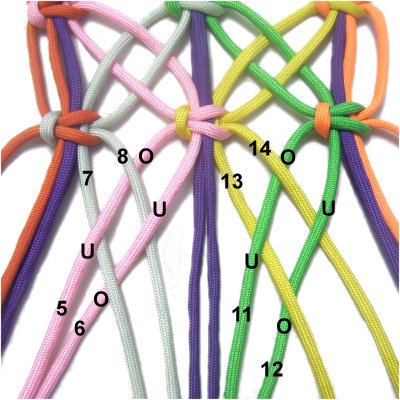
Step 3,
continued: Tie the Square Knots in
row 2 as
follows, after moving down at least 1-inch, so
there is space between the two rows:
Center SK
--Cords 4, 6, 7, 9 (fillers are 6 - 7)
Left SK
--Cords 1 - 3 + cord 5 (fillers are 2 -
3)
Right SK
--Cords 8 + 10 - 12 (fillers are
10 - 11)
After the three knots are tied, check to make
sure the right and left edges are straight
(vertically). Loosen the knots and move
them forward slightly, if that will help
straighten the edges.
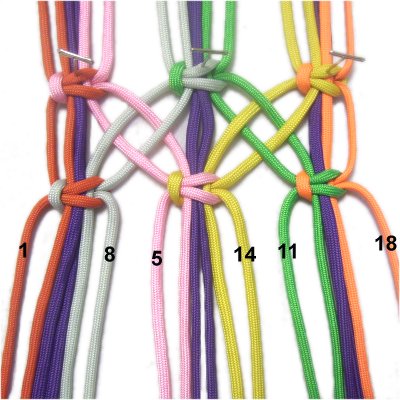
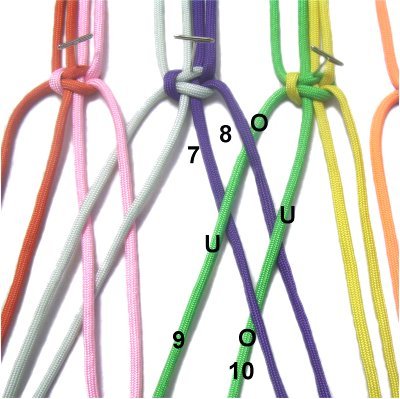
Step
4: Move the two working
cords in the center group again, passing cord
4undercord
5.
Pass cord
9 under cord
8.
Step 4,
continued: Tie the third row of SK
as follows:
Center SK
-- Cords 5 - 8
Left SK
-- Cords 1 - 4
Right SK
-- Cords 9 - 12
Check the edges to make sure they are
straight. Measure to make sure the three
rows are the same distance from each other.
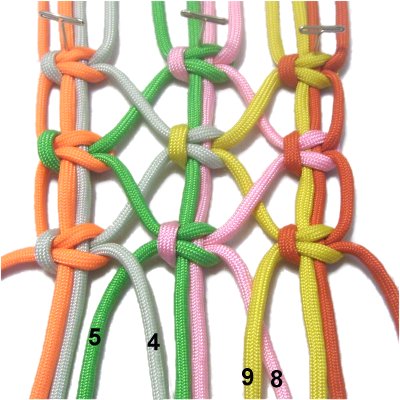
Step 5: Repeat step 3
to make the 4th row of SK.
Important:
The direction of the crossings for all
three Locking Patterns must be made as
described, or the knots won't "lock"
together.
For this design, just remember that the 2
working cords from the center
group should ALWAYS rest under
those coming from the left and
right groups.
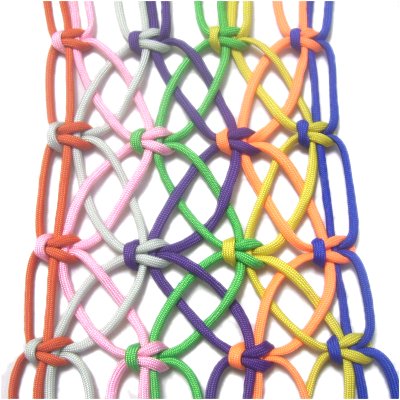
Daisy Lock
Locking Patterns can have interesting names.
This one is called the Crazy Daisy, because the
crossed elements resemble the petals of a flower
(pink and yellow design in the image above).
It takes three rows of SK and three groups of
cords to make one "daisy", which is what is
described below.
When arranging the cords in step 1, the second
cord in each group should be the same color
(purple cords in images).
What makes the Daisy Lock different from the Cross
Lock (next design) is that there are additional
filler cords. These remain vertical, which
stabilizes the panel, and doesn't allow it to
stretch as much.
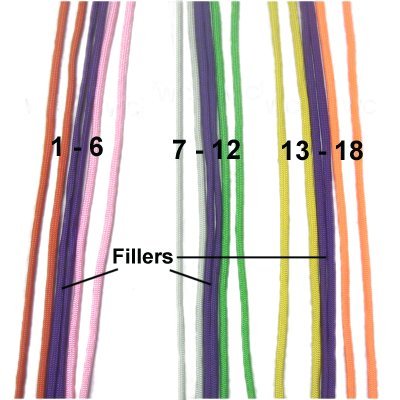
Step
1: Secure 9 cords to your board,
after folding them in half. Arrange
them into three groups that rest at least
1.5 inches apart.
Mentally number the cords 1 - 18.
In the images, the dark purple cords
are the fillers in each group, and you add two
others when tying the SK, for a total of 4
fillers per knot.
Prior to tying each
row, identify the working
cords (WC), as well as the four
fillers. Make sure they rest close
together, so each group is separated.
Step
2: Tie one Square Knot in each
group, with 2 working cords and the 4
fillers resting between them:
The working cords for the first SK are 1
and 6.
For the second SK, the working cords are 7
and 12.
Use cords 13 and 18 as working cords for
the third SK.
Designer's Tip:
Keeping track of the mental numbering in Locking
Patterns can be challenging.
You can apply tape to label the cords that are
being crossed, and write their numbers on the
tape.
Step
3: Move
cords 7 - 8 and 13 - 14 slightly to
the left.
Cross cord
6over
- under cords 7 and 8.
Cord
5 should be crossed under
- over cords 7 and 8.
Cross cord
12over
- under cords 13 and 14. Cord 11
should cross under
- over cords 13 and 14.
Step
4: The SK in the center
is tied first.
The working cords are 5 and 14. The
fillers are 6, 9, 10 and 13.
There should be at least 1.5-inch
of space between this knot and the
previous one.
Step 4,
continued: Tie the SK on the left
with 1 - 4 + 7 and 8. The working cords are
1 and 8, and the rest are the fillers.
Tie the SK on the right
with 11 and 12 + 15 - 18. The working cords
are 11 and 18, and the rest are fillers.
Designer's
Tip: Locking Patterns look best if
the crossed cords are slightly taut. Secure
the knots in one row prior to tying the
next. This will help keep the edges
straight.
Step
5: Move cords 5 - 6
and 11 - 12 slightly to the left.
Cross cord
8over
- under cords 5 and 6.
Cross cord
7under
- over cords 5 and 6.
Cross cord
14over
- under cords 11 and
12. Cord
13 should cross under
- over cords 11 and 12.
Designer's
Tip: Locking Patterns always return
to the original groups every other row.
Step
6: Tie the third row of SK
(same as step 2):
Center
SK: The working cords
are 7 and 12.
SK
on left: The working
cords are 1 and 6.
SK
on right: The working
cords are 13 and 18.
Step 6,
continued: Make sure the edges are
straight, as well as the filler cords.
The distance between the rows should be the
same.
Repeat
steps 3 - 6 again, if you have enough
material.
Cross Lock
Locking Patterns can look very similar to each
other. The Cross Lock pattern looks like the
Daisy Lock, but it doesn't have the extra filler
cords. This design can be expanded side to
side, which is why it's been used to make fishing
nets and similar items.
The main challenge in this design is to keep track
of the numbering. For that reason, I suggest
you apply tape to each cord, with the numbers
written on each piece.
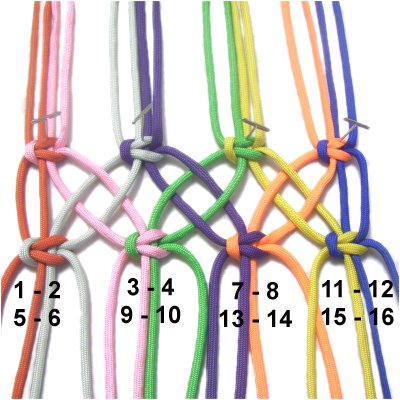
Step
1: Secure eight 2-yard
cords to the top of your board, after
folding them in half.
Arrange them into 4 groups of four cords
each, and mentally number them 1 - 16.
2017
Update:
The information for this design has been changed,
to make it easier to understand.
Step
2: Tie the first row of
Square knots with the following groups:
1
- 4 5 - 8
9 - 12
13 - 16
Secure the knots to your board.
Step
3: Move cords
5 and 6 (2nd SK) slightly to the
left as shown.
Cross cord
4over
- under cords 5 and 6, as you
move it to the right.
Cross cord
3under
- over cords 5 and 6, also
heading right.
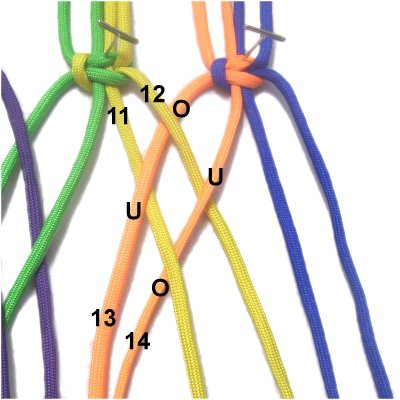
Step 4: Move cords
9 and 10 (3rd SK) to the left.
Cross cord
8over
- under cords 9 and 10, as you
move it right.
Cross cord
7under
- over cords 9 and 10.
Step
5: Move cords
13 and 14 to the left.
Cross cord
12over
- under cords 13 and 14.
Cross cord
11under-over
cords 13 and 14.
Step
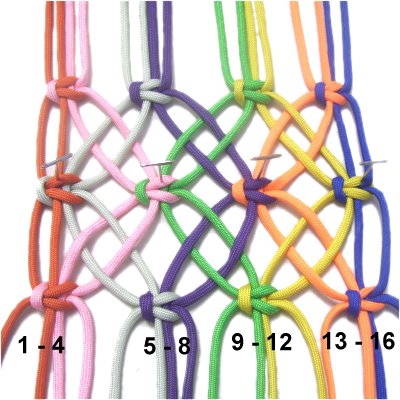
6: Tie the second row of
SK,tightening
each one at least 1.5 inches from the
first row. Make sure you keep the edges
straight, and secure the knots.
Cords 3 -
4 + 9 - 10 Cords
7 - 8 + 13 - 14
Cords 1 -
2 + 5 - 6 Cords 11
- 12 + 15 - 16
Step
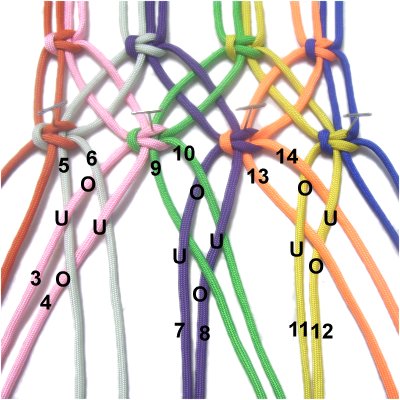
7: Cross the cords again as
follows:
Move cords
3 and 4 to the left.
Cross cord
6over
- under cords 3 and 4.
Cross cord
5under
- over cords 3 and 4.
Step 7,
continued:
Move cords
7 and 8 to the left.
Cross cord
10over
- under cords 7 and 8
Cross cord
9under
- over cords 7 and 8
Move cords
11 and 12 to the left.
Cross
cord 14over
- under cords 11 and 12.
Cross cord
13under
- over cords 11 and 12.
Step
8: Tie the 3rd row of SK as you
did in Row 1:
1
- 4 5 - 8
9 - 12
13 - 16
Secure
these knots if you plan to tie another
row.
Step
9:Repeat
steps 3 - 6 to tie row 4, if you
wish to continue.
Locking Patterns look better if they have
multiple rows.
By using any text
or images on Free Macrame Patterns, you are
agreeing to ourTerms of Use